This article presents an easy to use control for inputting or displaying notes in the form of a musical keyboard. The keyboard's colors and basic orientation are customizable. This is the first in a series of articles on my upcoming MidiUI library.
Introduction
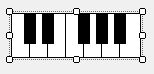
As part of my upcoming MidiUI suite of MIDI GUI widgets, I'm presenting my PianoBox control. It is a customizable musical keyboard control that allows you to enter and display notes as pressed/highlighted keys. There are other controls like this out there, but this one is the first of a suite of controls designed specifically to be used with my Midi library.
This uses my MIDI library, which it includes in binary form. The source is available at the link just provided.
Update: Added hotkey support
Update 2: Focus support is now implemented
Conceptualizing this Mess
A MIDI library isn't incredibly useful without some GUI controls to allow a user to interact with it. I'm currently building a suite of controls for use with my Midi library as I said, and a PianoBox control just happens to be the first one. It is a Windows Forms control that allows you to interact with it through the user interface or code against it to display highlighted or "pressed" piano keys. You can use it to display the current chord(s) playing in a MIDI track and/or to allow a user to use the mouse and/or computer keyboard to tap out melodies. The control itself has no knowledge of MIDI per se - only of piano notes, but it can be connected to MIDI devices by wiring up a couple of events.
Appearancewise, the control is drawn in a simple 2 dimensional rendering using 4 colors, which are settable through the control's properties. It can be rendered horizontally or vertically, also indicated through the control properties.
Behaviorwise, the control allows you to set the number of octaves to be displayed, and to set and clear individual piano keys. It allows you to assign hotkeys to the piano keys as well. Furthermore, it also reports on piano keys being pressed either by the user or through code. Interactivity with the user is on by default, but can be disabled by setting the appropriate property. This doesn't totally disable the control, nor change the appearance, but it does prevent the user from being able to strike piano keys.
Rendering this Mess
I had to write the rendering code for this twice because the first method wasn't pixel perfect at all widths and heights. My mistake was trying to render in two passes where I should have used three.
The First Pass
All we do here is erase the background and make it the same color as the "white" piano keys
The Second Pass
Here, we draw the backgrounds for all the highlighted keys (both "black" and "white" keys). Any key that's currently pressed gets its highlight color drawn for the key background. This is trickier than it sounds. The problem is we're drawing by dividing our space into 7 equal portions per octave, one portion for each white key. As we advance from left to right (vertical is even trickier), we're essentially either moving 2 or 3 keys each iteration depending on where we are on the keyboard - remember black keys have a gap. For the vertical one, since we need to lay the keys out from bottom to top, we count our keys backward as we move from top to bottom in the render.
The Third Pass
Here's where we finally draw all the border lines between the "white" keys, as well as all the "black" rectangular portions for the "black" keys. We're doing something similar to the second pass, where we divide each octave into 7 equal portions. As we advance, we draw the border between the portions, and sometimes (okay, usually) a "black" key in between as well. As we move from left to right, we advance a key count by two or three each iteration like before (and again vertically it's reversed) but this time we skip rendering the "black" portion for the "black" key if it's pressed because we already drew it in orange (or whatever the highlight color is) on the second pass.
Hit Testing this Mess
In order to translate mouse actions into key presses, we must be able to translate two dimensional X and Y coordinates to some key on the piano keyboard. This is harder than it seems because the "white" keys aren't regularly shaped across an octave. You have some that look like an "L" such the C keys, some that look like a reversed "L", like the E key, and some that look like an upside down "T" like the D key. A related issue that complicates things is that the black keys have a gap in their layout - actually two gaps, technically, if you count the edges of the octave at B and C, which we do. This means that we can't just do simple math to determine where our X and Y coordinates map to a key.
Instead, for an octave, and then for each key we have our own hit testing code which takes into account the shape and relative location of the key within the octave.
Worse, we must do this separately for vertical versus horizontal orientations.
Finally, we clamp the result to make sure it's within a valid bounds for the keys.
Connecting this Mess
To communicate the key presses to and from code, we have the PianoKeyDown and PianoKeyUp events which are raised when a piano key is struck or released, respectively. To get and set the keys through code, there are also the GetKey() and SetKey() methods and the read only Keys property. Setting a key to struck or released will raise the associated event unless otherwise specified calling SetKey(). The Keys property returns a bool[] array that allows you to examine the state of each key.
Coding this Mess
This was more frustrating at first than I'd normally care to admit but that's primarily because I did it wrong first. I wasn't using enough painting passes, and consequently I was trying to compute things that were subject to scaling errors and off-by-ones when rendering, leading to ugly results in terms of the highlighted notes when the control wasn't perfectly sized.
In the end, the code wound up more complicated than I had originally envisioned, or really would have liked, but I don't believe code should be any simpler than it can be. Sometimes, we have to deal with complicated code:
var g = args.Graphics;
var rect = new Rectangle(0, 0, Width - 1, Height - 1);
using (var brush = new SolidBrush(_whiteKeyColor))
g.FillRectangle(brush,args.ClipRectangle);
var whiteKeyCount = 7 * _octaves;
int key;
using (var selBrush = new SolidBrush(_noteHighlightColor))
{
if (Orientation.Horizontal == _orientation)
{
var wkw = Width / whiteKeyCount;
var bkw = unchecked((int)Math.Max(3, wkw * .666666));
key = 0;
var ox = 0;
for (var i = 1; i < whiteKeyCount; ++i)
{
var x = i * wkw;
var k = i % 7;
if (3 != k && 0 != k)
{
if(_keys[key])
g.FillRectangle(selBrush, ox+1, 1, wkw - 1, Height-2);
++key;
if(_keys[key])
g.FillRectangle(selBrush, x - (bkw / 2) + 1, 1,
bkw - 1, unchecked((int)(Height * .666666)));
++key;
if (_keys[key])
g.FillRectangle(selBrush, x, 1, wkw - 1, Height - 2);
}
else
{
if(_keys[key])
g.FillRectangle(selBrush, ox + 1, 1, wkw - 1, Height - 2);
++key;
if(_keys[key])
g.FillRectangle(selBrush, x, 1, wkw - 1, Height - 2);
}
ox = x;
}
if(_keys[_keys.Length-1])
{
g.FillRectangle(selBrush, ox, 1, Width-ox- 1, Height - 2);
}
} else
{
var wkh = Height / whiteKeyCount;
var bkh = unchecked((int)Math.Max(3, wkh * .666666));
key = _keys.Length-1;
var oy = 0;
for (var i = 1; i < whiteKeyCount; ++i)
{
var y = i * wkh;
var k = i % 7;
if (4 != k && 0 != k)
{
if (_keys[key])
g.FillRectangle(selBrush, 1, oy + 1, Width - 2, wkh - 1);
--key;
if(_keys[key])
g.FillRectangle(selBrush, 1, y - (bkh / 2) + 1,
unchecked((int)(Width * .666666)) - 1, bkh - 2);
--key;
if(_keys[key])
g.FillRectangle(selBrush, 1, y , Width - 2, wkh - 1);
}
else
{
if (_keys[key])
g.FillRectangle(selBrush, 1, oy + 1, Width - 2, wkh - 1);
--key;
if(_keys[key])
g.FillRectangle(selBrush, 1, y, Width - 2, wkh - 1);
}
oy = y;
}
if (_keys[0])
{
g.FillRectangle(selBrush, 1,oy, Width - 2, Height - oy-1);
}
}
using (var brush = new SolidBrush(_blackKeyColor))
{
using (var pen = new Pen(_borderColor))
{
g.DrawRectangle(pen, rect);
if (Orientation.Horizontal == _orientation)
{
var wkw = Width / whiteKeyCount;
var bkw = unchecked((int)Math.Max(3, wkw * .666666));
key = 0;
for (var i = 1; i < whiteKeyCount; ++i)
{
var x = i * wkw;
var k = i % 7;
if (3 != k && 0 != k)
{
g.DrawRectangle(pen, x - (bkw / 2), 0, bkw,
unchecked((int)(Height * .666666)) + 1);
++key;
if (!_keys[key])
g.FillRectangle(brush, x - (bkw / 2) + 1, 1, bkw - 1,
unchecked((int)(Height * .666666)));
g.DrawLine(pen, x, 1 +
unchecked((int)(Height * .666666)), x, Height - 2);
++key;
}
else
{
g.DrawLine(pen, x, 1, x, Height - 2);
++key;
}
}
}
else
{
var wkh = Height / whiteKeyCount;
var bkh = unchecked((int)Math.Max(3, wkh * .666666));
key = _keys.Length - 1;
for (var i = 1; i < whiteKeyCount; ++i)
{
var y = i * wkh;
var k = i % 7;
if (4 != k && 0 != k)
{
g.DrawRectangle(pen, 0, y - (bkh / 2),
unchecked((int)(Width * .666666)), bkh - 1);
--key;
if(!_keys[key])
g.FillRectangle(brush, 1, y - (bkh / 2) + 1,
unchecked((int)(Width * .666666)) - 1, bkh - 2);
g.DrawLine(pen, 1 +
unchecked((int)(Width * .666666)), y, Width - 2, y);
--key;
}
else
{
g.DrawLine(pen, 1, y, Width - 2, y);
--key;
}
}
}
}
}
}
What a longwinded render! We have to do 3 passes, rendering background, selection, and then finally "black" keys + borders, and we have to count keys as we go, plus be careful to skip the missing "black" keys we shouldn't render, and we have to do it all twice, one for each orientation.
Note again, how we move - we're moving along an octave in seven equal portions - one portion for each "white" key, and then rendering the "black" keys and borders between them on each iteration as needed. That's why the advance is strange, but we have to do it this way in order to get our measurements right. Or rather, while we could have done it another way, this way for all its complexity is actually the easiest of the available options.
The hit testing is even worse, but the code is at least relatively obvious once you understand conceptually what it's doing, as I explained it before.
What I actually like the least about developing controls is doing control properties. It's standard form for each public property on a control to have a "property changed" event that corresponds to it, as well as a corresponding protected virtual method that invokes the event. Worse, because controls with this pattern end up with a lot of events, there's extra code needed in dealing with the events to make it all efficient. Then you have to hint at the property window on how to present your property to the designer. All of this leads to several different, often heavily attributed members even for the simplest properties. Here's the Octaves property:
static readonly object _OctavesChangedKey = new object();
...
int _octaves = 1;
...
[Description("Indicates the number of octaves to be represented")]
[Category("Behavior")]
[DefaultValue(1)]
public int Octaves {
get { return _octaves; }
set {
if (1 > value || 12 < value)
throw new ArgumentOutOfRangeException();
if (value != _octaves)
{
_octaves = value;
var keys = new bool[_octaves * 12];
Array.Copy(_keys, 0, keys, 0, Math.Min(keys.Length, _keys.Length));
_keys = keys;
Refresh();
OnOctavesChanged(EventArgs.Empty);
}
}
}
[Description("Raised when the value of Octaves changes")]
[Category("Behavior")]
public event EventHandler OctavesChanged {
add { Events.AddHandler(_OctavesChangedKey, value); }
remove { Events.RemoveHandler(_OctavesChangedKey, value); }
}
protected virtual void OnOctavesChanged(EventArgs args)
{
(Events[_OctavesChangedKey] as EventHandler)?.Invoke(this, args);
}
Almost all of this extra code is to support the property changed event using the standard/recommended pattern for doing so that Microsoft foisted upon us all.
The rest of the "fluff" is doc comments and various attributes that tell the property window in the designer how to best present our property, like under which category, and with what description since it won't use the doc comment.
The weirdness with the event.add/event.remove/Events[...] stuff is because there are limitations in terms of efficiency when using the simpler, "automatic" method of exposing and raising events, at least when I learned control development in the .NET 1.x days. Someone correct me if this has changed, but if you had a control that sourced a lot of events without doing this it would bog everything down, so you use this mechanism. Consequently, all of Microsoft's controls have a protected Events member to facilitate using this pattern, but it's murder on the fingers.
Using this Mess
Despite all of the above, or more to the point, because of it, using the control is very simple.
Just add a reference to this library to your winforms project, drag it onto a form, set some properties, and wire up your piano key events and you're golden. I've included a sample app I whipped up really quick that demonstrates it. It will take your selected MIDI input device's input and display it on the piano keyboard. At the same time, it takes anything you tap out on the piano keyboard and send it to the selected MIDI output device.
private void Piano_PianoKeyDown(object sender, PianoKeyEventArgs args)
{
if(null!=_outputDevice && _outputDevice.IsOpen && args.Key < 128)
{
_outputDevice.Send(new MidiMessageNoteOn((byte)args.Key, 127,
(byte)ChannelUpDown.Value));
}
}
private void Piano_PianoKeyUp(object sender, PianoKeyEventArgs args)
{
if (null != _outputDevice && _outputDevice.IsOpen && args.Key < 128)
{
_outputDevice.Send(new MidiMessageNoteOff((byte)args.Key, 127,
(byte)ChannelUpDown.Value));
}
}
private void _inputDevice_Input(object sender, MidiInputEventArgs args)
{
if (IsHandleCreated)
{
BeginInvoke(new Action(() =>
{
if (null != _outputDevice && _outputDevice.IsOpen)
{
_outputDevice.Send(args.Message);
}
switch (args.Message.Status & 0xF0)
{
case 0x80:
var msw = args.Message as MidiMessageWord;
Piano.SetKey(msw.Data1, false, true);
break;
case 0x90:
msw = args.Message as MidiMessageWord;
Piano.SetKey(msw.Data1, true, true);
break;
}
}));
}
}
That's most of using it. In fact, the only bits that deal with using it directly above I've bolded. The latter routine may seem just a little scary with the weird BeginInvoke() call and then the hex mess inside of it. It's not a big deal though. Basically, this gets called when the MIDI input device gets some input, but it's called from a potentially different thread, and in some cases, might be called before the form is entirely loaded. So we check to make sure the form's handle is created, and then we use BeginInvoke() to essentially run the code that follows on the main UI thread of the application instead. The hex mess is just MIDI protocol-speak for NOTE UP or NOTE DOWN. We could have actually used higher level code for this and avoided all the hex, but it's slightly less efficient and there's a relatively uncommon scenario where when you go that route it might not work right even if you do have to go out of your way to break it. Using this lower lever way instead is absolutely bulletproof, just a bit uglier to read.
You can reassign hotkeys to defaults with MapHotKeyDefaultsToOctave(). This will set up the top two rows starting at Q, or the bottom two rows, starting at Z to a single octave. The keyboard is laid out roughly like a piano keyboard, with Q representing C and 2 representing C#.
Limitations
It needs more testing. As I release iterations of this library it will be more robust, although the control itself is simple enough that it should be fine as is.
Key handling is not quite complete. It does accept hotkeys, but otherwise there's no way to navigate with the keyboard.
History
- 12th July, 2020 - Initial submission
- 12th July, 2020 - Update, added hotkey support
- 12th July, 2020 - Finished focus support
Just a shiny lil monster. Casts spells in C++. Mostly harmless.


 General
  News
News  Suggestion
  Question
  Bug
Bug  Answer
  Joke
Joke  Praise
  Rant
Rant  Admin
Admin 


