Introduction
Let’s have a brief recap before proceeding. Suppose, we as developers have created an application. When we create a container image for our application, we pack up our code, as well as all its dependencies and tools needed to run it as a container. The advantage is that when we run this image as a container on production, it will run the same way as it did on our development machine. This is because the application will use the same set of resources irrespective of which machine we run it as a container on. When we run an application as a container, it will run the same way everywhere. Docker is a tool that helps us deal with creating and running containers. Again, if you still have any doubts regarding containers, touch base with my article here. Also in my earlier article, we created a virtual machine on Azure and deployed our container there. You can also run containers on Azure as ACI’s (Azure Container Instances). Let’s learn how.
What are Azure Container Instances?
Using ACIs, you can simply run your containers on Azure. The advantage is you can run it for a particular amount of time and then stop the container. You will just be billed for the time your container runs. It’s really easy to use.
Creating a Virtual Machine
ACI works better with images created with Windows 2016 systems rather than with Windows 10 systems. So, I created a Windows 2016 virtual machine on Azure.
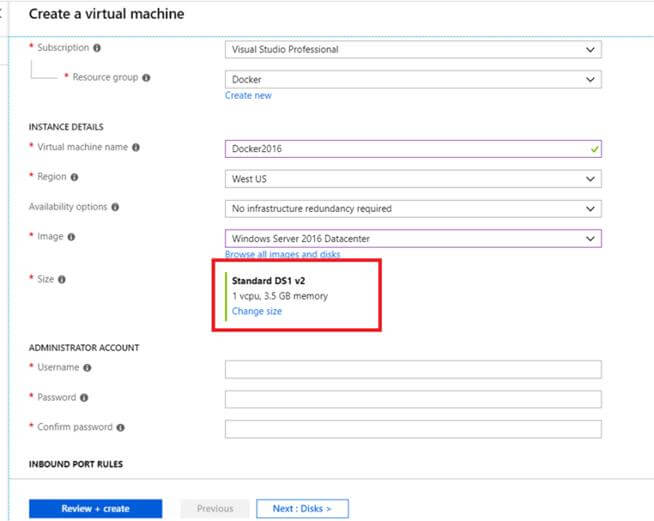
When you create a virtual machine, be careful of the disk size that you choose. Not all disk sizes support double virtualization. Also, you need to allow all RDP connections to be able to connect to Azure.

Once the virtual machine is created, we would want to install Visual Studio 2017 and Docker for Windows Community Edition next. But the thing is that servers have very strict security policies, especially when you try to browse through Internet Explorer. So, I downloaded Chrome.exe on to my actual system and then copied it to my virtual machine. I then installed Chrome on my virtual machine and later, using Chrome, installed Visual Studio 2017 & Docker for Windows Community Edition.
Once all the installations are done, let’s create an application as below.
Creating an Application
Create a new ASP.NET MVC Core project in Visual Studio 2017. While creating, make sure you have the ‘Enable Docker Support’ option checked.
I call my app ‘aspnetapp’. Once you enable docker support, a file called dockerfile is created in the solution explorer.
Replace the existing code in this file with the following piece of code:
  1  FROM microsoft/dotnet:sdk AS build-env
  2  	WORKDIR /app
  3
  4  	# Copy csproj and restore as distinct layers
  5  	COPY *.csproj ./
  6  	RUN dotnet restore
  7
  8  	# Copy everything else and build
  9  	COPY . ./
 10  	RUN dotnet publish -c Release -o out
 11
 12  	# Build runtime image
 13  	FROM microsoft/dotnet:aspnetcore-runtime
 14  	WORKDIR /app
 15  	COPY --from=build-env /app/out .
 16  	ENTRYPOINT ["dotnet", "aspnetapp.dll"]
Go to PowerShell and navigate to the project directory. Once there, run the command.
docker build -t aspnetapp .
Once the project is built, run the following command.
docker run -d -p 8080:80 --name myaspnetapp aspnetapp
Once this is successful, go to localhost:8080 to navigate the app.
So, this is how we run the app in a container. Now, let’s check out how we can run this container as an ACI.
Creating an ACI
Let’s create a container registry in Azure as follows:
You can find your username and password in the Access Keys section as shown below. We will need these when we push our app to the container registry.
We will also create a repository called ‘demo’.
Open PowerShell and type in the following code to log in to your container registry with the access keys, as discussed above.
docker login yourContainerRegistryLoginServer
docker tag yourImageName yourLoginServer/yourRegistryName:yourTag

docker push yourLoginServer/yourRegistryName:yourTag
This pushes your application to Azure.
Running Your Application as an ACI
Open your container registry in Azure portal, go to the Repository tab, and click on ‘Run instance’.
Create a container instance as below:
Once the deployment is successful, you will be notified as below:
Now, go to your container instance as below:
You will find the IP address as below:
Navigate to the IP address to run your container.
Your app will now run as a container instance. You can stop and run your container any time you want.
This concludes the Azure Container Instance tutorial. You can find further information here on ACIs.
This article was originally published on my website.
I have been working in .NET for 8 years now. I like to keep myself updated with new technologies. When I am not coding I like to share my experiences at - https://taagung.com


 General
  News
News  Suggestion
  Question
  Bug
Bug  Answer
  Joke
Joke  Praise
  Rant
Rant  Admin
Admin 


