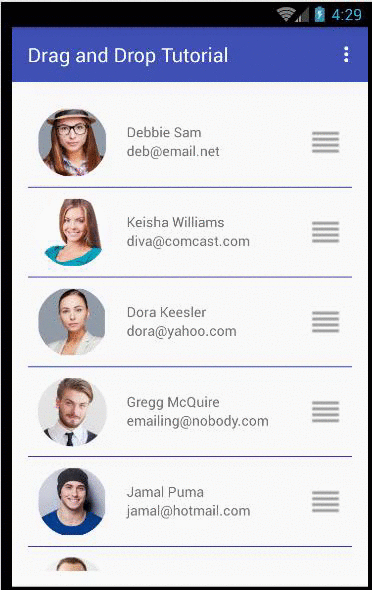
In this post, I will provide a tutorial on how to remember the drag and drop position of your RecyclerView list items in Android. There are few third party libraries that exist to help implement drag and drop in RecyclerView and Paul Burke provided an excellent three part tutorial on how to use native components to implement drag and drop. I will build upon this tutorial to show how your app can remember the new re-ordered position after the list has been re-ordered by drag and dropping. See this in action below.
Whichever way you implement RecyclerView drag and drop, the challenge is when you exit the app and come back, how does your app remember the last positions of the list items after they were re-organized. You may think that there is a new Intent (REMEMBER_LIST_POSITION) you can call but there is none, at-least I have not seen any so you will have to implement this manually if you desire such functionality. Here is how I have chosen to implement this functionality.
- Create a standard RecyclerView
- Implement drag and drop on the RecyclerView
- Attach a listener to the RecyclerView Adapter to listen for when the list item changes
- When the list item changes, grab all the Ids on the items in the collections
- Collapse this list into a JSON string and save to the
SharedPreference - When the RecyclerView is shown again, fetch the JSON string from
SharedPreference and inflate back into a List<Long> - Use this list to sort the items and display, reflecting their last positions the last time they were changed.
If you find the tutorial helpful at anytime, please pause and use the social media buttons to share it in case someone else will benefit from it. Let us go ahead and see this in action. As with most things in programming, your approach may be different from mine and I will be glad to hear how you solved this problem if it is something that you have had to deal with. The source code for this tutorial can be found here.
Create New Android Studio Project
In this section of the post, we want to create a new Android Studio project for our drag and drop demo app. I am using Android Studio 1.4 and if you have created a new Android project lately you will realize that a few things have changed especially with the new project template. Follow the steps below to create new project for this demo app.
Step 1: Create New Project
Follow the standard new project wizard to create a new Android Studio project. Give the project any name, select Phone and Tablet form factor. Select the default API level 16 and Blank Activity template.
Step 2: Cleanup
The new template comes with some boiler plate code that we do not need for this demo app. In the activity_main.xml, remove the Floating Action Button component. In MainActivity.java file, also remove the Floating Action Button code block. In content_main.xml, remove the Hello World TextView.
Step 3: Add RecyclerView
In the place where you remove the Hello World TextView in content_main.xml, add RecyclerView like this:
<android.support.v7.widget.RecyclerView
        android:id="@+id/note_recycler_view"
        android:scrollbars="vertical"
        android:layout_width="match_parent"
        android:layout_height="match_parent"/>
Step 4: Add Model Class
At the root of your project, add a model class Customer.java. This demo app is showing a list of fictitious customers. The names and images of the people used in this demo app are not real. The images are purchased from Dollar Photo Club. Here is the content of the Customer.java, use the generate functional to add the boiler plate getter and setter code.
public class Customer {
    private Long id;
    private String name;
    private String emailAddress;
    private int imageId;
    private String imagePath;
}
Step 5: Add Drag Image
Add this image to your res/drawable folder, we will use this as the handle for our drag and drop.
Step 6: Add Dependencies
Add the following dependencies for the external libraries we will use for this app; many thanks to the authors of those libraries.
compile 'de.hdodenhof:circleimageview:2.0.0'
    compile 'com.squareup.picasso:picasso:2.5.2'
    compile 'com.yqritc:recyclerview-flexibledivider:1.2.6'
    compile 'com.google.code.gson:gson:2.3.1'
Also add this line to your Manifest:
<uses-permission android:name="android.permission.INTERNET" />
Step 7: Add Sample Data
We are using sample in memory data to generate the demo data displayed in this app. Optionally, create a package called utilities and in this package, add a class called SampleData.java. In this class, add a method called:
public static List<Customer> addSampleCustomers()
and here is the content of that method.
Implement RecyclerView with Drag and Drop
In this section, we will go ahead and implement the RecyclerView with drag and drop functionality. Follow the steps below to implement RecyclerView.
Step 1: Add Adapter
At the root of the project, add a class file named CustomerListAdapter.java, leave the file alone and letès come back to it in a minute.
Step 2: Implement ItemTouchHelper
To implement ItemTouchHelper, we actually need to add four files. To understand the purpose of each of these files, read these post series. Add the following files to your project.
- In your
utilities package, add ItemTouchHelperAdapter.java and below is the content:
public interface ItemTouchHelperAdapter {
void onItemMove(int fromPosition, int toPosition);
void onItemDismiss(int position);
}
- In your
utilities package, add ItemTouchHelperViewHolder.java and below is the content:
public interface ItemTouchHelperViewHolder {
void onItemSelected();
void onItemClear();
}
- In your
utilities package, add SimpleItemTouchHelperCallback.java and here is the content:
public class SimpleItemTouchHelperCallback extends ItemTouchHelper.Callback {

    private final ItemTouchHelperAdapter mAdapter;

    public SimpleItemTouchHelperCallback(ItemTouchHelperAdapter adapter) {
        mAdapter = adapter;
    }

    @Override
    public boolean isLongPressDragEnabled() {
        return true;
    }

    @Override
    public boolean isItemViewSwipeEnabled() {
        return false;
    }

    @Override
    public int getMovementFlags(RecyclerView recyclerView, RecyclerView.ViewHolder viewHolder) {
        final int dragFlags = ItemTouchHelper.UP | ItemTouchHelper.DOWN;
        final int swipeFlags = ItemTouchHelper.START | ItemTouchHelper.END;
        return makeMovementFlags(dragFlags, swipeFlags);
    }

    @Override
    public boolean onMove(RecyclerView recyclerView,
    RecyclerView.ViewHolder source, RecyclerView.ViewHolder target) {
        mAdapter.onItemMove(source.getAdapterPosition(), target.getAdapterPosition());
        return true;
    }

    @Override
    public void onSwiped(RecyclerView.ViewHolder viewHolder, int i) {
        mAdapter.onItemDismiss(viewHolder.getAdapterPosition());
    }

    @Override
    public void onSelectedChanged(RecyclerView.ViewHolder viewHolder, int actionState) {
        if (actionState != ItemTouchHelper.ACTION_STATE_IDLE) {
            ItemTouchHelperViewHolder itemViewHolder = (ItemTouchHelperViewHolder) viewHolder;
            itemViewHolder.onItemSelected();
        }

        super.onSelectedChanged(viewHolder, actionState);
    }

    @Override
    public void clearView(RecyclerView recyclerView, RecyclerView.ViewHolder viewHolder) {
        super.clearView(recyclerView, viewHolder);

        ItemTouchHelperViewHolder itemViewHolder = (ItemTouchHelperViewHolder) viewHolder;
        itemViewHolder.onItemClear();
    }
}
- Add a package called
listener and add an interface called OnStartDragListener.java and here is the content:
public interface OnStartDragListener {
void onStartDrag(RecyclerView.ViewHolder viewHolder);
}
- While you are at the
listener package, add another interface called OnCustomerListChangedListener.java and here is the content:
public interface OnCustomerListChangedListener {
    void onNoteListChanged(List<Customer> customers);
}
Step 3: Implement Custom Row
Now, we need to add the custom row that lays out the views item in each row of our list. In your res/layout folder, add the layout file row_customer_list.xml and here is the content of that file.
="1.0"="utf-8"
<LinearLayout xmlns:android="http://schemas.android.com/apk/res/android"
android:layout_width="match_parent" android:layout_height="wrap_content">
<de.hdodenhof.circleimageview.CircleImageView
android:layout_width="70dp"
android:layout_height="70dp"
android:layout_margin="10dp"
android:layout_centerVertical="true"
android:id="@+id/image_view_customer_head_shot" />
<LinearLayout
android:id="@+id/linear_layout_customer_name"
android:layout_width="0dp"
android:layout_weight="3"
android:layout_margin="10dp"
android:paddingTop="@dimen/margin_padding_normal"
android:layout_height="wrap_content"
android:layout_centerVertical="true"
android:orientation="vertical">
<TextView
android:id="@+id/text_view_customer_name"
android:layout_width="match_parent"
android:layout_height="wrap_content"
/>
<TextView
android:id="@+id/text_view_customer_email"
android:layout_width="match_parent"
android:layout_height="wrap_content" />
</LinearLayout>
<ImageView
android:id="@+id/handle"
android:layout_width="0dp"
android:layout_weight="1"
android:layout_height="wrap_content"
android:layout_gravity="center_vertical|right"
android:scaleType="center"
android:src="@drawable/ic_reorder_grey" />
</LinearLayout>
Step 4: Implement the Adapter
We now have all the components needed to implement the adapter. Now update the adapter with the following code. I am including the import statements so you can see which library is being referenced from this file. A few things are happening in the code below, for the most part it is a standard implementation of RecyclerView Adapter.
The drag and drop is simply implemented with the Java Collections framework. And after the swap, we are attaching our own home made listener which lets us know that a swap has been made and returns the new collections of items back to us. This is the list we will now work on.
package com.okason.draganddrop;
import android.content.Context;
import android.graphics.Color;
import android.support.v4.view.MotionEventCompat;
import android.support.v7.widget.RecyclerView;
import android.view.LayoutInflater;
import android.view.MotionEvent;
import android.view.View;
import android.view.ViewGroup;
import android.widget.ImageView;
import android.widget.TextView;
import com.okason.draganddrop.listeners.OnCustomerListChangedListener;
import com.okason.draganddrop.listeners.OnStartDragListener;
import com.okason.draganddrop.utilities.ItemTouchHelperAdapter;
import com.okason.draganddrop.utilities.ItemTouchHelperViewHolder;
import com.squareup.picasso.Picasso;
import java.util.Collections;
import java.util.List;
public class CustomerListAdapter extends
RecyclerView.Adapter<CustomerListAdapter.ItemViewHolder>
implements ItemTouchHelperAdapter {
private List<Customer> mCustomers;
private Context mContext;
private OnStartDragListener mDragStartListener;
private OnCustomerListChangedListener mListChangedListener;
public CustomerListAdapter(List<Customer> customers, Context context,
OnStartDragListener dragLlistener,
OnCustomerListChangedListener listChangedListener){
mCustomers = customers;
mContext = context;
mDragStartListener = dragLlistener;
mListChangedListener = listChangedListener;
}
@Override
public ItemViewHolder onCreateViewHolder(ViewGroup parent, int viewType) {
View rowView = LayoutInflater.from
(parent.getContext()).inflate(R.layout.row_customer_list, parent, false);
ItemViewHolder viewHolder = new ItemViewHolder(rowView);
return viewHolder;
}
@Override
public void onBindViewHolder(final ItemViewHolder holder, int position) {
final Customer selectedCustomer = mCustomers.get(position);
holder.customerName.setText(selectedCustomer.getName());
holder.customerEmail.setText(selectedCustomer.getEmailAddress());
Picasso.with(mContext)
.load(selectedCustomer.getImagePath())
.placeholder(R.drawable.profile_icon)
.into(holder.profileImage);
holder.handleView.setOnTouchListener(new View.OnTouchListener() {
@Override
public boolean onTouch(View v, MotionEvent event) {
if (MotionEventCompat.getActionMasked(event) == MotionEvent.ACTION_DOWN) {
mDragStartListener.onStartDrag(holder);
}
return false;
}
});
}
@Override
public int getItemCount() {
return mCustomers.size();
}
@Override
public void onItemMove(int fromPosition, int toPosition) {
Collections.swap(mCustomers, fromPosition, toPosition);
mListChangedListener.onNoteListChanged(mCustomers);
notifyItemMoved(fromPosition, toPosition);
}
@Override
public void onItemDismiss(int position) {
}
public static class ItemViewHolder extends RecyclerView.ViewHolder implements
ItemTouchHelperViewHolder {
public final TextView customerName, customerEmail;
public final ImageView handleView, profileImage;
public ItemViewHolder(View itemView) {
super(itemView);
customerName = (TextView)itemView.findViewById(R.id.text_view_customer_name);
customerEmail = (TextView)itemView.findViewById(R.id.text_view_customer_email);
handleView = (ImageView)itemView.findViewById(R.id.handle);
profileImage = (ImageView)itemView.findViewById(R.id.image_view_customer_head_shot);
}
@Override
public void onItemSelected() {
itemView.setBahttp:
}
@Override
public void onItemClear() {
itemView.setBackgroundColor(0);
}
}
}
Step 5: Implement RecyclerView Java Code
Open your MainActivity.java and add the following instance variables near the top of the file.
private RecyclerView mRecyclerView;
    private CustomerListAdapter mAdapter;
    private RecyclerView.LayoutManager mLayoutManager;
    private ItemTouchHelper mItemTouchHelper;
    private List<Customer> mCustomers;
After the onCreate method, add this method. And then call this method from the onCreate() method probably after the call to set Toolbar. Ignore the error warning for a minute.
private void setupRecyclerView(){
mRecyclerView = (RecyclerView) findViewById(R.id.note_recycler_view);
mRecyclerView.setHasFixedSize(true);
mLayoutManager = new LinearLayoutManager(this);
mRecyclerView.setLayoutManager(mLayoutManager);
mCustomers = SampleData.addSampleCustomers();
mAdapter = new CustomerListAdapter(mCustomers, this, this, this);
ItemTouchHelper.Callback callback = new SimpleItemTouchHelperCallback(mAdapter);
mItemTouchHelper = new ItemTouchHelper(callback);
mItemTouchHelper.attachToRecyclerView(mRecyclerView);
mRecyclerView.addItemDecoration(new HorizontalDividerItemDecoration.Builder(this)
.colorResId(R.color.colorPrimaryDark)
.size(2)
.build());
mRecyclerView.setAdapter(mAdapter);
}
Update the signature of your MainActivity to implement the two listeners that we added like below and use Android Studio quick fix to implement the methods.
public class MainActivity extends AppCompatActivity
    implements OnCustomerListChangedListener,
        OnStartDragListener{
Here is the implementation of one of the methods, and we will implement the other one in the next section.
@Override
    public void onStartDrag(RecyclerView.ViewHolder viewHolder) {
        mItemTouchHelper.startDrag(viewHolder);

    }
At this point, you should be able to run your app. Everything should be working except that when you close the app and open, the position of the drag and drop will not be saved. We will implement that next. But make sure that you get the app working before you proceed.
Implement Save Drag and Drop Position
At this point, your drag and drop list should be working and we now want to remember the position of the list items after they have been re-organized. Like I mentioned at the beginning of the post, this is accomplished by saving the ids of the list items to SharedPreference so go ahead and add the following class members to the top of the file.
private SharedPreferences mSharedPreferences;
    private SharedPreferences.Editor mEditor;
    public static final String LIST_OF_SORTED_DATA_ID = "json_list_sorted_data_id";
    public final static String PREFERENCE_FILE = "preference_file";
And in the onCreate() instantiate the SharedPreference like so:
mSharedPreferences = this.getApplicationContext()
                .getSharedPreferences(PREFERENCE_FILE, Context.MODE_PRIVATE);
        mEditor = mSharedPreferences.edit();
Then go ahead and implement the other method that listens for when the list changes and here is the implementation of that method:
@Override
public void onNoteListChanged(List<Customer> customers) {
List<Long> listOfSortedCustomerId = new ArrayList<Long>();
for (Customer customer: customers){
listOfSortedCustomerId.add(customer.getId());
}
Gson gson = new Gson();
String jsonListOfSortedCustomerIds = gson.toJson(listOfSortedCustomerId);
mEditor.putString(LIST_OF_SORTED_DATA_ID, jsonListOfSortedCustomerIds).commit();
mEditor.commit();
}
Then, add this method to your MainActivity.java:
private List<Customer> getSampleData(){
List<Customer> customerList = SampleData.addSampleCustomers();
List<Customer> sortedCustomers = new ArrayList<Customer>();
String jsonListOfSortedCustomerId = mSharedPreferences.getString(LIST_OF_SORTED_DATA_ID, "");
if (!jsonListOfSortedCustomerId.isEmpty()){
Gson gson = new Gson();
List<Long> listOfSortedCustomersId = gson.fromJson
(jsonListOfSortedCustomerId, new TypeToken<List<Long>>(){}.getType());
if (listOfSortedCustomersId != null && listOfSortedCustomersId.size() > 0){
for (Long id: listOfSortedCustomersId){
for (Customer customer: customerList){
if (customer.getId().equals(id)){
sortedCustomers.add(customer);
customerList.remove(customer);
break;
}
}
}
}
if (customerList.size() > 0){
sortedCustomers.addAll(customerList);
}
return sortedCustomers;
}else {
return customerList;
}
}
Now update the line in setupRecyclerView() that you get the data from:
mCustomers = SampleData.addSampleCustomers();
to:
mCustomers = getSampleData();
This is the method that does the little magic of re-displaying items using their last sorted position. All on the fly without re-saving the items back to the database. Obviously, if the data is coming from a database, the above method must run in a background thread to avoid blocking the main thread. I have used variations of this approach for a few recent projects. I would like to know if you have had to solve a similar problem and what approach you ended up using.
If you think anyone in your social media list can benefit from the list, please feel free to share the post.
Keep coding!
The post Remember Drag and Drop Position with RecyclerView appeared first on Val Okafor.
My name is Val Okafor, I am a Senior Software Engineer with specialization in Android Development. Learning and problem solving is my passion and I share my Android development knowledge through my blog ValOkafor.com.
My Android courses are the courses I wish I had when I started. I teach Android development in the context of a fully developed Android app. I believe that new Android concepts are better understood if they are presented in the context of creating an app from scratch to finish.
I focus on creating Productivity Android apps and besides Android development I have 7 years’ experience as System Administrator supporting Enterprise applications and 2 years’ experience as a Web Developer building websites using PHP and ASP.Net.
I have worked for corporations such as The Home Depot, American Council on Exercise, Legend3D and HD Supply, Inc. I have a bachelor's degree in Information Technology from National University San Diego, California and a master's degree in Software Engineering from Regis University Denver, Colorado.
I enjoy sharing my extensive work experience through my blog, social media.


 General
  News
News  Suggestion
  Question
  Bug
Bug  Answer
  Joke
Joke  Praise
  Rant
Rant  Admin
Admin 


