Introduction
This article shows in a step by step manner how to create a Durandal CRUD web application with Visual Studio MVC template and Nuger Durandal Starter Kit.
Creating The Project
Open a new project and choose ASP.NET Web Application under Visual C# and Web, then give an appropriate name to project as shown in Figure 1 and Figure 2.
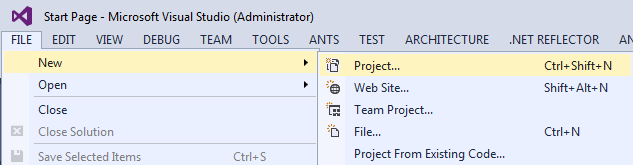
Figure 1 – Open a new project

Figure 2 – Choose ASP.NET Web Application
Choose MVC template as Figure 3 shows.
Figure 3 – Choose MVC Template
To add durandal starterkit nuget package, right click to your own project from project solution explorer, then click Manage Nuget Packages. Figure 4 illustrates the point.
Figure 4 – Manage Nuget Packages
Search for durandal starterkit (created by Rob Eisenberg) and install it to your project as shown in Figure 5.
Figure 5 – Durandal Starterkit
Coding
Open routeConfig.cs under App_Start folder, then change default controller as Durandal. Figure 6 shows the code line.
Figure 6 – Change default controller to durandal
İf everything goes fine, you should see the durandal starter kit welcome web page when you click run. Figure 7 shows the welcome web page.
Figure 7 – Durandal Starterkit Welcome Web Page
Add knockout definitions nuget package for Typescript with nuget package manager search knockout.TypeScript.DefinitelyTyped, then install it to your project. Check the definition file knocout.d.ts is added to your project under scripts/Typings/knockout.
Open your project settings Type Script build Tab, check the module system is AMD. Figure 8 shows the configuration.
Figure 8 – AMD is checked for Typescript Build Module System
Create userdata as type script file under App/modules folder. First, you should create modules folder under App folder. The userdata file will be our user model. Add Name, Surname, Phone and address as KnockoutObservable in userdata class as shown below code. Define the constructor of the class as shown below. When you save the file, the js file should be created, check the solution explorer showing all files, then find the created userdata.js file.
module UserModule {
    export class userdata {
        public Name: KnockoutObservable<string> = ko.observable<string>();
        public Surname: KnockoutObservable<string> = ko.observable<string>();
        public Phone: KnockoutObservable<string> = ko.observable<string>();
        public Address: KnockoutObservable<string> = ko.observable<string>();
        public constructor(name: string , surname: string , phone: string , address: string ) {
            this.Name(name);
            this.Surname(surname);
            this.Phone(phone);
            this.Address(address);
        }
    }
}
export = UserModule
Create users.ts typescript file as viewmodel under viewmodels and create users.html as view unders views. Import models/userdata to use the userdata mode to users.ts file. Add four public items, Name, Surname, Phone and Address as knockoutObservable.
Users.ts
import user = require("models/userdata")
class users {
    public Name: KnockoutObservable<string> = ko.observable<string>();
    public Surname: KnockoutObservable<string> = ko.observable<string>();
    public Phone: KnockoutObservable<string> = ko.observable<string>();
    public Address: KnockoutObservable<string> = ko.observable<string>();
    public userArray: KnockoutObservableArray<user.userdata> = ko.observableArray<user.userdata>([
        new user.userdata("Yildirim", "Kocdag", "5555", "AABBCC"),
        new user.userdata("Yildirim1", "Kocdag1", "55551", "AABBCC1")
        ]);

    public AddNew = () =>
    {
        this.userArray.push(new user.userdata
                (this.Name(), this.Surname(), this.Phone(), this.Address()));
        this.Name("");
        this.Surname("");
        this.Phone("");
        this.Address("");
    }

    public Remove = (user : user.userdata) =>
    {
        this.userArray.remove(user);
    }
}
export = users;
Create a div for foreach loop to show array items in users view. In addition to this, add a form for inserting new item to array.
User.html

<div data-bind="foreach : userArray">
    <b>Name:</b> <span data-bind="text : Name"></span>
    <br />
    <b>Surname:</b><span data-bind="text: Surname"></span>
    <br />
    <b>Phone:</b><span data-bind=" text: Phone"></span>
    <br />
    <b>Address:</b><span data-bind="text: Address"></span>
    <br />
    <input type="button" value="Delete" data-bind="click: $parent.Remove" />
    <hr>
</div>

<b>New Record</b>
<br />
Name: <input type="text"  data-bind="value: Name"/>
Surname: <input type="text" data-bind="value: Surname" />
Phone: <input type="text" data-bind="value: Phone" />
Address: <input type="text" data-bind="value: Address" />
<input type="button" value="Save" data-bind="click: AddNew" />
data-bind="text : Name" expression shows that Name property is one-way binding to the view with text attribute.data-bind="value: Name" expression shows that Name property is two-way binding to the view with value attribute.
When we click save button, system should save the item to the array with AddNew function that defined in viewmodel.
The Delete button will be removing the item from array with $parent.Remove function which is bind to the click function of button. The remove function is written in viewmodel.
To add the new view to menu, the navigation to this view should be defined in router in shell.js file.
Shell.js

define(['plugins/router', 'durandal/app'], function (router, app) {
    return {
        router: router,
        search: function() {
            app.showMessage('Search not yet implemented...');
        },
        activate: function () {
            router.map([
                { route: '', title:'Welcome', moduleId: 'viewmodels/welcome', nav: true },
                { route: 'flickr', moduleId: 'viewmodels/flickr', nav: true },
                { route: 'users', title:'Users', moduleId:'viewmodels/users', nav:true}
            ]).buildNavigationModel();
            return router.activate();
        }
    };
});
When you click play button, then select users page, you will see the page like below:
History
I will add update process, if the article has expected attention.
Phd. Yildirim Kocdag is a Computer Engineer.
Programming Languages
Android, Objective-c, c#, vb.net, asp.net, javascript, TSQL.
Computer Science
DataMining, Compilers, Expert Systems, Digital Image Processing, AI and Extreme Programming.
ykocdag@yahoo.com
http://www.linkedin.com/profile/view?id=223886830


 General
  News
News  Suggestion
  Question
  Bug
Bug  Answer
  Joke
Joke  Praise
  Rant
Rant  Admin
Admin 


