Introduction
Shell Drop Handlers are DLLs that are registered in the system to extend the drag and drop functionality in the Shell. You can use these extensions to allow files to become drop targets for other files, or use the standard drag and drop functionality to invoke your own business logic. In this article, I will show you how to create a Drag Handler extension using .NET and a library called SharpShell.
The Drag Handler we'll create will allow the user to drag XML files onto an XSD file, and validate the contents of the XML files against the XSD schema. Here's how it'll look.
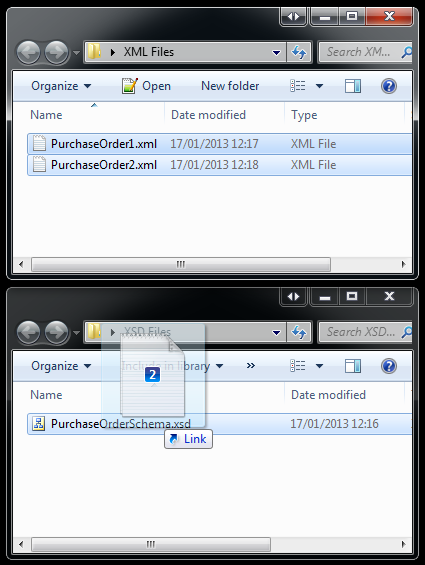
Above: Here we drag two XML files over an XSD file - the extension kicks in and shows the visual cue 'Link'.

Above: The user releases the mouse and the extension validates the XML files against the XSD, displaying the results in a dialog.
The Series
This article is part of the series '.NET Shell Extensions', which includes:
- .NET Shell Extensions - Shell Context Menus
- .NET Shell Extensions - Shell Icon Handlers
- .NET Shell Extensions - Shell Info Tip Handlers
- .NET Shell Extensions - Shell Drop Handlers
- .NET Shell Extensions - Shell Preview Handlers
- .NET Shell Extensions - Shell Icon Overlay Handlers
- .NET Shell Extensions - Shell Thumbnail Handlers
- .NET Shell Extensions - Shell Property Sheets
Step 1: Creating the Project
First, create a new C# Class Library project.
Tip: You can use Visual Basic rather than C# - in this article, the source code is C# but the method for creating a Visual Basic Shell Extension is just the same.
In this example, we'll call the project 'XsdDropHandler'. Rename the 'Class1.cs' file to 'XsdDropHandler.cs'.
Now add the following references:
System.Windows.FormsSystem.Drawing
These references contain various useful bits and pieces that other parts of the SharpShell library will need, such as icons and context menus.
Tip: If you use Nuget to install SharpShell (see 'Step 2') you don't need to add these references - they'll be added automatically.
Step 2: Referencing SharpShell
We now need to add a reference to the core SharpShell library. You can do that in a few different ways:
Add Reference
Download the 'SharpShell Core Library' zip file at the top of the article and add a reference to the SharpShell.dll file.
Tip: The download on this article is correct at the time of writing - if you need the latest version, use Nuget (as described below) or get the library from sharpshell.codeplex.com.
Use Nuget
If you have Nuget installed, just do a quick search for SharpShell and install it directly - or get the package details at https://www.nuget.org/packages/SharpShell.
Use CodePlex
Rather than getting the library from this page, which may not be the latest version, you can always get the very latest version of the library from CodePlex - on the SharpShell home page which is sharpshell.codeplex.com. Nuget will always have the latest stable version - CodePlex may have betas available, and the CodeProject articles will have the version that was available at the time of writing.
Step 3: Deriving from SharpDropHandler
Now that we've set up the project, we can derive the XsdDropHandler class from SharpDropHandler. SharpDropHandler is the base class for Drop Handler Shell Extensions - and it will provide all of the COM plumbing and interop needed - we'll just implement a couple of abstract members to provide the business logic. So here's how your class should look:
public class XsdDropHandler : SharpDropHandler
{
}
For a drop handler, there are two abstract functions in the base class that we must implement in the derived class.
DragEnter
protected abstract void DragEnter(DragEventArgs dragEventArgs);
DragEnter is called when the user has selected some shell items and dragged them over the shell item that you register the extension for (so in our case, this will happen when the user drags anything over an XSD file). You must do the following in the DragEnter function:
- Check the set of files that are being dragged (these are in the '
DragItems' member). - Depending on what drag operations you'll allow, set the
dragEventArgs.Effect member to the effect you are going to allow.
So for example in our drop handler, we'll make sure that every dragged file is an XML file. If they are all XML files, we'll set the drag effect to 'link'.
Drop
protected abstract void Drop(DragEventArgs dragEventArgs);
Drop is called when the user releases the mouse and the actual functionality needs to be invoked. DragEventArgs are provided in case you need to see things like the keys being pressed or the mouse position.
In our example, we'll open up our validation form in this function.
Step 4: Implementing DragEnter
As described, DragEnter is just going to allow the 'link' effect if EVERY drag file is an XML file. Here's the code:
protected override void DragEnter(DragEventArgs dragEventArgs)
{
dragEventArgs.Effect =
DragItems.All(di => string.Compare(Path.GetExtension(di), ".xml",
StringComparison.InvariantCultureIgnoreCase) == 0)
? DragDropEffects.Link : DragDropEffects.None;
}
This is straightforward enough not to need too much explanation. We use the Linq statement 'All' to verify a condition on every path (that the extension is XML), if this is true, we set the drag effect to link.
Step 5: Implementing Drop
Drop is even more straightforward - we'll pass the paths to the form.
Tip: Remember that for a SharpDropHandler, the dragged files are stored in the property 'DragFiles' and the object we're dragging over is stored in the property 'SelectedItemPath'.
protected override void Drop(DragEventArgs dragEventArgs)
{
var validatorOutputForm = new ValidationOutputForm
{XsdFilePath = SelectedItemPath, XmlFilePaths = DragItems};
validatorOutputForm.ShowDialog();
}
In this function, we pass the xsd path (which is the SelectedItemPath property) and the xml paths (the DragItems property) to our ValidationOutputForm, which we'll build next.
Here, you can see how straightforward it is to implement the core business logic for the extension.
Step 6: The Validation Form
I'm not going to go into too much detail here - the code is in the XsdDropHandler sample in the source code. This is essentially a very simple WinForms form that shows a list of validation results, the validation results come from using an XmlReader to read the XML files, validating against the provided schema file.
Step 7: Handling the COM Registration
There are just a few things left to do. First, we must add the ComVisible attribute to our class. This because our class is a COM server and must be visible to other code trying to use it.
[ComVisible(true)]
public class XsdDropHandler : SharpDropHandler
Next, we must give the assembly a strong name. There are ways around this requirement, but generally this is the best approach to take. To do this, right click on the project and choose 'Properties'. Then go to 'Signing'. Choose 'Sign the Assembly', specify 'New' for the key and choose a key name. You can password project the key if you want to, but it is not required:
Finally, we need to associate our extension with some types of shell items we want to use it for. We can do that with the COMServerAssociation attribute:
[COMServerAssociation(AssociationType.ClassOfExtension, ".xsd")]
public class XsdDropHandler : SharpDropHandler
So what have we done here? We've told SharpShell that when registering the server, we want it to be associated with XSD file classes in the system.
You can associate with files, folders, classes, drives and more - full documentation on using the association attribute is available on the CodePlex site at COM Server Associations.
We're done! Building the project creates the XsdDropHandler assembly, which can be registered as a COM server to add the extension to the system, allowing you to drag XML files onto an XSD file to validate them against the schema.
Debugging the Shell Extension
If you have seen any of my other articles on .NET Shell Extensions, you may recognize the 'Server Manager' tool. This is a tool in the SharpShell source code that can be used to help debug Shell Extensions.
Tip: If you want the latest version of the tools, they're available pre-built from the CodePlex site.
Open the Sever Manager tool and use File > Load Server to load the XsdDropHandler.dll file. You can also drag the server into the main window. Selecting the server will show you some details on it. Select the server.
Now most SharpShell servers can be tested directly inside this application by selecting them and choosing 'Test Shell' - however, at this stage at least, Shell Drop Handlers cannot be tested in this way. There is another mechanism - press 'Test Shell' to open the test shell, then choose 'Shell Open Dialog'.
Once the shell open dialog has opened, you can drag and drop files over the XSD. If you attach a debugger to the Server Manager, you can debug directly into your extension. Remember that you have to Register the server before you can test it.
Installing and Registering the Shell Extension
You can check the 'Installing and Registering the Shell Extension' section of the .NET Shell Extensions - Shell Context Menus for details on how to install and register these extensions - the process is the same.
History
- 19th January, 2013: Initial version


 General
  News
News  Suggestion
  Question
  Bug
Bug  Answer
  Joke
Joke  Praise
  Rant
Rant  Admin
Admin 


 2.0.82.7292 SP6a