Click here to Skip to main content
15,886,578 members
Articles / Desktop Programming / WPF
Tip/Trick

Button Inside passwordbox like Windows 8 in WPF Usercontrol

Rate me:
Please Sign up or sign in to vote.
4.80/5 (3 votes)
6 Nov 2013CPOL 25.6K   536   2   5
WPF passwordbox usercontrol

Introduction

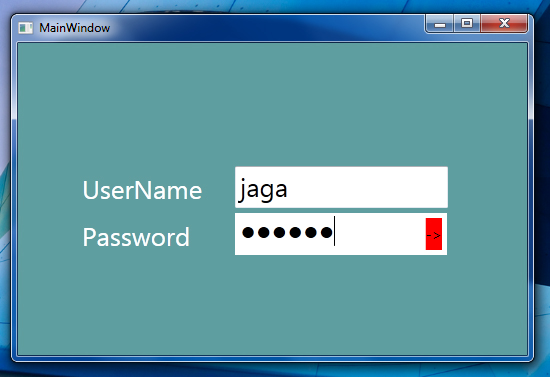
As a new WPF programmer, I wanted to simplify the function and was looking for good design controls. Microsoft Windows 8 OS has a new type of control, that is, a button inside the text-box. In my project log in screen, I planned to use this type of control. So I created a user-control for this.

Image 1

Using the Code

Normally, WPF button has hover animation but we don't want it. So first, we style for this:

XML
<Style x:Key="ButtonWithoutHover" TargetType="Button">
    <Setter Property="OverridesDefaultStyle" Value="True"/>
    <Setter Property="Margin" Value="0"/>
    <Setter Property="Template">
        <Setter.Value>
            <ControlTemplate TargetType="Button">
                <Border Name="border" 
                    BorderThickness="3"                                                        
                    BorderBrush="White"                                       
                    Background="{TemplateBinding Background}">
                    <ContentPresenter HorizontalAlignment="Center" 
                    VerticalAlignment="Center" />
                </Border>                            
            </ControlTemplate>
        </Setter.Value>
    </Setter>
</Style> 

For binding this design, put Style="{StaticResource ButtonWithoutHover}" inside the button tag. Then, we have to put button control and passwordbox in Dockpanel.

XML
<DockPanel Canvas.Right="2" Canvas.Top="2">
<Button Style="{StaticResource ButtonWithoutHover}" BorderThickness="3" 
BorderBrush="White" FontSize="15" DockPanel.Dock="Right" 
Content="->"  Click="onButtonClick" Grid.Column="1" >                   
</Button>
<PasswordBox BorderThickness="0" Name="txtPassword" 
DockPanel.Dock="Left"  Grid.Column="0" />

</DockPanel> 

At a Click event, we have to include the C#:

C#
public event RoutedEventHandler Click;

void onButtonClick(object sender, RoutedEventArgs e)
{
    if (this.Click != null)
    this.Click(this, e);
}  

Now the Button inside passwordbox user control is ready.

Implementing Steps

  1. Include the namespace of user control in new WPF application:
    XML
    xmlns:wpfCtrl="clr-namespace:WpfUserControls;assembly=WpfUserControls"
  2. Include the passwordbox in grid:
    XML
    <wpfCtrl:PasswordBoxWin8 Background="CadetBlue" Margin="24,12,257,258" FontSize="26" />

    I have not set the background in usercontrol. So you must specify the Background color while implementing.

Image for Controls

Points of Interest

I have learned the Dockpanel and border usages while creating this usercontrol.

History

  • Nov 06 2013 - Initial version

License

This article, along with any associated source code and files, is licensed under The Code Project Open License (CPOL)


Written By
Software Developer M CUBIC SOFTWARE PVT LTD
India India
Hi, I'm Jagadeeswaran Natarajan from Chennai, TamilNadu, India. In Past 4 years ( 2010 onwards) I'm working as a dot net programmer company called M Cubic Software Pvt Ltd, chennai.

I have done more then 4 project in various technologies.

Comments and Discussions

 
SuggestionSome suggestions. Pin
Leung Yat Chun6-Nov-13 5:51
Leung Yat Chun6-Nov-13 5:51 
Hello

Nice tips, a good start.

I think if you update your UserControl to be inherited from Textbox, all properties of Textbox is available when user using it.
And note that WinRT no longer support trigger in ControlTemplate, so to avoid rewriting the control you may consider VisualStateManager, e.g.

XML
<Style x:Key="ButtonWithoutHover" TargetType="Button">
    <Setter Property="OverridesDefaultStyle" Value="True"/>
    <Setter Property="Margin" Value="0"/>
    <Setter Property="BorderBrush" Value="White"/>
    <Setter Property="BorderThickness" Value="3"/> <!-- Consider to put all templatable property here, easier to extend in future -->
    <Setter Property="Template">
        <Setter.Value>
            <ControlTemplate TargetType="Button">
                <Border Name="border" 
                BorderThickness="{TemplateBinding BorderThickness}"
                BorderBrush="{TemplateBinding BorderBrush}"                                 
                Background="{TemplateBinding Background}"> <!-- WinRT does not support Triggers -->
                    <VisualStateManager.VisualStateGroups>
                        <VisualStateGroup x:Name="CommonStates">
                            <VisualState x:Name="Normal">
                                <Storyboard>
                                    <ObjectAnimationUsingKeyFrames  Storyboard.TargetName="border" 
                                                                Storyboard.TargetProperty="BorderBrush">
                                        <DiscreteObjectKeyFrame KeyTime="0" Value="{x:Static Brushes.Transparent}" />
                                    </ObjectAnimationUsingKeyFrames>
                                </Storyboard>
                            </VisualState>

                            <VisualState x:Name="MouseOver">
                                <Storyboard >
                                    <ObjectAnimationUsingKeyFrames  Storyboard.TargetName="border" 
                                                                Storyboard.TargetProperty="BorderBrush">
                                        <DiscreteObjectKeyFrame KeyTime="0" Value="{x:Static Brushes.Black}" />
                                    </ObjectAnimationUsingKeyFrames>
                                </Storyboard>
                            </VisualState>
                        </VisualStateGroup>
                    </VisualStateManager.VisualStateGroups>
                    <ContentPresenter HorizontalAlignment="Center" VerticalAlignment="Center" />
                </Border>
                <ControlTemplate.Triggers>
                    <!--<Trigger Property="IsMouseOver" Value="True">
                        <Setter TargetName="border" Property="BorderBrush" Value="Black" />
                    </Trigger>-->
                </ControlTemplate.Triggers>
            </ControlTemplate>
        </Setter.Value>
    </Setter>
</Style>


Regards
Joseph Leung

GeneralRe: Some suggestions. Pin
Jagadeeswaran Natarajan7-Nov-13 17:43
professionalJagadeeswaran Natarajan7-Nov-13 17:43 
GeneralRe: Some suggestions. Pin
Leung Yat Chun8-Nov-13 4:59
Leung Yat Chun8-Nov-13 4:59 
QuestionSome more Pin
Ranjan.D6-Nov-13 5:09
professionalRanjan.D6-Nov-13 5:09 
AnswerRe: Some more Pin
Jagadeeswaran Natarajan6-Nov-13 18:19
professionalJagadeeswaran Natarajan6-Nov-13 18:19 

General General    News News    Suggestion Suggestion    Question Question    Bug Bug    Answer Answer    Joke Joke    Praise Praise    Rant Rant    Admin Admin   

Use Ctrl+Left/Right to switch messages, Ctrl+Up/Down to switch threads, Ctrl+Shift+Left/Right to switch pages.