Introduction
TreeView control is one of the most useful controls comes with the Microsoft IE WebControls.
I have used Microsoft IE web control (free download) for this sample application.
You may download the Microsoft IE web control from the following link.
http://asp.net/IEWebControls/Download.aspx?tabindex=0&tabid=1.
I have attached the soucecode in the following files TreeViewSample.aspx file and TreeViewSample.aspx.cs files. Please go through the attached files.
- You may refer the above URL to understand how to set the reference and add the IE webControl into your web project. Due to time limitation I may not able to give step by step instructions to create the Treeview control in your web page. Please excuse me!!
I have created this control as part of my current project when I failed to find a customized Tree control which satisfy my requirements in the net ;-) .
However I have referred Mr. Steve Sharrok's article about TreeView Control (You can view his article from the folowing link http://aspalliance.com/articleViewer.aspx?aId=125&pId=).
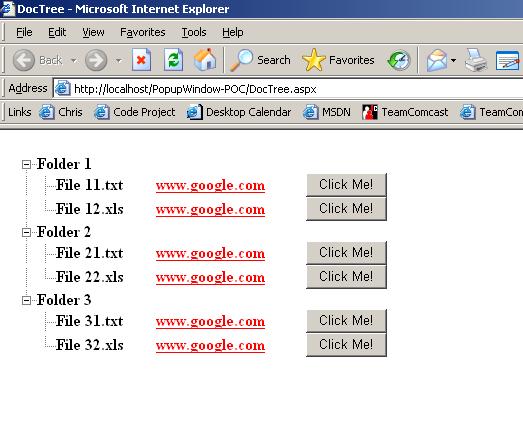
In the given example I tried to populate the TreeView control with the folders and files as Steve did.
But there are some differences in this TreeView control. Here each of the node contains a hyperlink (which actually points to http://www.google.com/ - You can make it point to any web page as per your wish) and a HTML input button.
This is just a demonstartion of how can we achieve the treenodes with other user controls.
Please follow the given steps to create a Treeview Control in your ASP.NET application.
- Make sure that you have installed Microsoft IE web controls in your system.
- Add the Microsoft IE web controls reference to the newly created project.
![Reference]()
- Create a blank ASP.NET project
- Add a webform named Sample.aspx and delete the content of Sample.aspx file except the first line from the HTML view.
-
Paste the follwoing code from the SampleTreeview.aspx attached with this article into sample.aspx file after the existing first line.
-
<%@ Register TagPrefix="iewc" Namespace="Microsoft.Web.UI.WebControls" Assembly="Microsoft.Web.UI.WebControls" %>
<!DOCTYPE HTML PUBLIC "-//W3C//DTD HTML 4.0 Transitional//EN" >
 <body MS_POSITIONING="GridLayout">
 <script language="javascript">
 function clickedMe()
 {
  alert('hey, why did you click me ???');
 }
  </script>
  <form id="TreeViewSample" method="post" runat="server">
   <table id="Table1" height="100%" cellSpacing="0" cellPadding="8" border="0">
    <tr height="100%">
     <td vAlign="top"><iewc:treeview id="TreeCtrl" runat="server" SelectedStyle="background:white;color:black;font-size=16;font-weight:bold"
       HoverStyle="border=solid 1px;color=black;background:white;font-size=16;font-weight:bold" SystemImagesPath="/PopupWindow-POC/images/treeimages/"
       DefaultStyle="background:white;color:black;font-size:16;font-weight:bold" ShowLines="False" ShowToolTip="False"
       Width="600"></iewc:treeview></td>
    </tr>
   </table>
  </form>
 </body>
- Make sure that your SystemImagesPath pointing to a valid path. If you have installed Microsoft IE webcontrols and followed the steps required for the installtion you will have all the tree images under the folder webctrl_client\1_0 folder in your default website. For avoiding confusion I have copied the image folder into my application folder. (/PopupWindow-POC/images).
- Now go to the Sample.aspx.cs file and replace the page_load function with the following code.Please note that the root folder for the tree is pointing to TestData folder. So please download TestData folder from the attached zip file and keep it in your application folder since I'm using the mappath to retreive the TestData folder.
-
private void Page_Load(object sender, System.EventArgs e)
{
if ( !this.IsPostBack)
{
TreeNodeType type;
type = new TreeNodeType();
type.Type = "folder";
TreeCtrl.TreeNodeTypes.Add( type );
type = new TreeNodeType();
type.Type = "file";
TreeCtrl.TreeNodeTypes.Add( type );
GetFolders( MapPath( "~/TestData" ), TreeCtrl.Nodes );
TreeCtrl.ExpandLevel = 3;
}
}
- Now add the follwoing 2 functions from SampleTreeView.aspx.cs file from the attached zip file inot the Sample.aspx.cs file.
-
private void GetFolders( string path, TreeNodeCollection nodes )
{
string[] dirs = Directory.GetDirectories( path );
foreach( string p in dirs )
{
string dp = p.Substring( path.Length );
nodes.Add( Node( "", p.Substring( path.Length + 1), "folder" ) );
}
string[] files = Directory.GetFiles( path, "*.*" );
foreach( string p in files )
{
nodes.Add( Node( p, p.Substring( path.Length ), "file" ) );
}
for( int i = 0; i < nodes.Count; i++ )
{
if ( nodes[ i ].Type == "folder" )
{
GetFolders( dirs[ i ] + "\\", nodes[i ].Nodes );
}
}
}
-
private TreeViewSample Node( string path, string text, string type )
{
TreeNode n = new TreeNode();
n.Type = type;
StringBuilder nodeText = new StringBuilder();
if ( type == "file" )
{
_idNumber++;
nodeText.Append(@"<table border=""0"" cellpadding=""0"" cellspacing=""0""><tr><td width=""100px"">") ;
nodeText.Append(@"<b><a style=""text-decoration:none;cursor:default;background:white;color:black;font-size:16;font-weight:bold"" href=""javascript:void(0)""");
nodeText.Append(@"> ").Append(text.Trim()).Append("</a></b>");
nodeText.Append(@"</td><td width=""150px"">");
nodeText.Append(@"<b><a style=""background:white;color:red;font-size:16;font-weight:bold"" href=""<a href="%22http:
nodeText.Append(@">www.google.com </a></b>");
nodeText.Append(@"</td><td width=""100px"">");
nodeText.Append(@"<INPUT id=""").Append(_idNumber.ToString()).Append(@""" type=""button"" onclick=""javascript:clickedMe()"" value=""Click Me!"">");
nodeText.Append(@"</td></tr></table>");
}
else if ( type == "folder" )
{
nodeText.Append(@"<table border=""0"" cellpadding=""0"" cellspacing=""0""><tr><td width=""100px"">") ;
nodeText.Append(@"<b><a style=""text-decoration:none;cursor:default;background:white;color:black;font-size:16;font-weight:bold"" href=""javascript:void(0)""");
nodeText.Append(@"> ").Append(text.Trim()).Append("</a></b>");
nodeText.Append(@"</td></tr></table>");
}
n.Text = nodeText.ToString();
return n;
}
- Please add all the namespaces required for successful compilation. You may use the TreeviewSample.aspx.cs file for your reference.
-
using System;
using System.IO;
using System.Collections;
using System.ComponentModel;
using System.Data;
using System.Drawing;
using System.Text;
using System.Web;
using System.Web.SessionState;
using System.Web.UI;
using System.Web.UI.WebControls;
using System.Web.UI.HtmlControls;
using Microsoft.Web.UI.WebControls;
Build your project and execute.
I know this article is not complete to its extend. Since currently I'm working in a tight scheduled project I couldnt update the article with more details.
This member has not yet provided a Biography. Assume it's interesting and varied, and probably something to do with programming.


 General
  News
News  Suggestion
  Question
  Bug
Bug  Answer
  Joke
Joke  Praise
  Rant
Rant  Admin
Admin 


