Introduction
In this article, we will see how to use AngularJS for building websites. It scopes for beginners who want to start with AngularJS and explains some basic features of AngularJS framework. I consider a simple CRUD example for products. I explained all the code segments used in this demonstration, then you can download the source code to get angularjs in action yourself.
Background
AngularJS is JavaScript MVC framework extensively used these days, and provides a powerful mechanism to develop responsive websites more quickly and more easily. Being the MVC framework, it provides you the way to distribute website code in three components, i.e., Model, Views & Controllers. So you have clear separations between data model, application logic (controllers) and the view presentation, makes it easy to focus on your primary development area. The view receives data from the model for display. When a user interacts with the application by clicking or typing, the controller responds by changing data in the model. Finally, the view gets notified that a change has occurred in the model so that it can update the displayed content.
In Angular applications, the view is the Document Object Model, the controllers are JavaScript classes, and the model data is stored in object properties. AngularJS ships the HTML template and data to the browser to be assembled at client side. With libraries like jQuery, you have to interact with DOM in order to update UI with the fresh model state, i.e., whenever you observe any change in the model, you have to interact with DOM to reflect the changes. While AngularJS provides us Data-Binding, we don't have to move data from one part to another, only we have to map the UI parts with JavaScript properties and it will be sync automatically.
Using the Code
Let's start with the code, we will move step-by-step from scratch to build a sample CRUD operations example.
Add index.html page with ng-app attribute in html tag, as:
<html ng-app="demoApp">
This will define our html page as angularjs application. Since angularjs is primarily a single page application framework, it will use html view templates as partial views in response to a certain route. To render a partial view, we use an attribute data-ng-view for a div tag, all our partial views will be rendered within this div tag.
<div data-ng-view=""></div>
Download two files angular.js and angular-route.js and add references to these files in index.html page. Or alternatively, you can directly add references to https://angularjs.org/ site as:
<script type="text/javascript"
src="http://code.angularjs.org/1.2.13/angular.js"></script>
<script type="text/javascript"
src="http://code.angularjs.org/1.2.13/angular-route.js"></script>
Partial Views
Now move to the real content for our CRUD example, we will develop two partial views, ProductListing.html and ProductEdit.html. Let's review the ProductListing html:
<div class="container">
    <h2 class="page-title">Products Listing</h2>

    <div class="searchbar">
        <ul class="entity-tabular-fields">
            <li>
                <label>Search: </label>
                <span class="field-control">
                    <input type="text" data-ng-model="filter.productName" />
                </span>
                <label></label>
            </li>
        </ul>
    </div>
    <h2><a href="#/ProductEdit">Add new product</a></h2>

    <table class="items-listing">
        <thead>
            <tr>
                <th>Code
                </th>
                <th>Name
                </th>
                <th>Description
                </th>
                <th>Category
                </th>
                <th>Action
                </th>
            </tr>
        </thead>
        <tbody>
            <tr data-ng-repeat="product in products | filter:filter.productName">
                <td><a href="#/ProductEdit?code=
                {{product.code}}">{{product.code}}</a></td>
                <td>{{product.name}} </td>
                <td>{{product.description}} </td>
                <td>{{product.category}} </td>
                <td><a href="#/?code={{product.code}}">Delete</a></td>
            </tr>
        </tbody>
    </table>
</div>
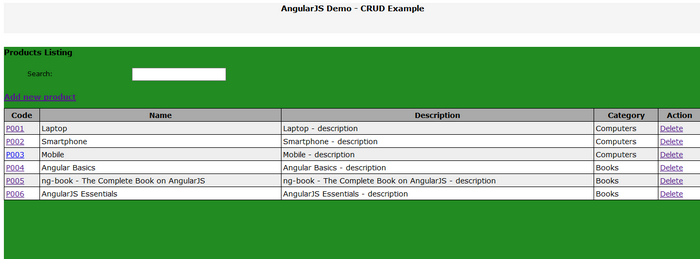
Apart from html or CSS stuff, focus on angular directives, in <tbody> tag, we use the directive data-ng-repeat="product in products | filter:filter.productName". Where 'products' is our JavaScript array, serves here like in-memory data storage. This directive tells the JavaScript to loop through each array item and generate the <tr> tags for each individual item. Then, we added a filter with to get filter our items with respect to the productName within arbitrary filter object, as you might have noticed this is what object property we have binded our search textbox in the upper part of this ProductListing view by using the data binding directive data-ng-model="filter.productName", so whatever user types in this search box, products array will be filtered with the matching strings. To output any value to the html, we use the angular's data binding syntax {{VAULE_TO_BE_OUTPUT}}, like we displayed the products properties in table cells:
<td>{{product.name}} </td>
For the first cell, we display product.code and make it a link to our second partial view ProductEdit.html. And the last cell also contains a link to the same listing page with product code in the query string. We will later see the JavaScript code for our models / controllers, let's first review the ProductEdit partial view. Here is the content for ProductEdit.html:
<div class="container">

    <h2 class="page-title">Product Edit</h2>
    <br />

    <ul class="entity-tabular-fields">
        <li class="entity-field-row">
            <label>Product Code: </label>
            <span class="field-control">
                <input type="text" data-ng-model="currentProduct.code" />
            </span>
            <label></label>
        </li>
        <li class="entity-field-row">
            <label>Product Name: </label>
            <span class="field-control">
                <input type="text" data-ng-model="currentProduct.name" />
            </span>
            <label></label>
        </li>
        <li class="entity-field-row">
            <label>Description: </label>
            <span class="field-control">
                <input type="text"
                data-ng-model="currentProduct.description"  aria-multiline="true"/>
            </span>
            <label></label>
        </li>
        <li class="entity-field-row">
            <label>Category: </label>
            <span class="field-control">
                <input type="text" data-ng-model="currentProduct.category" />
            </span>
            <label></label>
        </li>
        <li class="entity-field-row">
            <label></label>
            <span class="field-control">
                <button data-ng-click="saveProduct()">Save</button>
            </span>
            <label></label>
        </li>
    </ul>

</div>

Notice the data-ng-model attribute we added for all input tags, this binds the model(product) properties with the UI elements. In this case, it is automatically created a new product object named currentProduct and populates its properties with the values user put in these input controls. In the end, you see a button tag with attribute data-ng-click which binds the button's click event with saveProduct() function inside the current $scope. Now you see $scope, this you can think of as a special JavaScript object, all our current view's required objects/methods are binded to $scope object, anything we declared within $scope object we can access from our views. You will get more clear when we proceed further with the model/controllers code.
JavaScript / Angular Part
Now let's move to the JavaScript part of code, earlier you added references for two AngularJS libraries, now add another JavaScript file, let's say main.js and add reference to the same index page. You can download the code attached, here I continue discussion with small parts.
First, declare our application object by calling angular.module.
var demoApp = angular.module('demoApp', ['ngRoute']);
The first parameter 'demoApp' is the name of the module we defined, and second parameter is any array of dependencies which are required by our module, in our case we have only one dependency 'ngRoute' for the scope of this article.
Next, we configure the routes for partial views:
demoApp.config(function ($routeProvider) {
$routeProvider
.when('/',
{
controller: 'ProductController',
templateUrl: 'partials/ProductListing.html'
})
.when('/ProductEdit',
{
controller: 'ProductController',
templateUrl: 'partials/ProductEdit.html'
})
.otherwise({
redirectTo: '/'
});
});
Parameter $routeProvider is passed to the function for routes configuration, then uses a chain of .where() functions to look for url path and passes an object to define the target partial view with associated controller. Controller property defines which controller is going to be used by the partial view specified in templateUrl property. In our case, we are only using one controller, i.e., ProductController. otherwise() function defines the default partial view to be rendered if none of the specified paths is matched with the URL path being requested.
It's time to define ProductController, in AngularJS, you can have multiple ways to define a controller, we are using a controllers object, add all our controllers to this object and then finally setup this object to our app module's controllers.
var controllers = {};
controllers.ProductController = function ($scope, $route, $routeParams, $location, ProductFactory) {
}
demoApp.controller(controllers);
Here is our ProductController's definition:
controllers.ProductController = function ($scope, $route, $routeParams, $location, ProductFactory) {

    $scope.products = [];

    var init = function () {
        $scope.products = ProductFactory.getProducts();
    };

    var initProductEdit = function () {
        var code = $routeParams.code;
        if (code == undefined) {
            $scope.currentProduct = {};
        }
        else {
            $scope.currentProduct = ProductFactory.loadProductByCode(code);
        }
    };

    $scope.$on('$viewContentLoaded', function () {
        var templateUrl = $route.current.templateUrl;
        if (templateUrl == "partials/ProductEdit.html") {
            initProductEdit();
        }
        else if (templateUrl == "partials/ProductListing.html") {
            var code = $routeParams.code;
            if (code != undefined) {

                $scope.deleteProduct(code);
            }
        }
    });

    init();

    $scope.saveProduct = function () {

		ProductFactory.saveProduct($scope.currentProduct);
		$location.search('code', null);
		$location.path('/');
    };

    $scope.deleteProduct = function (code) {

        ProductFactory.deleteProduct(code);
		$location.search('code', null);
        $location.path('/');
    };
};
Each controller has to pass a parameter named $scope, which is used by view to access data model. Anything that you define within the $scope object, you can directly access from the view. There are also some other optional parameters $route, $routeParams, $location that you can use if you need.
We added supporting functions in this controller to interact with ProductFactory, and make these functions accessible from view by adding to the $scope object. We used an event '$viewContentLoaded', this event is fired when any partial view is being loaded in our div tag. Since I am using the ProductEdit page for both add/edit tasks, I put query string parameter for product code to be edited. I check in this event if we have query parameter code then the view is in editing mode, otherwise it is about to create a new product. Similar technique is used for delete task on ProductListing view, i.e., if we have code in the query string parameter, then we will delete that product and refresh the listing table.
Another parameter you might have noticed in the controller function is ProductFactory, this is the service component we need to access data from our controller. Angular framework allows the creation of a service component in different ways. The most common way is to create it using a factory. We need to add the service in the application module that passes two parameters: the name of the service and the factory function. It is a simple function that returns a new object. Here is the ProductFactory definition:
demoApp.factory('ProductFactory', function () {
var products = [
{ code: 'P001', name: 'Laptop',
description: 'Laptop - description', category: 'Computers' },
{ code: 'P002', name: 'Smartphone',
description: 'Smartphone - description',
category: 'Computers' },
{ code: 'P003', name: 'Mobile',
description: 'Mobile - description', category: 'Computers' },
{ code: 'P004', name: 'Angular Basics',
description: 'Angular Basics - description',
category: 'Books' },
{ code: 'P005', name: 'ng-book - The Complete Book on AngularJS',
description: 'ng-book - The Complete Book on AngularJS - description',
category: 'Books' },
{ code: 'P006', name: 'AngularJS Essentials',
description: 'AngularJS Essentials - description',
category: 'Books' }
];
var factory = {};
factory.getProducts = function () {
return products;
};
factory.loadProductByCode = function (code) {
var productFound;
for (var i = 0; i < products.length; i++) {
if (products[i].code == code) {
productFound = products[i];
break;
}
}
return productFound;
};
factory.saveProduct = function (product) {
var tempProduct = factory.loadProductByCode(product.code);
if (tempProduct == null || tempProduct == undefined) {
tempProduct = {};
tempProduct.code = product.code;
tempProduct.name = product.name;
tempProduct.description = product.description;
tempProduct.category = product.category;
products.push(tempProduct);
}
else {
tempProduct.code = product.code;
tempProduct.name = product.name;
tempProduct.description = product.description;
tempProduct.category = product.category;
}
};
factory.deleteProduct = function (code) {
var tempProduct = factory.loadProductByCode(code);
if (tempProduct != null) {
products.remove(tempProduct);
}
};
return factory;
});
We use the module's factory function in order to define factory service component. The code is self-explanatory, it contains only some helpers properties/functions. The deleteProduct function in the end of code listing is using an array function remove, which is not really a default array function, I used a custom function to add it to Array.prototype to make it accessible anywhere in the website. Make sure you do this in the beginning of the application loading, before any related code is going to be executed, for this article, I put it in the index.html script tag.
In factory components, we usually have to access data from server, but for the scope of this article, we are using only temporary in-memory array of products. Hopefully in the next article, I will change its code to access data from the server database.
Points of Interest
We are done with our CRUD example with AngularJS, I really enjoyed writing my experience I learned with Angular. I hope you also enjoyed this article and got something out of it.
I am planning to write another article, and try to use a server-side data storage and make requests to server from AngularJS. I appreciate your feedback/comments or any improvements you want to suggest in this topic, to help in making the article better and helpful for others.
History
- 14th October 2015: Article posted
Karachi - Pakistan.
http://idreesdotnet.blogspot.com/


 General
  News
News  Suggestion
  Question
  Bug
Bug  Answer
  Joke
Joke  Praise
  Rant
Rant  Admin
Admin 


