Task List in SharePoint 2013
Tasks lists in SharePoint are used for capturing actions, to-dos, and deadlines. Whenever multiple people are working together to deliver on time a joint project or initiative, you need some way of effectively communicating what everyone is supposed to do. You also track what everyone has (or has not) done in order to manage the project properly.
Benefits of Using Task List in SharePoint 2013
- Faster and easier user interface
- More flexibility with tasks and sub tasks
- Improved project insight with colors and a graphical timeline
- Enhanced accessibility with a mobile view of the task list
In this article, we will follow the below steps to learn about the following features:
- Create Task List
- Creating New Task in SharePoint 2013
- Delete a Task
- SharePoint Timeline
It’s really easy for developers having background in ASP.NET Technology to grasp these SharePoint related concepts easily.
Creating a Task List in SharePoint 2013
- Login with SharePoint site.
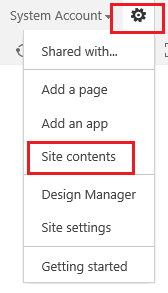
- Navigate to Site and Click on “Settings” option and then click on “site contents” option.
- Then click on “add an app” option.

- Then click on “Tasks” option from your app.
- Give the Task Name and click on create button.
- It will create a new task list, where you can manage your task relevant to project.
Creating New Tasks in SharePoint 2013
- Open the create task list and click on “New Task” icon.
- Add all relevant information and it will create one task in task library.
- These tasks are also assigned to relevant user, so whenever assigned user login with site, he can find this task and start working on it. He/she can also add task progress, so all are aware of task’s progress.
Deleting a Task in SharePoint 2013
- Login as admin user and open task list.
- Select relevant task and open it. After that, click on Delete button from ribbon task. This task will be deleted from task list.
SharePoint Timeline
Users have the ability to display or remove tasks or sub tasks from the timeline.
How to Add a Task in Timeline? – When you create a task click on “…” to open task preview window. Here you can select “Add to Timeline” to add the task to the above timeline. You can remove it from the same way with “Remove from timeline”.
Hopefully, this SharePoint for dummies article enables SharePoint 2013 users to understand how to create Task List, add tasks to Task List, Remove the Tasks from Task List (if required) and add/removes tasks from their timeline.
More Related from Microsoft SharePoint For Dummies
The post How to Create a Task List in SharePoint 2013? appeared first on SharePoint For Dummies.


