Introduction
Sending email is a very common task in any web application for many purposes. In daily development we need to add some mail functionality to our project to send email to the customer or another in our web site.
Using the code
For sending mail from ASP.NET MVC we use the "System.Net.Mail" namespace. Let's see how to do this.
- Open Visual Studio
- "File" -> "New" -> "Project..."
- Choose "Visual C#" - "Web" then select "ASP.NET MVC4 Web Application"
- Add a new internet application then click "OK"
Step 1: Create a new Model Class in the model folder. The following is the code for the new Model.
using System;
using System.Collections.Generic;
using System.Linq;
using System.Web;

namespace SendMailwithAttachment.Models
{
    public class MailModel
    {
        public string To { get; set; }
        public string Subject { get; set; }
        public string Body { get; set; }
    }
}
Step 2: Create a new SendMailerController in the Controller folder. The following is the code for the design of the new Controller.
SendMailerController.cs
using System;
using System.Collections.Generic;
using System.IO;
using System.Linq;
using System.Net;
using System.Net.Mail;
using System.Web;
using System.Web.Mvc;
namespace SendMailwithAttachment.Controllers
{
public class SendMailerController : Controller
{
public ActionResult Index()
{
return View();
}
[HttpPost]
public ActionResult Index(SendMailwithAttachment.Models.MailModel objModelMail, HttpPostedFileBase fileUploader)
{
if (ModelState.IsValid)
{
string from = "Your Gmail Id";
using (MailMessage mail = new MailMessage(from, objModelMail.To))
{
mail.Subject = objModelMail.Subject;
mail.Body = objModelMail.Body;
if (fileUploader != null)
{
string fileName = Path.GetFileName(fileUploader.FileName);
mail.Attachments.Add(new Attachment(fileUploader.InputStream, fileName));
}
mail.IsBodyHtml = false;
SmtpClient smtp = new SmtpClient();
smtp.Host = "smtp.gmail.com";
smtp.EnableSsl = true;
NetworkCredential networkCredential = new NetworkCredential(from, "Your Gmail Password");
smtp.UseDefaultCredentials = true;
smtp.Credentials = networkCredential;
smtp.Port = 587;
smtp.Send(mail);
ViewBag.Message = "Sent";
return View("Index", objModelMail);
}
}
else
{
return View();
}
}
}
}
Index.cshtml
@model SendMailwithAttachment.Models.MailModel
@{
    ViewBag.Title = "Index";
}
<script src="~/Scripts/jquery-1.7.1.min.js"></script>
<script>
    $(document).ready(function () {
        if ('@ViewBag.Message' == 'Sent') {
            alert('Mail has been sent successfully');
        }
    });
</script>

<h2>Index</h2>
<legend>Send Email </legend>


<p>@using (@Html.BeginForm("Index", "SendMailer", FormMethod.Post, new { @id = "form1", @enctype = "multipart/form-data" })) { @Html.ValidationSummary() <input type="submit" value="Send" /></p>


<table>
	<tbody>
		<tr>
			<td>To:</td>
			<td>@Html.TextBoxFor(m => m.To)</td>
		</tr>
		<tr>
			<td>Subject:</td>
			<td>@Html.TextBoxFor(m => m.Subject)</td>
		</tr>
		<tr>
			<td>Attachment</td>
			<td><input name="fileUploader" type="file" /></td>
		</tr>
		<tr>
			<td>Body:</td>
			<td>@Html.TextAreaFor(m => m.Body)</td>
		</tr>
	</tbody>
</table>

<p>}</p>
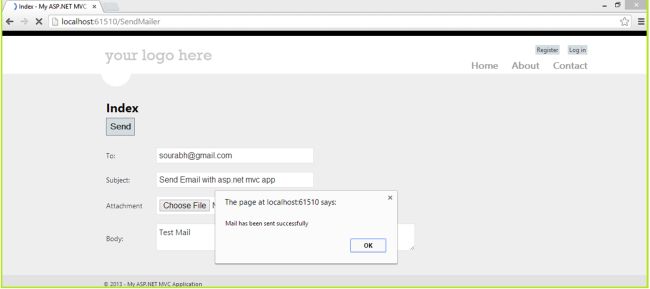
In the code above we have the following 4 fields:
- To
- Subject
- Message
- Attachment
When the user clicks the "Send" button, the mail will be sent to the specified mail address that you provide in the "To" TextBox. That’s it. Press F5 to run your code.
Understanding the Code
In MVC, we can post our data in one of two ways. 1. Strongly typed 2. Ajax using jQuery In the preceding example, we used the strongly typed solution, why? Because we have FileUploader. This fileupload needs an object HttpPostedFileBase, that gives you the FileName,Content Length, Content type properties of your selected files. For posting attached file data from a View to a Controller, we need the following simple 3 steps.
Step 1: In every web based app we define a <form> tag, here we also define a <form> tag in razor style.
@using (@Html.BeginForm("Index", "SendMailer", FormMethod.Post, new { @id = "form1", @enctype = "multipart/form-data" }))
As you have seen in the preceding line of code, here it is: @Html.BeginForm(“Action Method Name” , ”Controller Name”,Posting Method, new {@id=”form1”,@enctype=”multipart/form-data”} Step 2: Define fileupload control
<input type="file" name="fileUploader" />
Step 3:
[HttpPost]
public ActionResult Index(SendMailwithAttachment.Models.MailModel objModelMail,
    HttpPostedFileBase fileUploader)
In the code above:
public ActionResult Index(SendMailwithAttachment.Models.MailModel objModelMail,
    HttpPostedFileBase fileUploader)
that uses a [httppost] action method. In this method, we have a parameter of our MailModel object and HttpPostedFileBase object.
Here remember one thing always. In Step 2 you defined a fileupload control, here is the property name=”fileUploader”. So when you define an object of HttpPostedFileBase object variable, both names should be the same. In the code above name=”fileiploader” and in the ActionMethod HttpPostedFileBase fileUploader.
Now we create a MailMessage object. MailMessage mail = new MailMessage(); MailMessage is the main class for sending mail, this is the part of the System.Net.Mail namespace. The MailMessage class has properties, the important ones are:
- To
- From
- Cc
- Bcc
- Subject
- Body
- Attachment
So we add our data into specified properties.
string from = "Your Gmail Id";
using (MailMessage mail = new MailMessage(from, objModelMail.To))
{
mail.Subject = objModelMail.Subject;
mail.Body = objModelMail.Body;
if (fileUploader != null)
{
string fileName = Path.GetFileName(fileUploader.FileName);
mail.Attachments.Add(new Attachment(fileUploader.InputStream, fileName));
}
}
For sending mail we need a SMTP Server, so in ASP.Net we have the SmtpClient class, using that class object we set its properties for the SMTP settings.
SmtpClient smtp = new SmtpClient();
The SMTPClient class has these basic properties:
- Host
- Port
- UseDefaultCredential
- Credentials
- EnableSsl
- Send
smtp.Host = "smtp.gmail.com";
smtp.EnableSsl = true;
NetworkCredential networkCredential = new NetworkCredential(from, "Your Gmail Password");
smtp.UseDefaultCredentials = true;
smtp.Credentials = networkCredential;
smtp.Port = 587;
smtp.Host = "smtp.gmail.com"; This is the SMTP Host address of Gmail, if you want to use any other SMTP host service then please add a different SMTP host protocol, for example for Hotmail it is smtp.live.com.
In Smtp.Port=587, 587 is the port for Gmail, so for any other service port you need to change the port correspondingly.
smtp.Credentials = new System.Net.NetworkCredential("username", "password");
Smtp.Credentials specifies the Network Crendentials of your Gmail id so please add your username and password instead of ("username", "password"); The following is for a secure mail server, so you enable your SSL layer. smtp.EnableSsl = true; Smtp.Send sends the mail so please add your MailMesssage object here, based on properties, your mail will be sent.


 General
  News
News  Suggestion
  Question
  Bug
Bug  Answer
  Joke
Joke  Praise
  Rant
Rant  Admin
Admin 


