Introduction
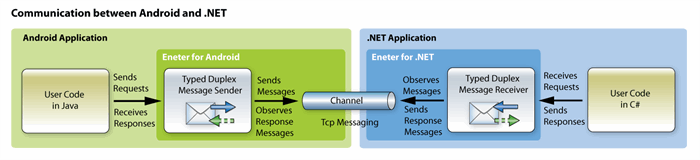
The example bellow implements a simple request-response communication between Android and .NET application.
The Android application is a simple client using the .NET application as a service to calculate length of the text message.
The example bellow uses Eneter Messaging Framework making the whole communication very simple.
(The framework is free for non-commercial use and can be downloaded from http://www.eneter.net. You need to download Eneter for.NET and Eneter for Android.
More detailed technical info can be found at technical info.)
TCP on Android
When you implement the communication via TCP on Android, you must count with two specifics:
1. You must set INTERNET permission for your Android application!
If the permission is not set, the application is not allowed to communicate across the network.
To set the INTERNET permission you must add the following line to AndroidManifest.xml.
<uses-permission android:name="android.permission.INTERNET"/>
Example of AndroidManifest.xml allowing communication across the network:
="1.0"="utf-8"
<manifest xmlns:android="http://schemas.android.com/apk/res/android"
package="net.client"
android:versionCode="1"
android:versionName="1.0" >
<uses-sdk android:minSdkVersion="7" />
<uses-permission android:name="android.permission.INTERNET"/>
<application
android:icon="@drawable/ic_launcher"
android:label="@string/app_name" >
<activity
android:name=".AndroidNetCommunicationClientActivity"
android:label="@string/app_name" >
<intent-filter>
<action android:name="android.intent.action.MAIN" />
<category android:name="android.intent.category.LAUNCHER" />
</intent-filter>
</activity>
</application>
</manifest>
2. The IP address 127.0.0.1 (loopback) cannot be used for communication between the Android emulator and the .NET application!
The emulator acts as a separate device. Therefore, the IP address 127.0.0.1 (loopback) cannot be used for the communication with other applications running on the same computer as the emulator.
Instead of that you must use a real IP address of the computer. It is the reason why the example uses 172.16.0.6 => Do not forget to use your own IP address to make the example running.
Android Client Application
The Android client is a very simple application allowing user to put some text message and send the request to the service to get back the length of the text.
When the response message is received it must be marshalled to the UI thread to display the result.
Also please do not forget to set android.permission.INTERNET and set the valid IP address - since 127.0.0.1 cannot be used - see the explanation above.
The whole implementation is very simple with using the Eneter framework:
package net.client;
import eneter.messaging.diagnostic.EneterTrace;
import eneter.messaging.endpoints.typedmessages.*;
import eneter.messaging.messagingsystems.messagingsystembase.*;
import eneter.messaging.messagingsystems.tcpmessagingsystem.TcpMessagingSystemFactory;
import eneter.net.system.EventHandler;
import android.app.Activity;
import android.os.Bundle;
import android.os.Handler;
import android.view.View;
import android.view.View.OnClickListener;
import android.widget.*;
public class AndroidNetCommunicationClientActivity extends Activity
{
public static class MyRequest
{
public String Text;
}
public static class MyResponse
{
public int Length;
}
private Handler myRefresh = new Handler();
private EditText myMessageTextEditText;
private EditText myResponseEditText;
private Button mySendRequestBtn;
private IDuplexTypedMessageSender<MyResponse, MyRequest> mySender;
@Override
public void onCreate(Bundle savedInstanceState)
{
super.onCreate(savedInstanceState);
setContentView(R.layout.main);
myMessageTextEditText = (EditText) findViewById(R.id.messageTextEditText);
myResponseEditText = (EditText) findViewById(R.id.messageLengthEditText);
mySendRequestBtn = (Button) findViewById(R.id.sendRequestBtn);
mySendRequestBtn.setOnClickListener(myOnSendRequestClickHandler);
try
{
openConnection();
}
catch (Exception err)
{
EneterTrace.error("Open connection failed.", err);
}
}
@Override
public void onDestroy()
{
mySender.detachDuplexOutputChannel();
}
private void openConnection() throws Exception
{
IDuplexTypedMessagesFactory aSenderFactory =
new DuplexTypedMessagesFactory();
mySender = aSenderFactory.createDuplexTypedMessageSender(MyResponse.class, MyRequest.class);
mySender.responseReceived().subscribe(myOnResponseHandler);
IMessagingSystemFactory aMessaging = new TcpMessagingSystemFactory();
IDuplexOutputChannel anOutputChannel =
aMessaging.createDuplexOutputChannel("tcp://172.16.0.6:8060/");
mySender.attachDuplexOutputChannel(anOutputChannel);
}
private void onSendRequest(View v)
{
MyRequest aRequestMsg = new MyRequest();
aRequestMsg.Text = myMessageTextEditText.getText().toString();
try
{
mySender.sendRequestMessage(aRequestMsg);
}
catch (Exception err)
{
EneterTrace.error("Sending the message failed.", err);
}
}
private void onResponseReceived(Object sender, final TypedResponseReceivedEventArgs<MyResponse> e)
{
myRefresh.post(new Runnable()
{
@Override
public void run()
{
myResponseEditText.setText(Integer.toString(e.getResponseMessage().Length));
}
});
}
private EventHandler<TypedResponseReceivedEventArgs<MyResponse>> myOnResponseHandler
= new EventHandler<TypedResponseReceivedEventArgs<MyResponse>>()
{
@Override
public void onEvent(Object sender,
TypedResponseReceivedEventArgs<MyResponse> e)
{
onResponseReceived(sender, e);
}
};
private OnClickListener myOnSendRequestClickHandler = new OnClickListener()
{
@Override
public void onClick(View v)
{
onSendRequest(v);
}
};
}
.NET Service Application
The .NET service is a simple console application listening to TCP and receiving requests to calculate the length of a given text.
Since the IP address 127.0.0.1 (loopback) cannot be used, do not forget to set a real IP address the Android emulator (or real device) can use to reach the service application.
The implementation of the service is very simple:
using System;
using Eneter.Messaging.EndPoints.TypedMessages;
using Eneter.Messaging.MessagingSystems.MessagingSystemBase;
using Eneter.Messaging.MessagingSystems.TcpMessagingSystem;
namespace ServiceExample
{
public class MyRequest
{
public string Text { get; set; }
}
public class MyResponse
{
public int Length { get; set; }
}
class Program
{
private static IDuplexTypedMessageReceiver<MyResponse, MyRequest> myReceiver;
static void Main(string[] args)
{
IDuplexTypedMessagesFactory aReceiverFactory = new DuplexTypedMessagesFactory();
myReceiver = aReceiverFactory.CreateDuplexTypedMessageReceiver<MyResponse, MyRequest>();
myReceiver.MessageReceived += OnMessageReceived;
IMessagingSystemFactory aMessaging = new TcpMessagingSystemFactory();
IDuplexInputChannel anInputChannel =
aMessaging.CreateDuplexInputChannel("tcp://172.16.06:8060/");
myReceiver.AttachDuplexInputChannel(anInputChannel);
Console.WriteLine("The service is running. To stop press enter.");
Console.ReadLine();
myReceiver.DetachDuplexInputChannel();
}
private static void OnMessageReceived(object sender,
TypedRequestReceivedEventArgs<MyRequest> e)
{
Console.WriteLine("Received: " + e.RequestMessage.Text);
MyResponse aResponse = new MyResponse();
aResponse.Length = e.RequestMessage.Text.Length;
myReceiver.SendResponseMessage(e.ResponseReceiverId, aResponse);
}
}
}
And here are applications communicating together:

My programming path started in 1987 when I got my first computer Sharp MZ-800.
It came with 8 bit CPU Z80, 64Kb RAM and the tape recorder. It was a great machine. I think I still have it somewhere.
I was fascinated and I started to write first programs. Eventually I became developer and software architect. I like innovations and clean nice solutions.


