
Windows Phone 8 App Development - Part 2: Developing an App
5.00/5 (2 votes)
This article is Part 2 of the series of the article on Windows Phone 8 app developments - Quick Start-up guide with best practices.
This article is Part 2 of the series of articles on Windows Phone 8 app developments - Quick Start-up guide with best practices.
This whole series is in 3 parts:
- Part 1: Planning and Environment Setup
- Part 2: App Development, best design practices, and some challenges
- Part 3: Testing/QA of the App and the process of publishing it to store
In case you haven’t checked out Part 1, I strongly recommend you to go through it first. Now I will discuss about the real app development challenges and some of the best practices to follow which I experienced while developing my first Windows Phone 8 app.
Language Choice
This was one of the first confusions we had – whether to go with XAML/C# or HTML/JS. Although it depends on an individual's or team’s experience and liking, it seems that XAML/C# is clearly the most preferred choice for app development. I have listed down some of the reasons to choose one:
XAML/C#: Windows Ecosystem, High Performance (Native), Resolution Independence, Easier UI Binding, Better Object Oriented Programming, Stateful (persistent state), Integration with Expression Blend, Easier debugging, better community knowledge support (coming from earlier Windows 7 days).
Read more: Top 10 Reasons why I choose XAML over HTML5
HTML5/JS: Multi-Platform, Lesser learning curve, JavaScript language flexibility, Easier styling through CSS, Powerful query selection for elements, Better integration with Blend, Plugins.
Read more: Top 10 Reasons Why I Choose HTML5 Over XAML
If you are new to XAML, then I would strongly recommend you learn few basic concepts such as XAML markups, XAML Code behind, events, styles, behavior/triggers, binding (one time, one way, two-way, etc.)
Link: XAML Overview
App Templates
There are many app templates available for Win 8.

If you really don’t care about template type, then let’s create a new Project for “Windows Phone Databound App” template.
If need more help, follow this link to create your first app: How to create your first app for Windows Phone.
Design Considerations
The Windows phone application can be based on pure XAML or it can leverage the power of any MVVM framework. I always prefer to use MVVM framework with any XAML based application because of many advantages such as easy data binding or event handling, robust design with better SoC (Separation of Concerns), better testability, etc.
MVVM framework popular options: MVVMLight (Easy and very lightweight, good for Phone), Prism (More comprehensive and good for desktop or Windows store apps).
The recently released free MVVMLight has support for Windows Phone 8. MVVMLight has the following advantages:
- Very light weight (just around 50-60Kb in size)
- Inbuilt IoC (SimpleIoc)
- Decoupling of View Model by using publish/subscribe message based communication
- Relay Command: Less code behind.
In case you are new to MVVM pattern, please go through the following link to understand it. It is used almost in every XAML app. Few concepts such as view models, data context, command, property change events, etc. are used extensively.
Link: Using the MVVM Pattern in Windows 8
Adding MVVMLight to the XAML project: Right click the project and select ‘Manage NuGet Packages’. Search ‘mvvmlight’ and install ‘MVVM Light’ (Toolkit). It will add few files and folders. If you need further help, follow these instructions: How to install MVVM Light Toolkit for Windows Phone
IoC Implementation and Importance
The SimpleIoc is really a great addition in GalaSoft MVVMLight. In most of the scenarios, view models are singleton objects which can be easily managed by SimpleIoC and can be accessed anywhere in the application.
public class ViewModelLocator
{
  /// <summary>
  /// Initializes a new instance of the ViewModelLocator class.
  /// </summary>
  public ViewModelLocator()
  {
 ServiceLocator.SetLocatorProvider(() => SimpleIoc.Default);

 if (ViewModelBase.IsInDesignModeStatic)
 {
		// Create design time view services and models
		//SimpleIoc.Default.Register<IDataService>();
 }
 else
 {
		// Create run time view services and models
		SimpleIoc.Default.Register<IDataService>();
 }

 SimpleIoc.Default.Register<MainViewModel>();
  }

  public T GetInstance<t>()
  {
       return ServiceLocator.Current.GetInstance<t>();
  }

  public static void Cleanup()
  {
     // TODO Clear the ViewModels
  }
}
For easy access across application:
public static ViewModelLocator Locator
{
   get
   {
      if (_locator == null)
         _locator = new ViewModelLocator();

      return _locator;
   }
}
Async/Await Pattern
Asynchrony proves especially valuable for applications that access the UI thread because all UI-related activity usually shares one thread. Application can stop responding. Async/await is a Tasked-Based Asynchronous Pattern (TAP) which is much easier to implement than Event-based Asynchronous Pattern (EAP) which came in .NET 2.0. We can create an asynchronous method almost as easily as you create a synchronous method. Read more here: Asynchronous Programming with Async and Await.
async private void LoadItems(string query)
{
   var items = await _data.GetItems(query);

   var itemVMs = items.Select(i => new ItemViewModel
   { ID = i.ID, LineOne = i.LineOne, LineThree = i.LineThree, LineTwo = i.LineTwo });
   this.Items = new ObservableCollection<itemviewmodel>(itemVMs);
}
Navigation
Windows Phone supports frame based navigation. The hardware back button makes navigation behave differently than desktop applications. Navigation can be based on “Data Template”, where depending upon current view model, we can show view template registered with App resources. Data Template based navigation is quite common in WPF applications.
I suggest to use default frame based navigation. It is hassle free and provides automatic back navigation which is managed by the back stack.
NavigationService available through PhoneApplicationPage class (base class of every phone page).
// Navigate to the new page
NavigationService.Navigate(new Uri("/DetailsPage.xaml?selectedItem=" +
(MainLongListSelector.SelectedItem as ItemViewModel).ID, UriKind.Relative));
In case you need to handle hardware back button press differently, then follow this:
At App level in App.xaml.cs:
private void RootFrame_BackKeyPress(object sender, System.ComponentModel.CancelEventArgs e)
{
    //Some custom logic/ condition
    If (true)
        e.Cancel = true;
    else {}
}
Or in page:
protected override void OnBackKeyPress(CancelEventArgs e)
{
    if(MessageBox.Show("Are you sure you want to exit?","Exit?",
                       MessageBoxButton.OKCancel) != MessageBoxResult.OK)
    {
         e.Cancel = true;
    }
}
Phone Storage
User/App data can be stored in isolated phone storage. It would be good to add a utility class like AppSettings:
public class AppSettings
    {
        IsolatedStorageSettings settings;
        bool isDirty;
        public AppSettings()
        {
            //Get the settings for this application.
            settings = IsolatedStorageSettings.ApplicationSettings;
        }

        /// <summary>
        /// Update a setting value for our application. If the setting does not
        /// exist, then add the setting.
        /// </summary>
        /// <param name="Key">
        /// <param name="value">
        /// <returns></returns>
        public void AddOrUpdateValue(string Key, Object value)
        {
            if (settings.Contains(Key))
            {
                settings[Key] = value;
            }
            // Otherwise create the key.
            else
            {
                settings.Add(Key, value);
            }
            isDirty = true;
        }

        public bool ContainsKey(string key)
        {
            return settings.Contains(key);
        }

        /// <summary>
        /// Get the current value of the setting, or if it is not found, set the
        /// setting to the default setting.
        /// </summary>
        /// <typeparam name="T"></typeparam>
        /// <param name="Key">
        /// <param name="defaultValue">
        /// <returns></returns>
        public T GetValue<t>(string Key)
        {
            if (settings.Contains(Key))
            {
                return (T)settings[Key];
            }
            return default(T);
        }

        /// <summary>
        /// Save the settings to isolated storage.
        /// </summary>
        public void Save()
        {
            if (!isDirty)
                return;
            settings.Save();
            isDirty = false;
        }
    }
It can be added to App class as static field for easy access across application:
public static AppSettings Settings
{
    get
    {
        if (_settings == null)
            _settings = new AppSettings();
            return _settings;
    }
}
Windows Phone Toolkit
An important addition to the default App development ecosystem which has limited number of controls at our disposal. Toolkit has many useful components. To add this: Go to “Manage NuGet Package” and search “toolkit”. Install “Windows Phone Toolkit” from the available packages.
This toolkit has many new controls such as: AutoCompleteBox, ContextMenu, CustomMessageBox, DateTimeConverters, DateTimePickers, ExpanderView, ListPicker, LongListMultiSelector, Map extensions, RatingControl, ToggleSwitch, Navigation transitions.
Application Bar
It is an integral part of your app which enables easy navigation between pages. Add the following lines of code with required menu items or icons in any page where you want to provide navigation options.
<phone:phoneapplicationpage applicationbar="">
        <shell:applicationbar ismenuenabled="True" isvisible="True"
        mode="Minimized" opacity="0.85">
            <shell:applicationbariconbutton click="About_Click"
             iconuri="/Assets/Icons/questionmark.png" text="about">
            <shell:applicationbariconbutton click="Personalize_Click"
             iconuri="/Assets/Icons/feature.settings.png" text="personalize">
            <shell:applicationbar .menuitems="">
                <shell:applicationbarmenuitem click="Rate_Click" text="rate and review">
                <shell:applicationbarmenuitem text="MenuItem 2">
            </shell:applicationbarmenuitem></shell:applicationbarmenuitem></shell:applicationbar>
        </shell:applicationbariconbutton></shell:applicationbariconbutton></shell:applicationbar>
</phone:phoneapplicationpage>
App bar:
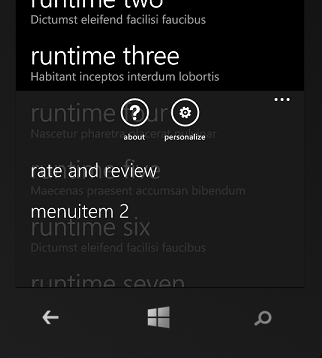
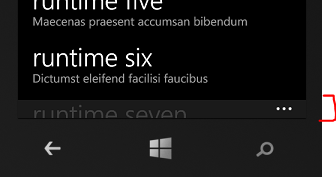
Menu items can be hidden by setting "IsMenuEnabled" flag to false. The app bar can be in minimized state by setting “Mode” as “Minimized”. Minimized app bar:
Phone Page Animated Transition
It is quite easy to implement by adding the following lines of code in page XAML. This is again possible because of toolkit. Even Effects such as SlideInEffect, TiltEffect and TurnstileFeatherEffect are possible through use of toolkit. For Page transition effect:
<toolkit:transitionservice>
 <toolkit:navigationintransition>
 <toolkit:navigationintransition>
		<toolkit:turnstiletransition mode="BackwardIn">
 </toolkit:turnstiletransition></toolkit:navigationintransition>
 <toolkit:navigationintransition>
		<toolkit:turnstiletransition mode="ForwardIn">
 </toolkit:turnstiletransition></toolkit:navigationintransition>
 </toolkit:navigationintransition>
</toolkit:transitionservice>
<toolkit:transitionservice>
 <toolkit:navigationouttransition>
 <toolkit:navigationouttransition>
		<toolkit:turnstiletransition mode="BackwardOut">
 </toolkit:turnstiletransition></toolkit:navigationouttransition>
 <toolkit:navigationouttransition>
 <toolkit:turnstiletransition mode="ForwardOut"></toolkit:turnstiletransition>
 </toolkit:navigationouttransition></toolkit:navigationouttransition></toolkit:transitionservice>
For more information. visit: http://www.codeproject.com/Articles/345129/Windows-Phone-7-Navigation-Transitions.
User Interface
The phone SDK provides some default theme and icons. It is highly recommended to use them as it matches the overall look and feel of phone. If needed, new theme can be added or existing theme styles can be extended. It is good practice to keep these new styles in App XAML or a separate file. Expression blend can be used to efficiently create new styles.
- SDK Path: C:\Program Files (x86)\Microsoft SDKs\Windows Phone\v8.0
- ICONs (Dark/Light): C:\Program Files (x86)\Microsoft SDKs\Windows Phone\v8.0\Icons
Adding custom styles at App level under:
<Application.Resources>
 <color x:key="GNForegroundColor">#FF000000</color>
 <color x:key="GNBackgroundColor">#FFFFFFFF</color>
 <color x:key="GNTextLightColor">#666666</color>

 <sys:double x:key="PivotHeaderFontSize">40</sys:double>
 <thickness x:key="GNPivotItemMargin">12,5,12,0</thickness>
 <solidcolorbrush x:key="GNBackgroundBrush" color="{StaticResource GNBackgroundColor}">
 <solidcolorbrush x:key="GNForegroundBrush" color="{StaticResource GNForegroundColor}">
 <style basedon="{StaticResource PhoneTextBlockBase}" targettype="TextBlock" x:key="GNTextStyle">
 <setter value="{StaticResource PhoneFontFamilyNormal}" property="FontFamily">
 <setter value="{StaticResource PhoneFontSizeMedium}" property="FontSize">
 <setter value="{StaticResource GNForegroundBrush}" property="Foreground">
 </style></Application.Resources>
Source Control
I used online Visual Studio as source control. It is just as easy to configure as we can do in our favorite TFS (Team Foundation Server). A valid Microsoft account is required to access online visual studio. License: The free version supports upto 5 users.
Link: http://www.visualstudio.com/ (Go to 'Visual Studio Online') Interface:

Source Code
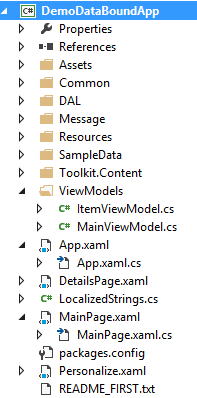
I have developed a Windows Phone 8 solution which includes most of the best practices discussed above such as MVVM, IoC/DI, Storage, app bar, transitions. It would be a great starting point for your application.
Source code location (github): https://github.com/manoj-kumar1/Win-Phone-8-Dev-Startup-Soln
Solution contains the following:
Next
In the next post - Part 3 of this article series, I will discuss about testing/QA of the developed application and the process of publishing it to Windows store.