
Step by Step Introduction to Microsoft SQL AZURE
4.24/5 (16 votes)
Step by step introduction to Microsoft SQL AZURE
Introduction
Though not very new nowadays, still many of us have just heard, some have started doing some R&D while some have championed them in Azure platform while the rest are unaware. Anyway, I recently made some beginners steps and wanted to share my experience in this article. In the next article, I will focus on many more stuff on SQL Azure.
Background
SQL Azure is a cloud based data service offered by Microsoft for data storage. It uses SQL Server as its database and uses T-SQL as its query language for data accessing purpose.
Purpose
The sole purpose of this article is not to give detailed information about SQL AZURE as many are available on the net. I would like to focus only on the steps, which I used for making this small experiment. Once again, it is intended for those who want to make a journey in this new field.
Let’s Make the Journey
Step 1
We need to request a CTP (community technology preview) account from Microsoft at this URL: Request a CTP.
Step 2
The SQL AZURE team will send the invitation via mail with details about the invitation code and some resources to get started with. There are some restrictions however like The CTP will limit to 1 SQL Azure server and 5 databases (I received like this).
Step 3
So, we need to go to https://sql.azure.com where we need to login by our Windows LiveID.
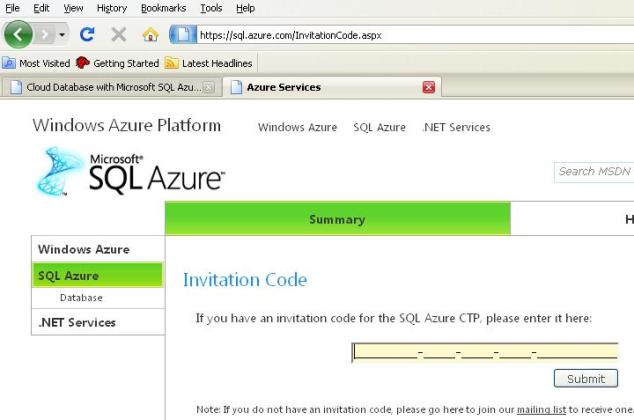
Step 4
After successful login, we will be asked to give the Invitation Code. Provide that and click on the Submit button.
Step 5
This will redirect to the Terms of Use page where after reading through the terms, click on the “I Accept “button.
Step 6
Next we will be presented with the CREATE SERVER PAGE.
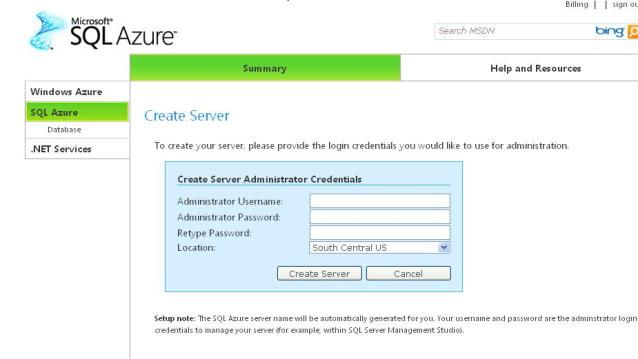
Step 7
After filling in the required fields, we need to click on the Create Server button. That will bring the My Project screen.
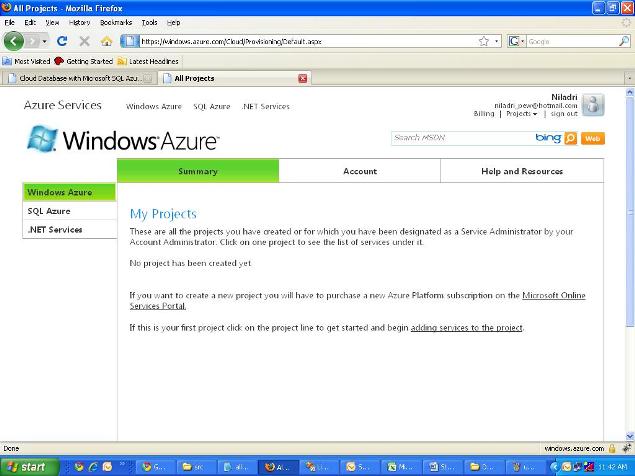
Step 8
We need to create some project. For that, let’s click on the SQL Azure link on the left.
Step 9
We will get a list of project details created so far. Click on the link.
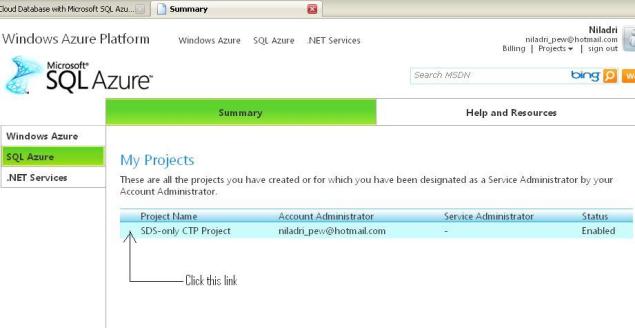
Step 10
That will lead to the Server Administration section.
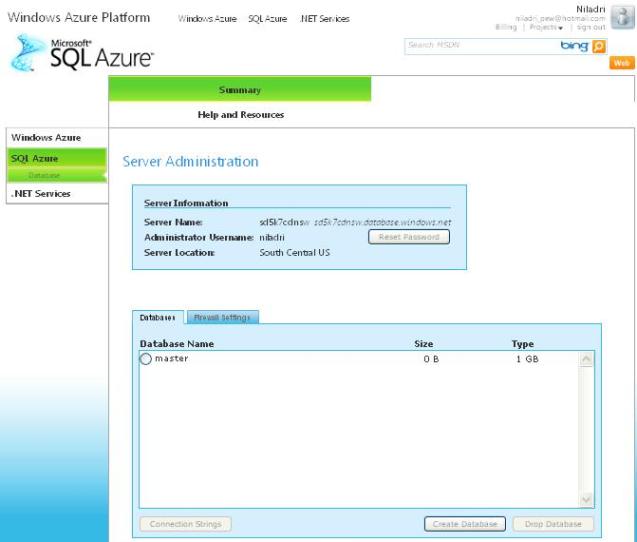
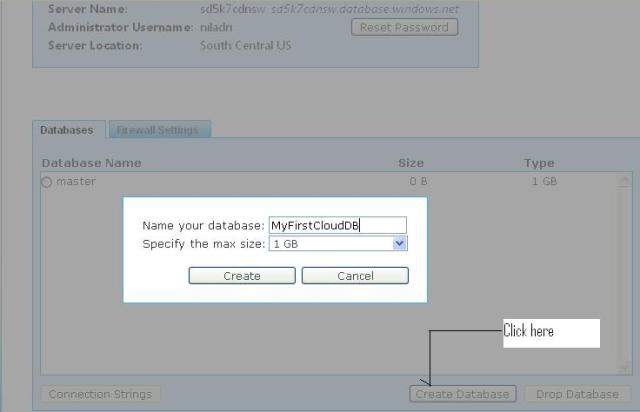
Step 11
Let’s create a database. Select the Database tab and click on the Create Database button. Let’s enter a database name, say “MyFirstCloudDB”. Click on create button.
Step 12
As can be seen, our database has been created with a size of 0 byte.
Step 13
Select our database and click on the Connection Strings button. We will receive both the ADO.NET & ODBC connection.
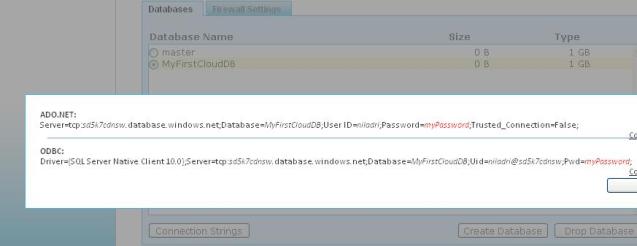
Currently, the database tasks that can be performed from the web tool are limited to only database creation and dropping.
Step 14
Go to the Firewall Settings Tab, click on the Add Rule Button and put a rule in to allow your IP address range.

If the Firewall Setting is not done properly, then you will receive the following error message:
Msg 40615, Level 14, State 1, Server <servername>, Line 1 Cannot open server

<'servername' >requested by the login. Client with IP address <some IP address>
is not allowed to access the server.

Msg 18456, Level 14, State 1, Server <servername>,
Line 1 Login failed for user <'username'.>
You can even edit and delete rules as per your discretion by clicking on the respective Edit Rule and Delete Rule buttons.
Step 15
Now I will describe the steps for basic CRUD operations to perform on our AZURE database through SSMS (Sql Server Management Studio):
- Open SSMS
- In the connection dialog box , click on the “Cancel” button
- Next, click on the "New Query" button of SSMS
- The connection dialog box will appear, where we need to enter
- Server Name
- Login
- Password
Now, we already obtain the Logging information from “Server Administration” page.
(Refer to step 13). That looks like the following:
"Provider=SQLNCLI10;Server=tcp:xx0x0xxxxx.database.windows.net;
Database= MyFirstCloudDB; ID=niladri; Password=myPassword;
Trusted_Connection=False;Encrypt=True;"
So we will enter the credentials accordingly.

Kindly note that the password is the Administrator Password and it is not ‘mypassword’ that is there in the connection string (Pic 9).
- Click on the Connect button and if the information is correctly entered, then a connection will be established with SQL Azure Database with a new query window open.
- The database list will be shown in the Available Databases section of SSMS.

-
Now say, you want to create an object (say a table in
MyFirstCloudDB). So when you chooseMyFirstCloudDBfrom the available databases section of SSMS, you will encounter an error message “The databaseMyFirstCloudDB" is not accessible”. -
In order to culminate that, follow the steps:
-
Log out
-
Again connect and this time Under Options->Connect to Database->Type
MyFirstCloudDBand then connect. -
Click the Connect Button:

Note: Sometime, even after successful connection, you may encounter the error message:
“Invalid object name 'sys.configurations'. (Microsoft SQL Server, Error: 208)”
In such a case too, you need to follow the same steps as mentioned in (h).
For more information on the last error message, you can refer to Invalid object name 'sys.configurations'. (.NET SqlClient Data Provider).
-
- Now let’s create a table in the MyFirstCloudDB
Let’s issue the below command and execute the query:
CREATE TABLE MYTESTTABLE(Field1 INT,Field2 VARCHAR(20))
INSERT INTO MYTESTTABLE SELECT 1,'Value1' UNION ALL SELECT 2, 'Value2'
You will encounter the following error:
Msg 40054, Level 16, State 1, Line 2

Tables without a clustered index are not supported in this version of SQL Server.
Please create a clustered index and try again.
This clearly indicates that we need to create a clustered index, i.e., a primary key column.
So, let's change our query to the following:
CREATE TABLE MYTESTTABLE(Field1 INT PRIMARY KEY,Field2 VARCHAR(20))
INSERT INTO MYTESTTABLE SELECT 1,'Value1' UNION ALL SELECT 2, 'Value2'
Issue a
selectcommand will give the below result:SELECT * FROM MYTESTTABLE Field1 Field2 1 Value1 2 Value2
Issue an
updatecommand and see the result:UPDATE MYTESTTABLE SET Field2 = 'New Value2' WHERE Field1 = 2 SELECT * FROM MYTESTTABLE Field1 Field2 1 Value1 2 New Value2
Issue a
deletecommand and see the result:DELETE FROM MYTESTTABLE WHERE Field1 = 2 SELECT * FROM MYTESTTABLE Field1 Field2 1 Value1
SQL Azure supports T-QL too. As an example, let's observe the below stored procedure.
Create Procedure dbo.Usp_GetRecords
AS
BEGIN
            -- SET NOCOUNT ON added to prevent extra result sets from
            -- interfering with SELECT statements.
            SET NOCOUNT ON;
    SELECT         Field1, Field2
            FROM MyTestTable
END
After running the stored proc, the output is as expected:
Field1 Field2
1          Value1
- Now let’s go to the Server Administration page of SQL Azure and refresh the page. Notice that the Database size has been changed to 16KB. This indicates that our table object is now in the cloud environment.

References
- SQL Azure
- Microsoft® SQL Azure™ Database
- Introduction to SQL Azure
- Getting started with SQL Azure
- Connecting to SQL Azure
- How to: Configure the SQL Azure Firewall
Conclusion
This is just the experience of my experiment with SQL Azure that I wanted to share. I would like to do more experiments on this and would like to share them with you all. Feedback will be highly appreciated.