Bonjour is also known as zero-configuration networking. Bonjour enables automatic discovery of computers, devices, and services on IP networks. Consider you walk to unfamiliar 4th floor in your corporate office. You need to print a document before going to a meeting. You use Bonjour to discover the printer nearby in that floor to print on-the-way to your meeting. Bonjour uses industry standard IP protocols to allow devices to automatically discover each other without the need to enter IP addresses or configure DNS servers. Specifically, Bonjour enables automatic IP address assignment without a DHCP server, name to address translation without a DNS server, and service discovery without a directory server. Bonjour is an open protocol which Apple has submitted to the IETF as part of the ongoing standards-creation process. To learn more, check out the Bonjour Protocol Specifications which detail the technologies that make up Link-Local and Wide-Area Bonjour.
Introduction
In past 20 years, computers gradually transitioned away from platform-specific protocols such as AppleTalk, IPX, and NetBIOS towards the Internet Protocol (IP). The majority of computers and other network devices all use TCP/IP for communication. In that transition, however, one piece of functionality was lost—the ability to add devices to a local network and then connect to those devices from computers and other devices on the network, all with little or no configuration.
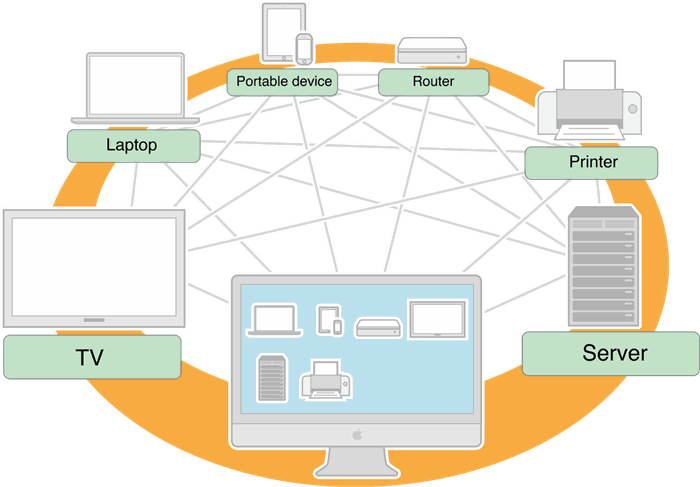
Fig1: Description of mDNS discovery of all available devices in network (from: developer.apple.com. See, Reference 1)
Consider printing using a standard printer. The moment a printer is configured in a user computer or device, it’s simply a matter of choosing an application’s Print command. For example, take your laptop to a client’s company, or a neighbor’s house, and try to print something. Your life will be super easy If they have a printer that supports Bonjour protocols. If Bonjour is supported, printing is just as easy as it was on your home network. To print, connect your laptop to your client’s Wi-Fi access point and start up your laptop. Then, your laptop automatically discovers any available printers. You open the document, click Print menu option. All available printer appears in the Print dialog. Select a printer, click Print, and the document prints. No configuration, search, find or any other complicated IT setup is required
Background
Bonjour is Apple’s concept for zero-configuration networking over IP. Bonjour comes out of the work of the ZEROCONF Working Group, part of the Internet Engineering Task Force (IETF). The ZEROCONF Working Group’s requirements and proposed solutions for zero-configuration networking over IP essentially cover three areas:
-
addressing (allocating IP addresses to hosts)
-
naming (using names to refer to hosts instead of IP addresses)
-
service discovery (finding services on the network automatically)
Bonjour has a zero-configuration solution for all three of these areas, as described in the following four sections.
Bonjour allows service providers, hardware manufacturers, and application programmers to support a single network protocol—IP—while breaking new ground in ease of use.
Network users no longer have to assign IP addresses, assign host names, or even type in names to access services on the network. Users simply ask to see what network services are available, and choose from the list.
In many ways, this kind of browsing is even more powerful for applications than for users. Applications can automatically detect services they need or other applications they can interact with, allowing automatic connection, communication, and data exchange, without requiring user intervention!
1. Open Quick demo application
2. Application detects all Bonjour compliant devices, services in your local network
3. Check for error and using tabs in application
 Fig 2: Well styled WPF application based on Telerik controls and using Zeroconf from git repo
Why WPF Application
When it comes to developing high-performance desktop applications, the choice between Windows Presentation Foundation (WPF) and Windows Forms (WinForms) is pivotal. WPF’s modern architecture, leveraging hardware acceleration and vector-based rendering, often results in smoother animations and graphics. Its resolution independence also shines on high DPI displays and touch which is the norm nowadays.
WinForms, in contrast, is often acknowledged as a lightweight and high-performance UI framework. Although it may not deliver the visual sophistication of WPF, Winforms excels in offering responsive user interfaces, even on less powerful hardware.
Both frameworks are performant, but WPF excels in achieving seamless animations and enhanced graphic quality.
Why Telerik WPF UI
- Build beautiful and high-performance WPF business applications with the Telerik UI for WPF components
- DPI independent and provide native 3D support
- Delivers 160+ controls to meet your app requirements for data handling, performance, UX, design, accessibility, and so much more
- Modern professional themes at finger tip
- Exceptional performance and user experience
- Intuitive API
- MVVM support
- Touch support
- Support for .Net core
MVVM Architecture
This project uses MVVM pattern. This pattern helps to cleanly separate business and presentation logic from user interface (UI). If someone wants to remove Telerik, it will be an easy task. Creating clean separation between application logic and the UI helps address numerous development issues that makes an application easier to test, maintain, and evolve. It also significantly improves code re-use. This helps developers and UI designers to collaborate more easily when developing respective parts of an app
Here are three core components in the MVVM pattern: the model, the view, and the view model. Each serves a distinct purpose. The diagram below shows the relationships between the three components.
Fig 3: Picture taken from learn.microsoft.com (see reference 3)
It is important to understand how each of these components interact. At high level, the view "knows about" the view model, and the view model "knows about" the model, but the model is unaware of the view model, and the view model is unaware of the view. Therefore, the view model isolates the view from the model, and allows the model to evolve independently of the view.
In this application, we have wpfDiscover.View (uses Telerik view for cool GUI experience), wpfDiscover.ViewModel and wpfDiscoverModel
Full source code and demo is available for download in links above at top of this page
The main window GUI (View layer code) look like below code. It uses Telerik GUI elements
<telerik:RadWindow Name="mainwWnd"
                   FontSize="14"
        xmlns="http://schemas.microsoft.com/winfx/2006/xaml/presentation"
        xmlns:x="http://schemas.microsoft.com/winfx/2006/xaml"
        xmlns:telerik="http://schemas.telerik.com/2008/xaml/presentation"
        xmlns:navigation="clr-namespace:Telerik.Windows.Controls.Navigation;assembly=Telerik.Windows.Controls.Navigation"
        xmlns:System="clr-namespace:System;assembly=mscorlib" xmlns:Chromes="clr-namespace:Telerik.Windows.Controls.Chromes;assembly=Telerik.Windows.Controls"
                   xmlns:Primitives="clr-namespace:Telerik.Windows.Controls.Primitives;assembly=Telerik.Windows.Controls.Navigation"
                   x:Class="wpfDiscover.DeviceDiscoveryMainWindow"
        xmlns:local="clr-namespace:wpfDiscoverViewModel;assembly=wpfDiscoverViewModel"
        navigation:RadWindowInteropHelper.ShowInTaskbar="True"
        Header="Discover Devices" Height="650" Width="1225" >
    <telerik:RadWindow.DataContext>
        <local:WpfDiscoverVM/>
    </telerik:RadWindow.DataContext>
------------------------------------------

----------code skipped for brevity---

------------------------------------------

</telerik:RadWindow>
The wpfDiscover.ViewModel (ViewModel layer) code looks like below
namespace wpfDiscoverViewModel
{
public class WpfDiscoverVM : INotifyPropertyChanged
{
#region Bound ICommand interfaces
public ICommand OnOffCommand { get; private set; }
public ICommand GetSelectedItemProp { get; private set; }
public ICommand ResetCommand { get; private set; }
#endregion // Bound ICommand interfaces
#region Bound properties
public ObservableCollection<DiscoveredDevice> DiscoveredDevices { get; private set; }
public string DeviceDetails { get; set; }
public DiscoveredDevice SelectedItem { get; set; }
public bool OnOffSwitch { get; set; }
public long TimeSpan { get; set; }
public int RetryCount { get; set; }
public int RetryInMs { get; set; }
public string ErrorDetails { get; set; }
public string ErrorPaneColor { get; set; }
-------------------------------------------------------------------
----------- code removed for brevity ---------------------------
--------------------------------------------------------------------
#endregion // Private Methods
}
}
The wpfDiscoverModel (Model layer) code is as below:
   public class WpfDiscoverModel : IObserver<DomainService>, INotifyPropertyChanged, IObserver<IZeroconfHost>
   {
       #region Private Members
       private static readonly NLog.Logger logger = NLog.LogManager.GetCurrentClassLogger();
       private Dictionary<string, DeviceDetails> discoveredDevices = new Dictionary<string, DeviceDetails>();
       private IObservable<DomainService> domainObserver;
       private IObservable<ServiceAnnouncement> serviceAnnouncement;
       private List<IDisposable> subDispose = new List<IDisposable>();
       private List<IObservable<IZeroconfHost>> zObservables = new List<IObservable<IZeroconfHost>>();
       private bool isShutDown = false;
       #endregion //  Private Members

       #region Private Consts
       private const int RETRY_COUNT = 2;
       private const int RETRY_DELAY_IN_MS = 2000;
       private const string SEPERATOR = " | ";
       private const string MANGLE = "@@";
       private const int DEFAULT_WAKE_TIME = 9000;
       private const int SECONDS_TO_MILLISECOND = 1000;
       #endregion // Private Consts

       #region Model Events
       public event PropertyChangedEventHandler PropertyChanged;
       public event Action<bool> StateChanged;
       public event Action<string> Error;
       public event Action<string> Unpublish;

 ---------- code removed for brevity

        internal void UnpublishDevice(string key)
        {
            Unpublish?.Invoke(key);
        }
        #endregion // Internal Members

    }
}
Points to remember
This project is done as a prototype or sample. So code brevity is traded for writing full fledged professional code. This allows anyone to learn the pattern, concept with ease instead of spending time to skip long error/exception handling, secure programming etc, If this technology/ article is useful for you, please do not forget to Vote!
Many thanks for taking time to read this article. I hope it is useful for anyone to grasp quick concept for their product development
History
V1.0 -- 5th May 2024 - First version
References
1. Bonjour Concepts (apple.com)
2. https://github.com/novotnyllc/Zeroconf
3. Model-View-ViewModel - .NET | Microsoft Learn
This member has not yet provided a Biography. Assume it's interesting and varied, and probably something to do with programming.


