Multiplayer Is Easy with Unity on Azure PlayFab Part 3: Setting Up a Multiplayer Server (Part 1)
0/5 (0 vote)
How to add to our game by setting up and building a Unity game project as a backend server
In the first two articles of this six-part series, we’ve learned how straightforward it is to create a game from a Unity template and link it to our Azure PlayFab account, then add account creation and login capabilities. In this article, we'll add to our game by setting up and building a Unity game project as a backend server. We’ll use this backend with PlayFab Multiplayer Services so we can host it on the cloud and scale to meet player demand.
We'll add the PlayFab Game Server SDK (GSDK) to our Unity game project, add script code to start and handle server events such as players joining and leaving, then build the project as a GUI-free server-only executable. Let’s continue with our Unity game project from the previous article and turn it into server code that our game can connect to for multiplayer matches.
Requirements
To follow along with this guide, you’ll need your free PlayFab account and this software installed on your computer:
This article builds on the Unity game project from the previous guide that we've configured with Azure PlayFab. You should review the first two articles of this series before continuing with this tutorial. To see the complete tutorial in action, review the full project code.
Adding the PlayFab GSDK to Unity
The Unity GSDK is PlayFab’s Game Server SDK. It enables us to turn a Unity Game project into a multiplayer server running on PlayFab’s scalable cloud instances. Each player’s game instance can connect to this server to enable the multiplayer experience.
To get started, download the GSDK repository.
Extract the files and open the UnityGsdk/Assets/PlayFabSdk folder in File Explorer.
To import the GSDK into the game, drag and drop the MultiplayerAgent folder into your Unity project’s Assets/PlayFabSDK folder. This action will add the agent code scripts.
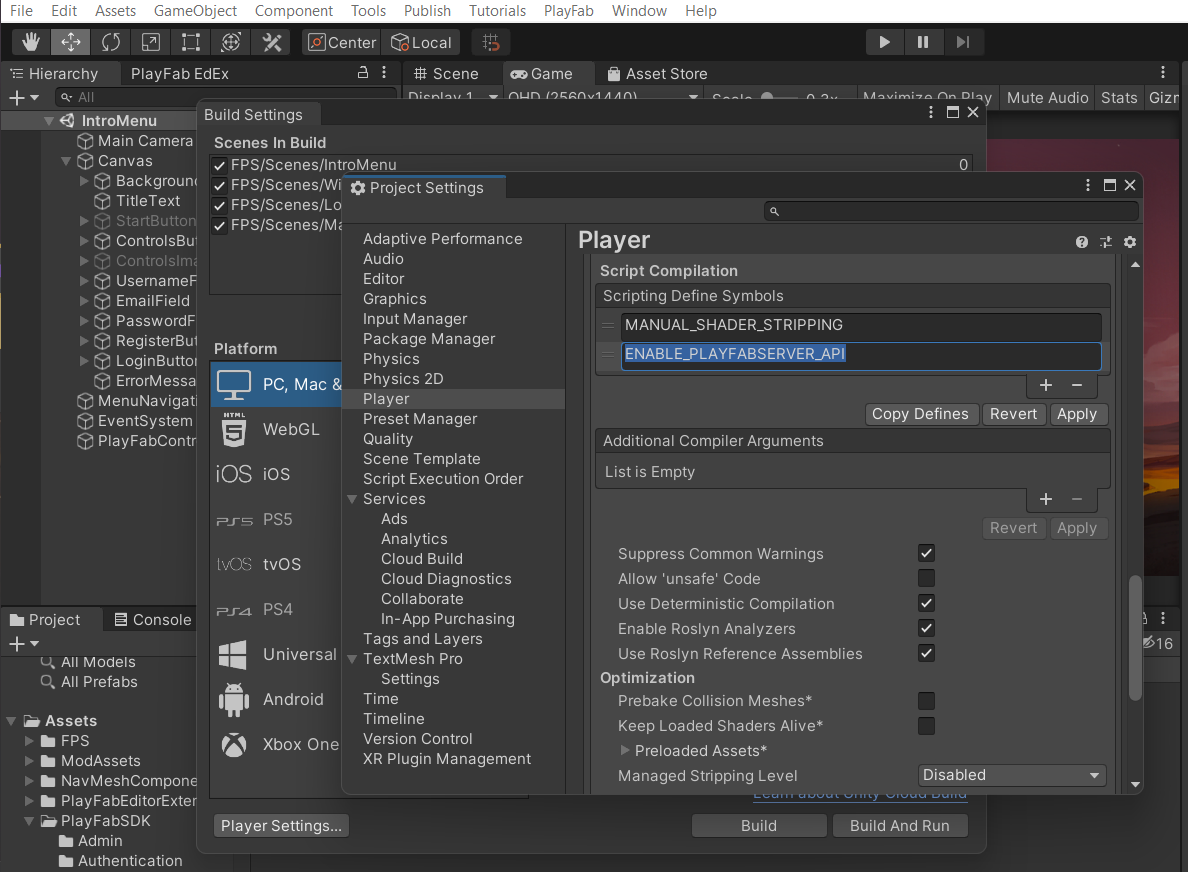
We also need to enable the PlayFab server functionality in the build by adding it to the settings. First, open File > Build Settings and click the Player Settings… button on the bottom left of the window. Then, add ENABLE_PLAYFABSERVER_API as a new Scripting Define Symbol and click Apply.
Creating the Server Script
You can now close the pop-up windows. Next, we'll add a script for the multiplayer server logic.
Create a new C# script under the Assets/Scripts folder where our new server code will go. Name the file, then double-click it to open in Visual Studio.
Add the following using statements at the top of the code:
using System;
using PlayFab;
using PlayFab.MultiplayerAgent.Model;
Next, let’s define a property for debug mode and a list to track the connected players inside the class:
private List<ConnectedPlayer> players;
public bool Debugging = true;
Then, we add multiple event handlers for the PlayFab server events based on the PlayFab multiplayer server agent sample code.
IEnumerator ReadyForPlayers()
{
    yield return new WaitForSeconds(.5f);
    PlayFabMultiplayerAgentAPI.ReadyForPlayers();
}

private void OnServerActive()
{
    Debug.Log("Server Started From Agent Activation");
}

private void OnPlayerRemoved(string playfabId)
{
    ConnectedPlayer player =
    players.Find(x => x.PlayerId.Equals(playfabId, StringComparison.OrdinalIgnoreCase));
    players.Remove(player);
    PlayFabMultiplayerAgentAPI.UpdateConnectedPlayers(players);
}

private void OnPlayerAdded(string playfabId)
{
    players.Add(new ConnectedPlayer(playfabId));
    PlayFabMultiplayerAgentAPI.UpdateConnectedPlayers(players);
}

private void OnAgentError(string error)
{
    Debug.Log(error);
}

private void OnShutdown()
{
    Debug.Log("Server is shutting down");
    StartCoroutine(Shutdown());
}

IEnumerator Shutdown()
{
    yield return new WaitForSeconds(5f);
    Application.Quit();
}

private void OnMaintenance(DateTime? NextScheduledMaintenanceUtc)
{
    Debug.LogFormat("Maintenance scheduled for: {0}",
                    NextScheduledMaintenanceUtc.Value.ToLongDateString());
}
Finally, update the Start() method as follows to allow the server to start up.
void Start()
{
    players = new List<ConnectedPlayer>();
    PlayFabMultiplayerAgentAPI.Start();
    PlayFabMultiplayerAgentAPI.IsDebugging = Debugging;
    PlayFabMultiplayerAgentAPI.OnMaintenanceCallback += OnMaintenance;
    PlayFabMultiplayerAgentAPI.OnShutDownCallback += OnShutdown;
    PlayFabMultiplayerAgentAPI.OnServerActiveCallback += OnServerActive;
    PlayFabMultiplayerAgentAPI.OnAgentErrorCallback += OnAgentError;

    StartCoroutine(ReadyForPlayers());
}
The full server script code should look like this:
using System.Collections;
using System.Collections.Generic;
using UnityEngine;
using System;
using PlayFab;
using PlayFab.MultiplayerAgent.Model;

public class Server : MonoBehaviour
{
    private List<ConnectedPlayer> players;
    public bool Debugging = true;

    IEnumerator ReadyForPlayers()
    {
        yield return new WaitForSeconds(.5f);
        PlayFabMultiplayerAgentAPI.ReadyForPlayers();
    }

    private void OnServerActive()
    {
        Debug.Log("Server Started From Agent Activation");
    }

    private void OnPlayerRemoved(string playfabId)
    {
        ConnectedPlayer player =
        players.Find(x => x.PlayerId.Equals(playfabId, StringComparison.OrdinalIgnoreCase));
        players.Remove(player);
        PlayFabMultiplayerAgentAPI.UpdateConnectedPlayers(players);
    }

    private void OnPlayerAdded(string playfabId)
    {
        players.Add(new ConnectedPlayer(playfabId));
        PlayFabMultiplayerAgentAPI.UpdateConnectedPlayers(players);
    }

    private void OnAgentError(string error)
    {
        Debug.Log(error);
    }

    private void OnShutdown()
    {
        Debug.Log("Server is shutting down");
        StartCoroutine(Shutdown());
    }

    IEnumerator Shutdown()
    {
        yield return new WaitForSeconds(5f);
        Application.Quit();
    }

    private void OnMaintenance(DateTime? NextScheduledMaintenanceUtc)
    {
        Debug.LogFormat("Maintenance scheduled for: {0}",
                        NextScheduledMaintenanceUtc.Value.ToLongDateString());
    }

    // Start is called before the first frame update
    void Start()
    {
        players = new List<ConnectedPlayer>();
        PlayFabMultiplayerAgentAPI.Start();
        PlayFabMultiplayerAgentAPI.IsDebugging = Debugging;
        PlayFabMultiplayerAgentAPI.OnMaintenanceCallback += OnMaintenance;
        PlayFabMultiplayerAgentAPI.OnShutDownCallback += OnShutdown;
        PlayFabMultiplayerAgentAPI.OnServerActiveCallback += OnServerActive;
        PlayFabMultiplayerAgentAPI.OnAgentErrorCallback += OnAgentError;

        StartCoroutine(ReadyForPlayers());
    }

    // Update is called once per frame
    void Update()
    {

    }
}
Building the Project into a Server Executable
While our server code doesn’t do much yet, we certainly don’t need it to include all the graphical user interface (GUI) and shader functionality that the game client has. So, we can build the project as a headless network server.
We do this by opening File > Build Settings, enabling the Server Build checkbox, and clicking Build. This action creates a non-graphical, server-only project version that we can upload to run on PlayFab’s virtual machines.
And that’s all for our multiplayer server code setup!
Next Steps
This time, we learned how to import the PlayFab Game Server SDK into a Unity project and lay the foundations for multiplayer server code. We then built the project into a server-only headless executable, ready for PlayFab.
Hop on over to the following article, where we'll turn this server code into simple server-side multiplayer gameplay action. We’ll then upload and deploy it to PlayFab through the dashboard.
To learn more about the latest roadmap updates for PlayFab, check out PlayFab Roadmap - PlayFab.


