HoH
Зміст
1. Кому це може бути цікаво
2. Що таке завантажувач
3. Будьте готові глибше
3.1. Отже, яку мову ви повинні знати, щоб розробити Boot Loader
3.2. Який компілятор вам потрібен
3.3. Як система завантажується
4. Кодуємо
4.1 Архітектура програми
4.2 Середовище розробки
4.3 Переривання BIOS і очищення екрана
4.4 «Змішаний код»
4.5 Реалізація CString
4.6 Реалізація CDisplay
4.7 Реалізація Types.h
4.8 Реалізація BootMain.cpp
4.9 Реалізація StartPoint.asm
5. Давайте все зберемо
5.1 Створення COM-файлу
5.2 Автоматизація збирання
6. Тестування та демонстрація
6.1 Як перевірити завантажувач.
6.2 Тестування за допомогою віртуальної машини VmWare
6.2.1 Створення віртуальної машини
6.2.2 Робота з Disk Explorer для NTFS
6.3 Тестування на реальному обладнанні
6.4 Налагодження
7. Джерела інформації
8. Висновок
Кому може бути цікаво
Most of all I’ve written this article for those who have been always interested in the way the different things work. It is for those developers who usually create their applications in high-level languages such as C, C++ or Java, but faced with the necessity to develop something at low-level. We will consider low-level programming on the example of working at system loading.
We will describe what is going after you turn on a computer; how the system is loading. As the practical example we will consider how you can develop your own boot loader which is actually the first point of the system booting process.
What is Boot Loader
Boot loader is a program situated at the first sector of the hard drive; and it is the sector where the boot starts from. BIOS automatically reads all content of the first sector to the memory just after the power is turned on, and jump to it. The first sector is also called Master Boot Record. Actually it is not obligatory for the first sector of the hard drive to boot something. This name has been formed historically because developers used to boot their operating systems with such mechanism.
Be ready to go deeper
In this section I will tell about knowledge and tools you need to develop your own boot loader and also remind some useful information about system boot.
So what language you should know to develop Boot Loader
On the first stage on the computer work the control of hardware is performed mainly by means of BIOS functions known as interrupts. The implementation of interrupts is given only in Assembler – so it is great if you know it at least a little bit. But it’s not the necessary condition. Why? We will use the technology of “mixed code” where it is possible to combine high-level constructions with low-level commands. It makes our task a little simpler.
In this article the main development languages is C++. But if you have brilliant knowledge of C then it will be easy to learn required C++ elements. In general even the C knowledge will be enough but then you will have to modify the source code of the examples that I will descried here.
If you know Java or C# well unfortunately it won’t help for our task. The matter is that the code of Java and C# languages that is produced after compilation is intermediate. The special virtual machine is used to process it (Java Machine for Java, and .NET for C#) which transform intermediate code into processor instructions. After that transformation it can be executed. Such architecture makes it impossible to use mixed code technology – and we are going to use it to make our life easier, so Java and C# don’t work here.
So to develop the simple boot loader you need to know C or C++ and also it would be good if you know something about Assembler – language into which all high-level code is transformed it the end.
What compiler you need
Щоб використовувати технологію змішаного коду, вам потрібні принаймні два компілятори: для Assembler і C/C++, а також компонувальник для об’єднання об’єктних файлів (.obj) в один виконуваний файл.
А тепер поговоримо про особливі моменти. Існує два режими роботи процесора: реальний режим і захищений режим. Реальний режим є 16-бітним і має деякі обмеження. Захищений режим 32-розрядний і повністю використовується в роботі ОС. При запуску процесор працює в 16-бітному режимі. Отже, щоб зібрати програму та отримати виконуваний файл, вам знадобляться компілятор і компонувальник Assembler для 16-розрядного режиму. Для C/C++ вам знадобиться лише компілятор, який може створювати об’єктні файли для 16-розрядного режиму.
Сучасні компілятори створені лише для 32-розрядних програм, тому ми не зможемо їх використовувати.
Я спробував кілька безкоштовних і комерційних компіляторів для 16-розрядного режиму та вибрав продукт Microsoft. Компілятор разом із компонувальником для Assembler, C, C++ входять до пакету Microsoft Visual Studio 1.52, а також їх можна завантажити з офіційного сайту компанії. Деякі подробиці про компілятори, які нам потрібні, наведені нижче.
ML 6.15 – компілятор асемблера від Microsoft для 16-розрядного режиму;
LINK 5.16 – компонувальник, який може створювати файли .com для 16-бітного режиму;
CL – С, С++ компілятор для 16-розрядного режиму.
Ви також можете використовувати кілька альтернативних варіантів:
DMC – безкоштовна компіляція для Assembler, C, C++ для 16 і 32-бітного режиму від Digital Mars;
LINK – безкоштовний компонувальник для компілятора DMC;
Є також деякі продукти Borland:
BCC 3.5 – С, С++ компілятор, який може створювати файли для 16-бітного режиму;
TASM - компілятор асемблера для 16-розрядного режиму;
TLINK – компонувальник, який може створювати файли .com для 16-бітного режиму.
Усі приклади коду в цій статті створено за допомогою інструментів Microsoft.
Для того, щоб вирішити нашу задачу, нам слід згадати, як відбувається завантаження системи.
Коротко розглянемо, як взаємодіють компоненти системи під час завантаження системи (див. рис.1).
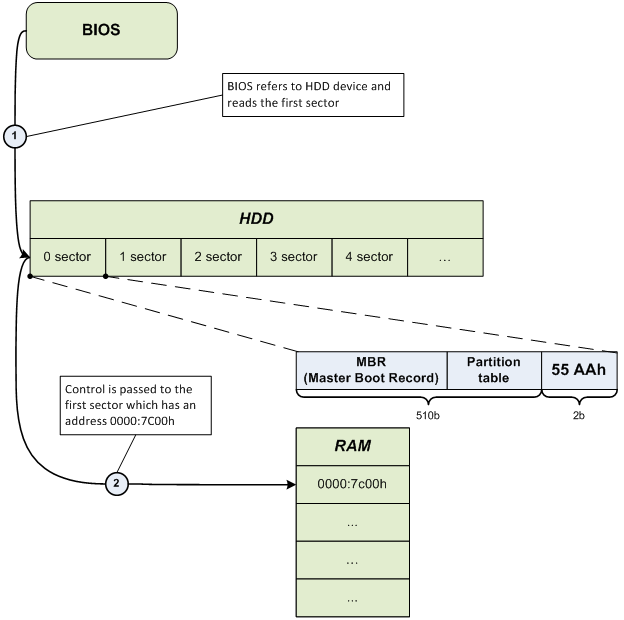
Рис.1 – «Як це завантажується»
Після того, як управління було передано на адресу 0000:7C00, Master Boot Record (MBR) починає свою роботу і запускає завантаження операційної системи. Ви можете дізнатися більше про структуру MBR, наприклад, тут .
Давайте кодувати
У наступних розділах ми безпосередньо займемося низькорівневим програмуванням – розробимо власний завантажувач.
Архітектура програми
Завантажувач, який ми розробляємо, призначений лише для навчання. Його завдання полягають лише в наступному:
- Коректне завантаження в пам'ять за адресою 0000:7C00.
- Виклик
BootMainфункції, розробленої мовою високого рівня. - Показати на дисплеї повідомлення «Hello, world…» з низького рівня.
Архітектура програми описана на рис.2, після чого йде текстовий опис.

Рис.2. – Опис архітектури програми
The first entity is StartPoint that is developed purely in Assembler as far as high-level languages don’t have the necessary instructions. It tells compiler what memory model should be used, and what address the loading to the RAM should be performed by after the reading from the disk. It also corrects processor registers and passes control to the BootMain that is written in high-level language.
Next entity– BootMain – is an analogue of main that is in its turn the main function where all program functioning is concentrated.
CDisplay and CString classes take care of functional part of the program and show message on the screen. As you can see from the Fig.2 CDisplay class uses CStringclass in its work.
Development environment
Here I use the standard development environment Microsoft Visual Studio 2005 or 2008. You can use any other tools but I made sure that these two with some settings made the compiling and work easy and handy.
First we should create the project of Makefile Project type where the main work will be performed (see Fig.3).
File->New\Project->General\Makefile Project
Fig.3 – Create the project of Makefile type
BIOS interrupts and screen clearing
To show our message on the screen we should clear it first. We will use special BIOS interrupt for this purpose.
BIOS proposes a number of interrupts for the work with computer hardware such as video adapter, keyboard, disk system. Each interrupt has the following structure:
int [number_of_interrupt]
where number_of_interrupt is the number of interrupt
Each interrupt has the certain number of parameters that should be set before calling it. The ah processor register is always responsible for the number of function for the current interrupt, and the other registers are usually used for the other parameters of the current operation. Let’s see how the work of int 10h interrupt is performed in Assembler. We will use the 00 function that changes the video mode and clears screen:
mov al, 02h
mov ah, 00h
int 10h
We will consider only those interrupts and functions that will be used in our application. We will need:
int 10h, function 00h – performs changing of video mode and clears screen
int 10h, function 01h – sets the cursor type
int 10h, function 13h – shows the string on the screen
«Mixed code»
Compiler for C++ supports the inbuilt Assembler i.e. when writing code in igh-level language you can use also low level language. Assembler Instructions that are used in the high level code are also called asm insertions. They consist of the key word __asm and the block of the Assembler instructions in braces:
__asm ;  key word that shows the beginning of the asm insertion
  { ;  block beginning

  … ; some asm code
  } ;  end of the block
To demonstrate mixed code let’s use the previously mentioned Assembler code that performed the screen clearing and combine it with C++ code.
void ClearScreen()
{
 __asm
{
 mov al, 02h ; setting the graphical mode 80x25(text)
mov ah, 00h ; code  of function of changing video mode
int 10h   ; call interrupt
}
}
CString implementation
CString class is designed to work with strings. It includes Strlen() method that obtains pointer to the string as the parameter and returns the number of symbols in that string.
#ifndef __CSTRING__
#define __CSTRING__
#include "Types.h"
class CString
{
public:
static byte Strlen(
const char far* inStrSource
);
};
#endif // __CSTRING__
#include "CString.h"
byte CString::Strlen(
const char far* inStrSource
)
{
byte lenghtOfString = 0;
while(*inStrSource++ != '\0')
{
++lenghtOfString;
}
return lenghtOfString;
}
CDisplay implementation
CDisplay class is designed for the work with the screen. It includes several methods:
1) TextOut() – it prints the string on the screen.
2) ShowCursor() – it manages the cursor representation on the screen: show, hide.
3) ClearScreen() – it changes the video mode and thus clears screen.
#ifndef __CDISPLAY__
#define __CDISPLAY__
#define BLACK 0x0
#define BLUE 0x1
#define GREEN 0x2
#define CYAN 0x3
#define RED 0x4
#define MAGENTA 0x5
#define BROWN 0x6
#define GREY 0x7
#define DARK_GREY 0x8
#define LIGHT_BLUE 0x9
#define LIGHT_GREEN 0xA
#define LIGHT_CYAN 0xB
#define LIGHT_RED 0xC
#define LIGHT_MAGENTA 0xD
#define LIGHT_BROWN 0xE
#define WHITE 0xF
#include "Types.h"
#include "CString.h"
class CDisplay
{
public:
static void ClearScreen();
static void TextOut(
const char far* inStrSource,
byte inX = 0,
byte inY = 0,
byte inBackgroundColor = BLACK,
byte inTextColor = WHITE,
bool inUpdateCursor = false
);
static void ShowCursor(
bool inMode
);
};
#endif // __CDISPLAY__
#include "CDisplay.h"
void CDisplay::TextOut(
const char far* inStrSource,
byte inX,
byte inY,
byte inBackgroundColor,
byte inTextColor,
bool inUpdateCursor
)
{
byte textAttribute = ((inTextColor) | (inBackgroundColor << 4));
byte lengthOfString = CString::Strlen(inStrSource);
__asm
{
push bp
mov al, inUpdateCursor
xor bh, bh
mov bl, textAttribute
xor cx, cx
mov cl, lengthOfString
mov dh, inY
mov dl, inX
mov es, word ptr[inStrSource + 2]
mov bp, word ptr[inStrSource]
mov ah, 13h
int 10h
pop bp
}
}
void CDisplay::ClearScreen()
{
__asm
{
mov al, 02h
mov ah, 00h
int 10h
}
}
void CDisplay::ShowCursor(
bool inMode
)
{
byte flag = inMode ? 0 : 0x32;
__asm
{
mov ch, flag
mov cl, 0Ah
mov ah, 01h
int 10h
}
}
Types.h implementation
Types.h is the header file that includes definitions of the data types and macros.
#ifndef __TYPES__
#define __TYPES__
typedef unsigned char byte;
typedef unsigned short word;
typedef unsigned long dword;
typedef char bool;
#define true 0x1
#define false 0x0
#endif // __TYPES__
BootMain.cpp implementation
BootMain() is the main function of the program that is the first entry point (analogue of main()). Main work is performed here.
#include "CDisplay.h"
#define HELLO_STR "\"Hello, world…\", from low-level..."
extern "C" void BootMain()
{
CDisplay::ClearScreen();
CDisplay::ShowCursor(false);
CDisplay::TextOut(
HELLO_STR,
0,
0,
BLACK,
WHITE,
false
);
return;
}
StartPoint.asm implementation
.286
.model TINY
extrn _BootMain:near
.code
org 07c00h ; for BootSector
main:
jmp short start
nop
start:
cli
mov ax,cs
mov ds,ax
mov es,ax
mov ss,ax
mov bp,7c00h
mov sp,7c00h
sti
call _BootMain
ret
END main
Creation of COM file
Now when the code is developed we need to transform it to the file for the 16-bit OS. Such files are .com files. We can start each of compilers (for Assembler and C, C++) from the command line, transmit necessary parameters to them and obtain several object files as the result. Next we start linker to transform all .obj files to the one executable file with .com extension. It is working way but it’s not very easy.
Let’s automate the process. In order to do it we create .bat file and put commands with necessary parameters there. Fig.4 represents the full process of application assembling.
Fig.4 – Process of program compilation
Build.bat
Let’s put compilers and linker to the project directory. In the same directory we create .bat file and fill it accordingly to the example (you can use any directory name instead of VC152 where compilers and linker are situated):
.\VC152\CL.EXE /AT /G2 /Gs /Gx /c /Zl *.cpp
.\VC152\ML.EXE /AT /c *.asm
.\VC152\LINK.EXE /T /NOD StartPoint.obj bootmain.obj cdisplay.obj cstring.obj
del *.obj
As the final stage in this section we will describe the way how to turn Microsoft Visual Studio 2005, 2008 into the development environment with any compiler support. Go to the Project Properties: Project->Properties->Configuration Properties\General->Configuration Type.
Configuration Properties tab includes three items: General, Debugging, NMake. Go to NMake and set the path to the build.bat in the Build Command Line and Rebuild Command Line fields – Fig.5.
Fig.5 –NMake project settings
If everything is correct then you can compile in the common way pressing F7 or Ctrl + F7. At that all attendant information will be shown in the Output window. The main advantage here is not only the assembly automation but also navigation thru the code errors if they happen.
Testing and Demonstration
This section will tell how to see the created boot loader in action, perform testing and debug.
How to test boot loader
You can test boot loader on the real hardware or using specially designed for such purposes virtual machine – VmWare. Testing on the real hardware gives you more confidence that it works while testing on the virtual machine makes you confident that it just can work. Surely we can say that VmWare is great method for testing and debug. We will consider both methods.
First of all we need a tool to write our boot loader to the virtual or physical disk. As far as I know there a number of free and commercial, console and GUI applications. I used Disk Explorer for NTFS 3.66 (version for FAT that is named Disk Explorer for FAT) for work in Windows and Norton Disk Editor 2002 for work in MS-DOS.
I will describe only Disk Explorer for NTFS 3.66 because it is the simplest method and suits our purposes the most.
Testing with the virtual machine VmWare
Creation of the virtual machine
We will need VmWare program version 5.0, 6.0 or higher. To test boot loader we will create the new virtual machine with minimal disk size for example 1 Gb. We format it for NTFS file system. Now we need to map the formatted hard drive to VmWare as the virtual drive. To do it:
File->Map or Disconnect Virtual Disks...
After that the window appears. There you should click Map button. In the next appeared window you should set the path to the disk. Now you can also chose the letter for the disk- see Fig.6.
Fig.6 – Parameters of virtual disk mapping
Don’t forget to uncheck the “Open file in read-only mode (recommended)” checkbox. When checked it indicates that the disk should be opened in read-only mode and prevent all recording attempts to avoid data corruption.
After that we can work with the disk of virtual machine as with the usual Windows logical disk. Now we should use Disk Explorer for NTFS 3.66 and record boot loader by the physical offset 0.
Working with Disk Explorer for NTFS
After program starts we go to our disk (File->Drive). In the window appeared we go to the Logical Drives section and chose disk with the specified letter (in my case it is Z) – see Fig.7.
Fig.7 – choosing disk in Disk Explorer for NTFS
Now we use menu item View and As Hex command. It the appeared window we can see the information on the disk represented in the 16-bit view, divided by sectors and offsets. There are only 0s as soon as the disk is empty at the moment. You can see the first sector on the Fig.8.
Fig.8 – Sector 1 of the disk
Now we should write our boot loader program to this first sector. We set the marker to position 00 as it is shown on the Fig.8. To copy boot loader we use Edit menu item, Paste from file command. In the opened window we specify the path to the file and click Open. After that the content of the first sector should change and look like it’s shown on the Fig.9 – if you haven’t changed anything in the example code, of course.
You should also write signature 55AAh by the 1FE offset from the sector beginning. If you don’t do it BIOS will check the last two bytes, won’t find the mentioned signature and will consider this sector as not the boot one and won’t read it to the memory.
To switch to the edit mode press F2 and write the necessary numbers –55AAh signature. To leave edit mode press Esc.
Now we need to confirm data writing.
Fig.9 – Boot Sector appearance
To apply writing we go to Tools->Options. Window will appear; we go to the Mode item and chose the method of writing - Virtual Write and click Write button – Fig.10.
Fig.10 – Choosing writing method in Disk Explorer for NTFS
A great number of routine actions are finished at last and now you can see what we have been developing from the very beginning of this article. Let’s return to the VwWare to disconnect the virtual disk (File->Map or Disconnect Virtual Disks… and click Disconnect).
Let’s execute the virtual machine. We can see now how from the some depth, from the kingdom of machine codes and electrics the familiar string appears ““Hello, world…”, from low-level…” – see Fig.11.
Fig.11 – “Hello world…”
Testing on the real hardware
Testing on the real hardware is almost the same as on the virtual machine except the fact that if something doesn’t work you will need much more time to repair it than to create the new virtual machine. To test boot loader without the threat of existent data corruption (everything can happen), I propose to use flash drive, but first you should reboot your PC, enter BIOS and check if it supports boot from the flash drive. If it does than everything is ok. If it does not than you have to limit your testing to virtual machine test only.
The writing of boot loader to the flash disk in Disk Explorer for NTFS 3.66 is the same to the process for virtual machine. You just should choose the hard drive itself instead of its logical section to perform writing by the correct offset – see Fig.12.
Fig.12 – Choosing physical disk as the device
Debug
If something went wrong – and it usually happens – you need some tools to debug your boot loader. I should say at once that it is very complicated, tiring and time-eating process. You will have to grasp in the Assembler machine codes – so good knowledge of this language is required. Any way I give a list of tools for this purpose:
TD (Turbo Debugger) – great debugger for 16-bit real mode by Borland.
CodeView – good debugger for 16-bit mode by Microsoft.
D86 – good debugger for 16-bit real mode developed by Eric Isaacson – honored veteran of development for Intel processor in Assembler.
Bocsh – program-emulator of virtual machine that includes debugger of machine commands.
“Assembly Language for Intel-Based Computers” by Kip R. Irvine is the great book that gives good knowledge of inner structure of the computer and development in Assembler. You ca also find information about installation, configuration and work with the MASM 6.15 compiler.
This link will guide you to the BIOS interrupt list: http://en.wikipedia.org/wiki/BIOS_interrupt_call
Conclusion
У цій статті ми розглянули, що таке завантажувач, як працює BIOS і як взаємодіють системні компоненти при завантаженні системи. Практична частина дала інформацію про те, як розробити власний простий завантажувач. Ми продемонстрували технологію змішаного коду та процес автоматизації складання за допомогою Microsoft Visual Studio 2005, 2008.
Звичайно, це маленький шматочок у порівнянні з величезною темою низькорівневого програмування, але якщо ця стаття вас зацікавила – це чудово.
Більше прикладів і результатів досліджень дивіться на сайті Apriorit .
ApriorIT is a software research and development company specializing in cybersecurity and data management technology engineering. We work for a broad range of clients from Fortune 500 technology leaders to small innovative startups building unique solutions.
As Apriorit offers integrated research&development services for the software projects in such areas as endpoint security, network security, data security, embedded Systems, and virtualization, we have strong kernel and driver development skills, huge system programming expertise, and are reals fans of research projects.
Our specialty is reverse engineering, we apply it for security testing and security-related projects.
A separate department of Apriorit works on large-scale business SaaS solutions, handling tasks from business analysis, data architecture design, and web development to performance optimization and DevOps.
Official site: https://www.apriorit.com
Clutch profile: https://clutch.co/profile/apriorit
This member has not yet provided a Biography. Assume it's interesting and varied, and probably something to do with programming.


 General
  News
News  Suggestion
  Question
  Bug
Bug  Answer
  Joke
Joke  Praise
  Rant
Rant  Admin
Admin 


