
WCF service with Topshelf using as a host, log4net as logging tool and HTML as output
How to run a simple WCF service with Topshelf as a host plus several tips and tricks
Introduction
Recently, I had to find a simple way to show the data information in HTML format (taken from database) through the browser but I didn't want to create a web project and run it under IIS (and install IIS either). I found that using of WCF service could solve the problem especially if we had Topshelf service host running on the server. I tried to find some information on how to run WCF service under this host but without any success, so I'm writing this article hoping someone will avoid all the mistakes that I made. Also I used log4net to log events and transform the XML output into HTML.
Background
Topshelf is the service host that makes the process of installation and running of services very easy. You can get all the information here.
WCF web service gives the simple and easy-to-use way for getting data using HTTP protocol. You (or your program) can ask a WCF web service to show data taken from database or do something else. Bluntly speaking, you send the HTTP request and get some answer in JSON or XML format. For my goals, I don't like the XML format, I wanted HTML. See below for what I did.
Using the Code
Let's divide the whole task into several steps. They are:
- Create a WCF web service
- Add logging using log4net
- Prepare and deploy the project to the server
Prerequisites
You need some tools to be installed before you start:
- VisualStudio 2010
- .NET 4.0
- Topshelf installed on the server
- Download log4net
Let's start!
1. Create WCF Web Service
- Open VS2010 and create a new project - WCF Service Application.

- Delete the Service1.svc and IService1.cs created by default and add your WCF service into the project:

- Let's program! For this example, I don't want really to connect to database so we just create the local object and will work with it. Firstly create the test object class, let it be about a
person:public class Person { public string FirstName { get; set; } public string LastName { get; set; } public string BirthYear { get; set; } public string Nickname { get; set; } public int Id { get; set; } }Open CoolService.cs, and create the constructor, here we create 2 instances of the
Personclass:public CoolService() { Person Jack = new Person() { FirstName = "Jack", LastName = "Nicolson", BirthYear = "1976", Nickname = "Goose", Id = 1 }; Person Jane = new Person() { FirstName = "Jane", LastName = "Corino", BirthYear = "1971", Nickname = "Mary Poppins", Id = 2 }; persons = new List<person>() { Jack, Jane }; }
We want to get the person information as HTML but the result could be XML or JSON, so try to transform our persons into XML and then into HTML.
Let's create the xslt that will help us to have the person information in pretty look. Right click on the project and select Add item... then select (Visual C# -> Data) XSLT File, rename it into Style and click Add. Add the following xslt code into it:
 <?xml version="1.0" encoding="utf-8"?>
<xsl:stylesheet version="1.0" xmlns:xsl="http://www.w3.org/1999/XSL/Transform"
    xmlns:msxsl="urn:schemas-microsoft-com:xslt" exclude-result-prefixes="msxsl">
  <xsl:output method="xml" indent="yes"/>
  <xsl:template match="/">
    <html>
      <head>
        <title>
          Person info
        </title>
        <style type="text/css">
          h1 {
          text-align: center;
          }
          h2
          {
          text-indent: 0px;
          }
          h3
          {
          text-indent: 20px;
          }

          body {
          font-family: Calibri;
          margin:0px;
          padding:0px;
          background: #fff;
          }
          td
          {
          padding: 5px;
          border:1px solid #A4B1BF;
          }
        </style>
      </head>
      <body>
        <xsl:apply-templates select="Person" />
      </body>
    </html>
  </xsl:template>

  <xsl:template match="Person">
    <h1>
      <xsl:value-of select="FirstName" /> - <xsl:value-of select="LastName" />
    </h1>
    <table class="report-table" cellpadding="0" cellspacing="0">
      <tr>
        <td>Birth year</td>
        <td>
          <xsl:value-of select="BirthYear" />
        </td>
      </tr>
      <tr>
        <td>Nick:</td>
        <td>
          <xsl:value-of select="Nickname" />
        </td>
      </tr>
    </table>
  </xsl:template>
</xsl:stylesheet>
It's pretty simple and doesn't require any explanations.
Now let's add this file into resource - in order to call it right from the code. Right click on the project and select Add item..., then select (in Visual C# -> General tab) Resource file that call Resource.resx. You will see the combobox at the left top corner, click it and select Files:

Drag the Style.xslt to any place and then you will be able to access this resource as a variable.
Include into the project the following namespaces:
using System.IO;
using System.Xml;
using System.Xml.Linq;
using System.Xml.Serialization;
using System.Xml.Xsl;
using System.Xml.XPath;
Rename DoWork() method into Stream GetPersonInfo(string id) (and don't forget to rename the corresponding interface). The following code does all the transformation that we need (add it into GetPersonInfo method):
StringReader reader = new StringReader(Resource.Style);
XmlReader xreader = XmlReader.Create(reader);
XslCompiledTransform xslt = new XslCompiledTransform(false);
xslt.Load(xreader);
XmlSerializer serializer = new XmlSerializer(typeof(Person));

XDocument doc = new XDocument();
using (XmlWriter writer = doc.CreateWriter())
{
    serializer.Serialize(writer, persons);
}

StringWriter outputWriter = new StringWriter();
xslt.Transform(doc.CreateNavigator(), null, outputWriter);
string htmlEmailText = outputWriter.ToString();
Everything is good but the problem is we need to return some data to the client and it can't be just a string because in this case the string will be encoded and result will be just set of encoded tags - it's a little bit different from what we really want (you can try if you want). So let's return Stream:
 System.Text.ASCIIEncoding encoding = new System.Text.ASCIIEncoding();
 MemoryStream stream = new MemoryStream(encoding.GetBytes(htmlEmailText));

 return stream;
Now we need to define the endpoints. Endpoint is the address that we will call when we need to ask our service to give us some information. In our case, the service CoolService is the endpoint. Add the following code into your Web.config file:
  <system.serviceModel>
    <behaviors>
      <serviceBehaviors>
        <behavior name="ServiceBehaviour">
          <serviceMetadata httpGetEnabled="true"/>
          <serviceDebug includeExceptionDetailInFaults="true"/>
        </behavior>
      </serviceBehaviors>
      <endpointBehaviors>
        <behavior name="web">
          <webHttp/>
        </behavior>
      </endpointBehaviors>
    </behaviors>

    <services>
      <service behaviorConfiguration="ServiceBehaviour" name="WcfTestService">
        <endpoint behaviorConfiguration="web" binding="webHttpBinding"
          contract="WcfTestService.ICoolService" address="" />
      </service>
    </services>

    <serviceHostingEnvironment multipleSiteBindingsEnabled="false" />
  </system.serviceModel>
You can see we use webHttpBinging because we want to call our service through browser. But what we also need to do is to add some information to our interface, so add the following code right behind the [OperationContract] attribute of your GetPersonInfo:
[WebGet(UriTemplate = "/id/{id}", ResponseFormat = WebMessageFormat.Xml)]
If means firstly that we will call our service using this template "/id/{id}" for getting information about the person by id and then only this format will be recognized, and secondly that the output will be in XML format. So if we want to get the information about a specific person, we need to specify the "id" parameter into the method (what we have already done).
Now we need to create some "entry point" for the topshelf. You can find all the information on the site, here I just show you what exactly you should do. Create a new class, call it CoolServiceBootstrapper.cs, then add the following namespaces:
using System;
using System.Collections.Generic;
using System.Linq;
using System.Web;
using Topshelf;
using Topshelf.Shelving;
using System.ServiceModel;
using System.ServiceModel.Description;
using System.ServiceModel.Web;
using log4net;
Inherit the class from Bootstrapper<WebServiceHost>, the final version of this class is:
  public class CoolServiceBootstrapper : Bootstrapper<WebServiceHost>
    {
        private ILog log4netLogger = LogManager.GetLogger(typeof(CoolServiceBootstrapper));
        public static WebServiceHost webService = null;
        public void InitializeHostedService
	(Topshelf.Configuration.Dsl.IServiceConfigurator<WebServiceHost> cfg)
        {
            log4net.Config.XmlConfigurator.Configure();
            cfg.Named("WcfTestService.CoolService");
            cfg.HowToBuildService(n =>
            {
                if (webService != null)
                {
                    webService.Close();
                }
                webService = new WebServiceHost(typeof(CoolService));

                log4netLogger.Info("Test cool service created");
                log4netLogger.Info("Test cool service endpoint: " +
		webService.Description.Endpoints.Select
                (e => e.ListenUri.ToString()).Aggregate((e, ne) => e + ", " + ne));

                return webService;
            });
            cfg.WhenStarted(s =>
            {
                s.Open();
                log4netLogger.Info("Test cool service started");
            });
            cfg.WhenStopped(s =>
            {
                s.Close();
                s = null;
            });
        }
    }
As you can see here, there are kind of pointers for topshelf, what to do when on init, start and stop. Also we add some logging functionality to make sure that everything works good.
2. Add logging using log4net
Ok, now we want to add some logging. Because services are invisible and we always want to know what's going on even if we don't see screen like in "Matrix" 
Ok, I think you already downloaded the log4net lib and unpacked it. Just copy the DLL into the working folder, add reference and add namespace using log4net; into your code.
Then create the private variable like that:
private ILog log4netLogger = LogManager.GetLogger(typeof(CoolService));
Then you can start logging. For example, you can log the data taken out of the database:
log4netLogger.Info("Persons count is " + persons.Count);
But how does the logging engine know where to save this log? It's pretty easy - just add this information into your Web.config (configSection - if you don't have this section, create it):
  <section name="log4net" type="log4net.Config.Log4NetConfigurationSectionHandler,
log4net" requirePermission="false"/>
Here, you just defined the section, but we need to actually add it into config file:
    <log4net>

    <appender name="LogFileAppender"
          type="log4net.Appender.RollingFileAppender" >
        <param name="AppendToFile"
             value="true" />
        <file type="log4net.Util.PatternString" value="..\..\log\Topshelf.Host.%appdomain.log" />
        <rollingStyle value="Size" />
        <maxSizeRollBackups value="4" />
        <maximumFileSize value="10MB" />
        <staticLogFileName value="true" />
        <layout type="log4net.Layout.PatternLayout">
            <param name="ConversionPattern"
                 value="%-5p %d{yyyy-MM-dd hh:mm:ss} - %m%n" />
        </layout>
    </appender>
    <root>
      <level value="INFO" />
      <appender-ref ref="LogFileAppender" />
    </root>
  </log4net>
As you can see, "file" string describes the file name. It supposes that your service is put 2 layers deeper than the service is in. As soon as the service starts working, the topshelf creates the file with service's name. I tried to define the log file into the service's folder but it didn't work. What I had was the exception that TopShelf tried to access the log file whereas it's been opened by another program. Using of this file name solved this issue.
3. Prepare and deploy the project to the server
So, now we are almost ready to deploy our service and see how it's working... but wait, how does the TopShelf know what to run? If you read something about TopShelf, you know now that it has the great feature called "Shelving". It means that TopShelf goes through all the services found in its Services directory, reads config files and runs the specific code that could be found into the class inherited from Bootstrapper class (you can read how it actually works here and here).
So now I think you already have TopShelf installed and running (if not, download topshelf binaries, unpack them, read "Using Shelving.txt" file and do what it tells). What you need to do is to create a new folder for your service and put it into Topshelf/Services/ folder. Then you need to copy all your files here - in our case, it will be log4net.dll, Topshelf.dll and WcfTestService.dll. Also, you need to copy Web.config file.
The next step is preparing of config file for Topshelf. Probably you know that topshelf crawls all the folders and looks for the config file with the same name. For example, if your folder's name is TestService, the config file should have the TestService.config name. This config file contains the additional information - which DLL should be run and how to run it, etc. Just copy web.config into the same folder and rename. This file will be used by Topshelf itself as a service host.
It's necessarily to add information for Topshelf:
<section name="ShelfConfiguration" type="Topshelf.Shelving.ShelfConfiguration, TopShelf" />
and the section itself:
<ShelfConfiguration Bootstrapper="WcfTestService.CoolServiceBootstrapper, WcfTestService" />
Please, make sure that you use the proper data: the Boostrapper value should be in the format "<Bootstrapper class name>, <Assembly name>".
Then you need to update the serviceModel section.
The main difference with the Web.config is that we specify the address of our web service explicitly:
Web.config:
  <system.web>
    <compilation debug="true" targetFramework="4.0" />
  </system.web>
  <system.serviceModel>
    <behaviors>
      <serviceBehaviors>
        <behavior name="ServiceBehaviour">
          <serviceMetadata httpGetEnabled="true"/>
          <serviceDebug includeExceptionDetailInFaults="true"/>
        </behavior>
      </serviceBehaviors>
      <endpointBehaviors>
        <behavior name="web">
          <webHttp/>
        </behavior>
      </endpointBehaviors>
    </behaviors>

    <services>
      <service behaviorConfiguration="ServiceBehaviour" name="WcfTestService.CoolService">
        <endpoint behaviorConfiguration="web" binding="webHttpBinding"
          contract="WcfTestService.ICoolService" address="" />
      </service>
    </services>

    <serviceHostingEnvironment multipleSiteBindingsEnabled="false" />
  </system.serviceModel>
Testservice.config
    <system.web>
    <compilation debug="true" targetFramework="4.0" />
  </system.web>
 <system.serviceModel>
    <behaviors>
      <serviceBehaviors>
        <behavior name="ServiceBehaviour">
          <serviceMetadata httpGetEnabled="true"
        httpGetUrl="http://localhost/testservice/"/>
          <serviceDebug includeExceptionDetailInFaults="false"/>
        </behavior>
      </serviceBehaviors>
      <endpointBehaviors>
        <behavior name="web">
          <webHttp/>
        </behavior>
      </endpointBehaviors>

    </behaviors>

    <services>
      <service behaviorConfiguration="ServiceBehaviour" name="WcfTestService.CoolService">
    <endpoint  behaviorConfiguration="web" binding="webHttpBinding"
          contract="WcfTestService.ICoolService"
	address="http://localhost/testservice/CoolService.svc" />
      </service>
    </services>

    <serviceHostingEnvironment multipleSiteBindingsEnabled="true" />
  </system.serviceModel>
After you copy files, restart the Topshelf. From my understanding, it should catch the changes automatically but for some reason it doesn't work always. So I prefer manual restarting. Go to Control Panel\System and Security\Administrative Tools\Services, find Topshelf, right click and select Restart.
To make sure that Topshelf can see your service, go to Topshelf/log/Topshelf.Host.Topshelf.Host.exe.log.
There is the whole information how Topshelf works with hosted services. If everything is okay, here in log folder, you will find the log created by our service named Topshelf.Host.TestService.log.
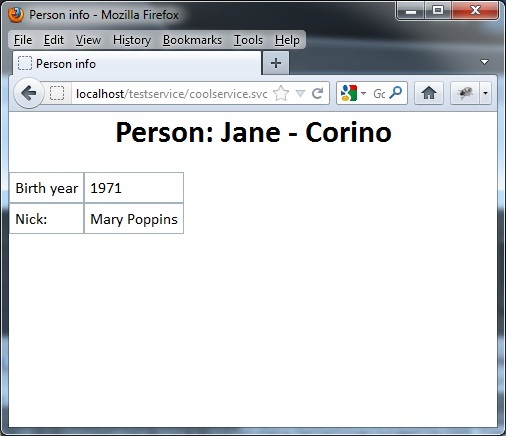
Now we are ready to test how our service works. Open your favorite browser and print in the address field: http://localhost/testservice/coolservice.svc/id/1.
If everything works, you should see something like this:
And if we look into the log file, we will see something like this:
INFO  2012-04-11 06:09:38 - Topshelf v2.2.2.0, .NET Framework v4.0.30319.261
INFO  2012-04-11 06:09:40 - Test cool service created
INFO  2012-04-11 06:09:40 - Test cool service endpoint: http://localhost/testservice/CoolService.svc
INFO  2012-04-11 06:09:40 - [TestService] Create complete
INFO  2012-04-11 06:09:40 - <testservice> Created
INFO  2012-04-11 06:09:40 - <testservice> Starting
INFO  2012-04-11 06:09:40 - Test cool service started
INFO  2012-04-11 06:09:40 - [TestService] Start complete
INFO  2012-04-11 06:09:40 - <testservice> Running
INFO  2012-04-11 06:10:15 - Persons count is 2