
Using OpenGL in a WPF Application
Use OpenGL in a WPF application with ease!
- Download SharpGL binaries - 134.88 KB
- Download example application - 128.84 KB
- Download source code - 9.14 KB
Introduction
In this article, I am going to show you the steps of how to use OpenGL to render directly into a WPF control - without any kind of fudging of window handles or WinFormsHost objects.
The first thing we'll do is create a project that does some OpenGL rendering. Following that, I'll describe the internals of how this is actually done under the hood - so if you just want to get cracking with OpenGL, you only need to read the first part of the article.
Beta Note: This article uses the SharpGL 2.0 Beta 1 release - it's a beta release so may be changed slightly by the time the full release is available.
Part 1: OpenGL Rendering in WPF
This is going to be really straightforward - the first thing to do is grab the latest version of SharpGL. SharpGL is a CLR wrapper to the OpenGL library - it supports hardware acceleration and has all core functions and extensions all the way up to the latest version of OpenGL, OpenGL 4.2.
Get the core binaries from the CodePlex downloads page. Here's the download page, you'll need the core binaries:
Or if you prefer, the core binaries can be downloaded from the link at the top of the article.
Getting Started
Create a new WPF application, called WPFOpenGL. Now add the SharpGL and SharpGL.WPF assemblies that you have downloaded as references.
SharpGL.dll contains the core OpenGL functionality. SharpGL.WPF contains a control specifically designed for your WPF applications. There is also a SharpGL.WinForms assembly that has a similar control for Windows Forms applications.
Using the OpenGLControl
At the top of the MainWindow.xaml file, add a reference to the SharpGL.WPF assembly:
<Window x:Class="WPFOpenGL.MainWindow"
        xmlns="http://schemas.microsoft.com/winfx/2006/xaml/presentation"
        xmlns:x="http://schemas.microsoft.com/winfx/2006/xaml"
        xmlns:sharpGL="clr-namespace:SharpGL.WPF;assembly=SharpGL.WPF"
        Title="MainWindow" Height="350" Width="525">
    <Grid>

    </Grid>
</Window>
All we're going to do now is add an OpenGL control as a child of the grid:
<Grid>
    <sharpGL:OpenGLControl />
</Grid>
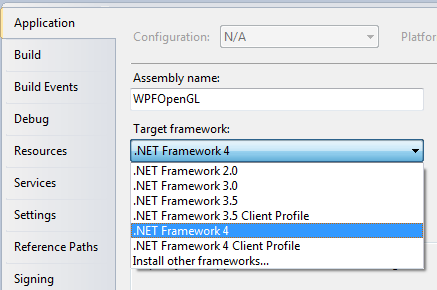
Now try running the application - you'll get at least one error complaining about a missing reference to System.Design. You must make sure you re-target your application to the .NET Framework 4.0 NOT the .NET Framework 4.0 Client Profile:
Once you have re-targeted the application, it will run up fine, but not show anything!
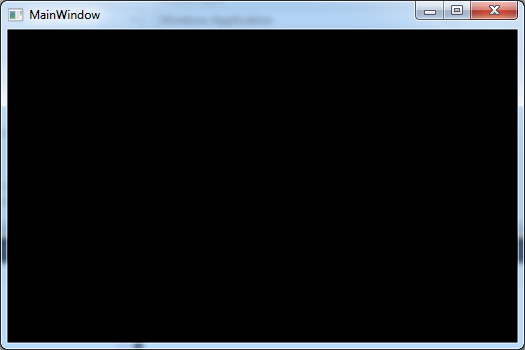
That's because we haven't actually done any rendering. Let's move onto that now.
Rendering with OpenGL
Go to the XAML that defines the OpenGL control, type in OpenGLDraw and press tab twice - this'll create the OpenGL Draw function:
<sharpGL:OpenGLControl OpenGLDraw="OpenGLControl_OpenGLDraw" />
private void OpenGLControl_OpenGLDraw(object sender, SharpGL.OpenGLEventArgs args)
{
}
The following section of code looks a bit large, but is fairly basic - we're just providing the geometry and colours for a pyramid and a cube:
private void OpenGLControl_OpenGLDraw(object sender, SharpGL.OpenGLEventArgs args)
{
    //  Get the OpenGL instance that's been passed to us.
    OpenGL gl = args.OpenGL;

    //  Clear the color and depth buffers.
    gl.Clear(OpenGL.GL_COLOR_BUFFER_BIT | OpenGL.GL_DEPTH_BUFFER_BIT);

    //  Reset the modelview matrix.
    gl.LoadIdentity();

    //  Move the geometry into a fairly central position.
    gl.Translate(-1.5f, 0.0f, -6.0f);

    //  Draw a pyramid. First, rotate the modelview matrix.
    gl.Rotate(rotatePyramid, 0.0f, 1.0f, 0.0f);

    //  Start drawing triangles.
    gl.Begin(OpenGL.GL_TRIANGLES);

        gl.Color(1.0f, 0.0f, 0.0f);
        gl.Vertex(0.0f, 1.0f, 0.0f);
        gl.Color(0.0f, 1.0f, 0.0f);
        gl.Vertex(-1.0f, -1.0f, 1.0f);
        gl.Color(0.0f, 0.0f, 1.0f);
        gl.Vertex(1.0f, -1.0f, 1.0f);

        gl.Color(1.0f, 0.0f, 0.0f);
        gl.Vertex(0.0f, 1.0f, 0.0f);
        gl.Color(0.0f, 0.0f, 1.0f);
        gl.Vertex(1.0f, -1.0f, 1.0f);
        gl.Color(0.0f, 1.0f, 0.0f);
        gl.Vertex(1.0f, -1.0f, -1.0f);

        gl.Color(1.0f, 0.0f, 0.0f);
        gl.Vertex(0.0f, 1.0f, 0.0f);
        gl.Color(0.0f, 1.0f, 0.0f);
        gl.Vertex(1.0f, -1.0f, -1.0f);
        gl.Color(0.0f, 0.0f, 1.0f);
        gl.Vertex(-1.0f, -1.0f, -1.0f);

        gl.Color(1.0f, 0.0f, 0.0f);
        gl.Vertex(0.0f, 1.0f, 0.0f);
        gl.Color(0.0f, 0.0f, 1.0f);
        gl.Vertex(-1.0f, -1.0f, -1.0f);
        gl.Color(0.0f, 1.0f, 0.0f);
        gl.Vertex(-1.0f, -1.0f, 1.0f);

    gl.End();

    //  Reset the modelview.
    gl.LoadIdentity();

    //  Move into a more central position.
    gl.Translate(1.5f, 0.0f, -7.0f);

    //  Rotate the cube.
    gl.Rotate(rquad, 1.0f, 1.0f, 1.0f);

    //  Provide the cube colors and geometry.
    gl.Begin(OpenGL.GL_QUADS);

        gl.Color(0.0f, 1.0f, 0.0f);
        gl.Vertex(1.0f, 1.0f, -1.0f);
        gl.Vertex(-1.0f, 1.0f, -1.0f);
        gl.Vertex(-1.0f, 1.0f, 1.0f);
        gl.Vertex(1.0f, 1.0f, 1.0f);

        gl.Color(1.0f, 0.5f, 0.0f);
        gl.Vertex(1.0f, -1.0f, 1.0f);
        gl.Vertex(-1.0f, -1.0f, 1.0f);
        gl.Vertex(-1.0f, -1.0f, -1.0f);
        gl.Vertex(1.0f, -1.0f, -1.0f);

        gl.Color(1.0f, 0.0f, 0.0f);
        gl.Vertex(1.0f, 1.0f, 1.0f);
        gl.Vertex(-1.0f, 1.0f, 1.0f);
        gl.Vertex(-1.0f, -1.0f, 1.0f);
        gl.Vertex(1.0f, -1.0f, 1.0f);

        gl.Color(1.0f, 1.0f, 0.0f);
        gl.Vertex(1.0f, -1.0f, -1.0f);
        gl.Vertex(-1.0f, -1.0f, -1.0f);
        gl.Vertex(-1.0f, 1.0f, -1.0f);
        gl.Vertex(1.0f, 1.0f, -1.0f);

        gl.Color(0.0f, 0.0f, 1.0f);
        gl.Vertex(-1.0f, 1.0f, 1.0f);
        gl.Vertex(-1.0f, 1.0f, -1.0f);
        gl.Vertex(-1.0f, -1.0f, -1.0f);
        gl.Vertex(-1.0f, -1.0f, 1.0f);

        gl.Color(1.0f, 0.0f, 1.0f);
        gl.Vertex(1.0f, 1.0f, -1.0f);
        gl.Vertex(1.0f, 1.0f, 1.0f);
        gl.Vertex(1.0f, -1.0f, 1.0f);
        gl.Vertex(1.0f, -1.0f, -1.0f);

    gl.End();

    //  Flush OpenGL.
    gl.Flush();

    //  Rotate the geometry a bit.
    rotatePyramid += 3.0f;
    rquad -= 3.0f;
}

float rotatePyramid = 0;
float rquad = 0;
Hit F5 - let's see what we've got:
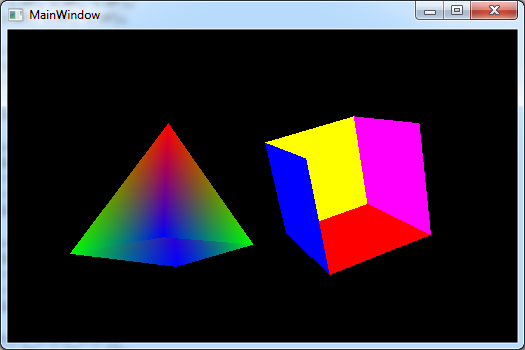
Well, we've got the rotating pyramid and cube, but it is very apparent that we have some issues - the faces of each model are being drawn in the order they are defined and overwriting each other - the depth buffer isn't working!
Well, just as we have an event for doing OpenGL drawing, there's one for doing OpenGL initialisation. Here's how we do some initialisation of OpenGL first. Handle the OpenGLInitialized event of the OpenGL control:
<sharpGL:OpenGLControl OpenGLDraw="OpenGLControl_OpenGLDraw"
	OpenGLInitialized="OpenGLControl_OpenGLInitialized" />
We get the function below in the code-behind - now just enable the depth test functionality:
private void OpenGLControl_OpenGLInitialized(object sender, OpenGLEventArgs args)
{
    //  Enable the OpenGL depth testing functionality.
    args.OpenGL.Enable(OpenGL.GL_DEPTH_TEST);
}
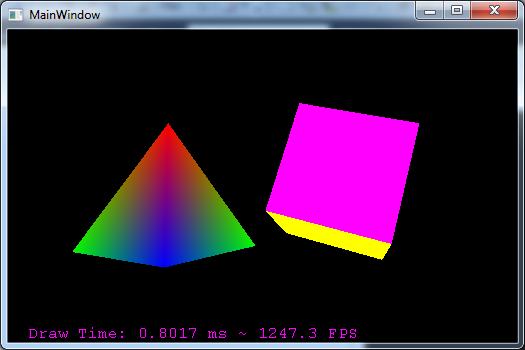
Bingo! As a bit of a performance check, we can add 'DrawFPS="True"' to our OpenGLControl XAML to see the frame rate:
Just be aware, the Draw Time is correct, the FPS is what could be used with such a draw time, not what is actually being used. The default FPS is 28, but there is a FrameRate property of the OpenGLControl that you can set to whatever you want.
Projections
The OpenGLControl will by default create a basic perspective transformation for the projection matrix, however in any real world app, you'll want to do your own. Do perspective transformations in the Resized event of the control, as below:
<sharpGL:OpenGLControl
    OpenGLDraw="OpenGLControl_OpenGLDraw"
    OpenGLInitialized="OpenGLControl_OpenGLInitialized"
    DrawFPS="True"
    Resized="OpenGLControl_Resized" />
..and the code behind...
private void OpenGLControl_Resized(object sender, OpenGLEventArgs args)
        {
            // Get the OpenGL instance.
            OpenGL gl = args.OpenGL;

            // Load and clear the projection matrix.
            gl.MatrixMode(OpenGL.GL_PROJECTION);
            gl.LoadIdentity();

            // Perform a perspective transformation
            gl.Perspective(45.0f, (float)gl.RenderContextProvider.Width /
				(float)gl.RenderContextProvider.Height,
                0.1f, 100.0f);

            // Load the modelview.
            gl.MatrixMode(OpenGL.GL_MODELVIEW);
        }
The RenderContextProvider is an object used internally to abstract the internals of how an OpenGL Render context is managed. It provides the pixel width and height of the render surface. It is described in more detail in Part 2.
Conclusion
This example shows how to use some simple OpenGL functions to perform some simple rendering. SharpGL 2.0 actually has every major OpenGL extension included and all core functionality up to OpenGL 4.2, so you can do some seriously cool stuff with it.
Part 2: How Does It Work?
Typically when OpenGL drawing is performed, it is rendered against a Native Win32 window handle's device context. In fact, this is essentially required to do any kind of OpenGL drawing.
There is another way - a device context can be created that draws to a DIB (Device Independent Bitmap) which removes the need for a window. We can then directly draw the DIB bits to the WPF control. However, there is a serious limitation to this - drawing to a DIB is never hardware accelerated, it always uses the native OpenGL 1.1 drivers included with Windows. Not only is it not hardware accelerated, it also doesn't support any modern extensions.
So how do we draw to memory (so we can draw to WPF) without a window? The best way is to use an OpenGL Framebuffer object. The OpenGL Framebuffer is an extension that allows drawing to occur to memory, rather than to a window. It allows for some very advanced features such as rendering the depth components of a scene directly to a texture, but will also allow us to render without a window.
Really without a window? No. To create an instance of OpenGL with access to extensions (including the framebuffer extension that we require) we STILL need to create the OpenGL render context from a Device Context associated with a double buffered window. So internally SharpGL creates a hidden window, creates a render context from it, and then redirects drawing to a framebuffer. After every frame is drawn, the contents of the framebuffer are drawn to the OpenGLControl - meaning we have an OpenGL control that can be hardware accelerated, support extensions and DOESN'T suffer from airspace issues associated with just dropping in a WinFormsHost!
The Render Context Provider
This is some fairly complicated logic (creating the framebuffer, etc.), the purpose of which is just to create an OpenGL render context. SharpGL does in fact support rendering to a DIB, or a Native Window, or even to a Hidden Window (which in Windows XP can then be blitted to the screen). As each way of rendering is different, we have the concept of a RenderContextProvider - an object that will handle the internals of creating, resizing and cleaning up an OpenGL render context and its supporting objects. This is why in the earlier example, we used the RenderContextProvider property of the OpenGL object to get the pixel width and height.
Further Reading
If you're interested in finding out more about SharpGL, here are some useful links:
SharpGLon CodePlex: http://sharpgl.codeplex.com/- My Blog: http://www.dwmkerr.com/
- Original
SharpGLCodeProject - Article: http://www.codeproject.com/KB/openGL/sharpgl.aspx
History
- 9th October, 2011: Initial post