
Day 40 of 100 Days of VR: Creating a VR First Person Shooter III – UI
5.00/5 (4 votes)
How to create a VR first person shooter - III
Here, we are at another milestone in the 100 days of VR challenge! Day 40! Who would have known that I would have made it to this point?
We’ve come a long way, we learned a bit about Unity, made a simple game, and now here we are working in VR!
Yesterday, we finished fixing most of the technical problems involved with porting our game to VR.
Well, turns out, I lied, there are a couple more things I’d like to fix today along with working a bit on the UI.
- For some reason, our camera is lower than we set it
- Enemies are literally running into us when trying to hit us
- Get our UI to show up again
Step 1: Changing Our Camera Starting Position
When we play the game on Unity, we have an interesting problem with our camera position being changed.
We set our camera position to be 1.5 at Y:

However, what’s interesting is that when we play the game on the Android platform, our camera position gets set to 0:

After debugging around, I found the cause. Our GvrEditorEmulator prefab forces our Main Camera to be set to the position: 0, 0, 0.
While technically, we don’t need the prefab, it is convenient, so we’ll keep it in. Instead, I’ve found a different solution.
While our camera is forced to be a set position, we can child our camera to another game object and then change the position of the parent game object.
Coincidentally, we’re already doing that with our Player game object.
All we have to do is raise our Player Y position up by the amount of the camera.
- Select
Player,change theYposition from1before to1.5 - (Optional) Go to the
Main Cameraand change theYposition to0
Now when we play the game, we’ll have a much better height when playing:


Step 2: Stopping Enemies from Going Inside the Player
Next problem, the enemies are literally running into us.
See:

There could be many things that are causing the problem, but I decided to look at the Nav Mesh Agent attach to each of the enemy prefabs, because there are options that control how close the enemy would get to their target:
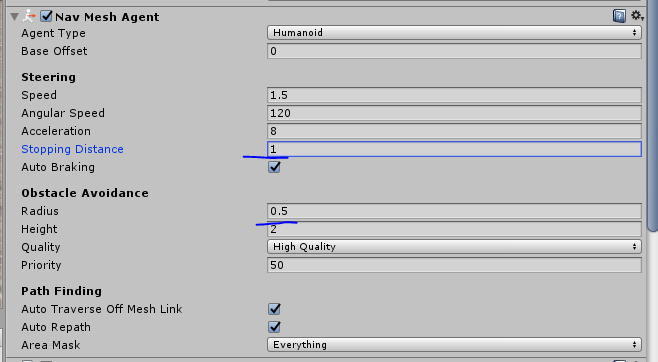
After playing around with the settings, I got the enemies to stop right in front of us:
StoppingDistance: 1.25Auto Braking: DisableRadius: 1.25
Here are our new settings:

With these new settings in, here’s a bit of our gameplay now:

Isn’t it nice that they’re beating us from the outside and not the inside? No? Oh well…
Step 3: Getting the UI to Show Up Again
Now that we have all the technical problems resolved (promise this time!), it’s time for us to go back and look at how we can get the UI to show up for our game.
This is going to be an annoying problem to solve because the problem only occurs on our Android device and not anywhere else. Which means there will be A… lot… of… building…
Luckily for you, I’ve gone through the torture of re-building multiple times so the rest of us don’t have to!
It turns out that getting the UI to show up isn’t too bad!
It turns out that if we have VR mode enabled in Unity, any UI we have on our Android device will NOT be available unless the canvas the UI is set with is set to World Space.
Here’s what it looks like on my phone when I disabled the VR options in Player Settings and just have normal Android app:

According to Unity’s quick guide for VR UI, and for extra credit, this article about UI expectations for the player, UI in VR must be run in World Space.
The biggest key takeaway I got from these 2 articles is that you should NEVER have the UI on your player’s screen, like how we’ve been doing it. This could cause motion sickness.
Specifically, we want to use Diegetic UI, where the UI is attached to a game object in the game world as opposed to an overlay on top of our screen.
Instead of having it float around or statically placed would be the better way to go.
Step 3.1: Getting the UI to Show Up
Anyways, to fix our problem and have our UI show up when VR is enabled, we must set our Canvas to be displayed in World Space.

- Select
HUDin our hierarchy. - In the
CanvasComponent,changeRender Modefrom
There are 3 options available to use, here’s the canvas documentation to explain what they are, but for a quick summary of the available render modes:
- Screen Space – Overlay: The UI is rendered on top of the scene
- Screen Space – Camera: The UI has put a certain distance from the Camera. It’s very similar to the Overlay, except certain changes to the camera could also cause changes to the UI. An example would be Perspective Camera would render the UI differently from an Orthogonal Camera
- World Space: The UI Canvas will act like a game object that just hangs somewhere in the game world for us to see. Also, this is the only option we can use for our UI
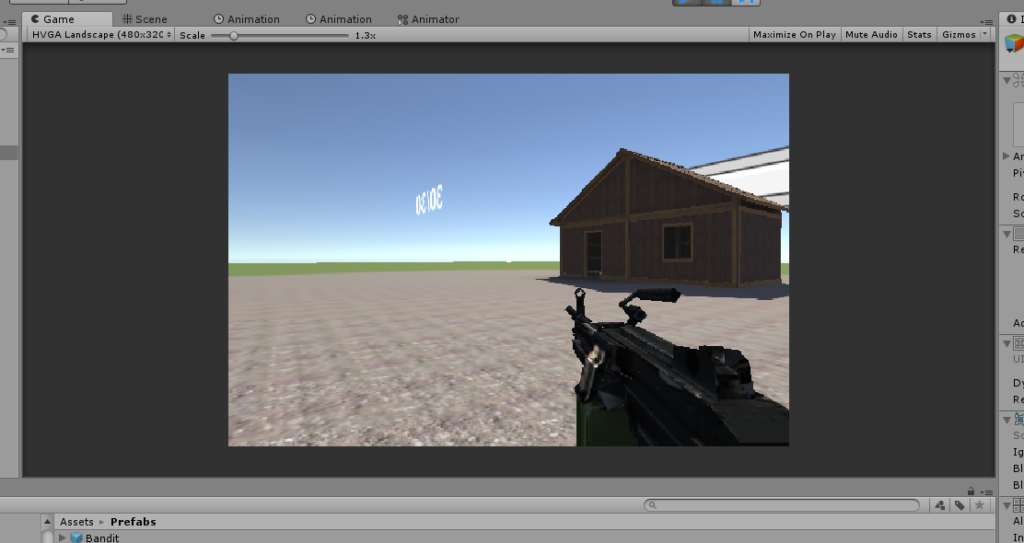
Here’s what our game looks like now with the World Space:
Now we need to make some adjustments with our UI.
Step 3.2: Figuring Out Where to Put the UI
The biggest question now at this point is, where should we put our UI elements?
While there isn’t a clear answer, I think our best option might be to attach the UI to be our weapon.
On the Google Cardboard, this would be the equivalent of having it right in our face, but if we were to switch to use the Daydream Viewer, we would be able to move it independently of our gaze.
With the decision being made, let’s go and see how we can attach our health and time UI to our gun!
Step 3.3: Putting Our UI Into World Space
We already have an existing HUD canvas game object in our game.
We’re going to repurpose that for our game, however, because we have more than just our UI on the canvas (the Victory and Game Over panels), I’m going to duplicate our HUD:
- On
HUDin our game hierarchy, hitCtrl + Dto duplicate it - Rename the duplicated
HUD (1)to be calledGunUICanvas - Delete the
Victory,Game Over, andAmmoUI child objects - Make the
GunUICanvasa child ofMachineGun_01
When we’re done, here’s what your hierarchy should look like.

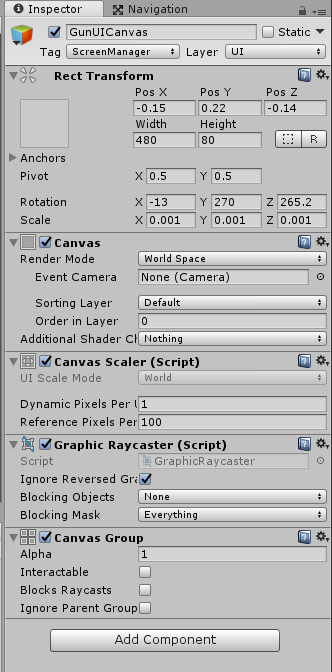
Next up, we’re going to change the settings of our GunUICanvas so that it would be right in front of our gun on the right side:
- Select
GunUICanvas - In the
Canvascomponent, theRender Modeshould already beWorld Space,if not, change it - In the Rect Transform component, I’ve played around with the settings and changed our
positionto be(-0.15, 0.22, -0.14), ourWidthto be480, and ourHeightto be80. - Set
Scaleto be(0.001, 0.001, 0.001), we want our UI to be small enough to fit in our screen - (Optional) Remove the Screen Manager Script
Here’s what we should have:
Next, I’m going to change the Anchor Presets for our Score UI game object to be in the bottom middle of our screen.
- Select
Score - In the Rect Transform component, open our Anchor Presets and hit Alt + Shift and select
Now with the width changes of our Canvas and making our Score at the bottom, we should have something like this for our game.

If we play the game in our VR device, I don’t think there will be any discomfort. The UI is positioned on the gun and since we’re focused on the cursor in the center, it’s not in our focus.
Step 3.4: Connecting the UI Elements to the Rest of our Scripts
Now that we have our GunUICanvas looking nice, the last thing that we need to do is re-connect all the UI elements to our scripts that use them, so our UI can get updated as we play.
We need to update our:
- Time Text
- Health Slider
Do you remember which scripts used these UI? No? Don’t worry, I do!
- In
GameManager,in the Score Manager script, drag ourScoreUI into theScoreslot - In
Player,in the Player Health script, drag our Health Bar slider into the Health Bar slot
Once we add our new UI components, our code will update the UI correctly!
Conclusion
And that completes Day 40! Today, we looked at fixing our last technical problems with the camera height and getting the enemies to attack us at a more appropriate distance.
However, the main topic of today was adding our UI back in.
It turns out that with Unity VR enabled, the only Canvas we can use is World Space. Once we have made that change, we can see our UI again.
With our new UI, we attached it to our gun and I think we made a good solution to provide relevant UI information to the player all without causing nausea.
Tomorrow, we’re going to continue working with the UI. Specifically, we’re going to add the game end states back into the game, so we can keep playing it without starting a new app instance.
Day 39 | 100 Days of VR | Day 41
The post Day 40 of 100 Days of VR: Creating a VR First Person Shooter III – UI appeared first on Coding Chronicles.