
SQL Server Database Project - SSDT - Continuous Delivery and Deploy Database Changes using Data-Tier Application Package [DacPac]
4.50/5 (6 votes)
Create a Data-Tier Application Package (DacPac) to easily manage, deploy and deliver chronological database changes onto multiple environments
- Download Project SSDT - 511 KB
- Download SQL Compare File Project_Database - 2.5 KB
- Download .bat deploy-using-sqlpackage-exe - 354 B
- Download zip Version DacPac - 10.8 KB
- Download Northwind.bak - 524.4 KB
Introduction
The main intention of this article is to help understand ways to simplify the process of database contribution and deploying changes onto different environments. Also, to bring together code changes and its corresponding database schema/script changes into one single change set. Finally, automated Database Delivery as part of Database Life-cycle Management (DLM) and Dev-Ops.
Prerequisite to Create a SQL Server Database Project
- Visual Studio
- SQL Server 2005 or higher
- SQL Server Data Tools (SSDT) [Download]
- Data-Tier Application Framework (DacFx) and SqlPackage must be on the machine performing the installation
Steps to Create a SQL Server Database Project or Data-Tier Application
We first need any database to create a SQL Server Date-Tier application in Visual Studio. In this article, we are going to use Northwind sample database which includes some Tables, Views and Stored Procedures to start with. You can download the database backup file from here.
Once you downloaded and restored the database in your SQL Server Management Studio, start by creating a new project in Visual Studio (For this article, I’m going to use Visual Studio 2015.)
From the installed templates, Select SQL Server and choose SQL Server Database Project. Name the project and solution as DacPac and SSDT respectively.
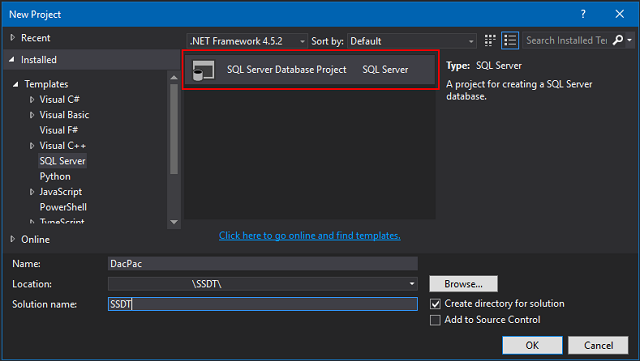
Clicking on "OK" button will bootstrap empty database project as shown in the below image:

Now, we need to import our Northwind database to our new project. Right click on the DacPac project and from Import menu, choose Database...


From the Import Database window, select the Source database connection... (Ignore “Target Project” and “Import Settings” as we are not going to use them). Clicking "Start" button, the project will scan for all database objects like Tables, Views, Stored Procedures, Triggers, functions, etc.

Click "Finish" button to complete the database import process. Now, we can see all the database objects as .sql script files, one for each object within our project.

If you open any of the .sql files… all it contains is a create SQL statements for an object. When we open Products tables (Products.sql), we can see the table design view as well as its create table statements. Also, we can see the other table information like Primary & Foreign keys, Check Constraints and Indexes as well as triggers, etc.

That’s it… our SQL Server Database Project is ready!
Build the project to know if there are any compile time errors and to see if there are any issues with database schema or syntax, ambiguous column names or mismatch column comparison in where clauses and data types, etc. In our case, the application builds successfully.
Now, add the solution to any Source Code Control System (SCCS) like GIT or TFS thereby we can achieve Continuous Integration (CI) and later Continuous Deployment (CD). The Best practice is to bring SQL Server Database Project together with its corresponding Web/application source code under one single repository.
Build success means we got a new database release artefact file called Data-Tier Application Package (DacPac.dacpac) in the application Bin/Debug folder.
What is DacPac File?
The ‘portable’ version of a database design is a DacPac. It is described by the pundits as a ‘self-contained database entity used by an application’, representing the ‘declarative model’ of the database, which can be authored alongside application code.
A DacPac can be built from scratch, created from a Visual Studio 2010 Data-Tier project, compiled from source code, or extracted from existing databases. We can deploy DacPac both to Azure SQL Databases or SQL Server, either as a new database or to upgrade an existing database.
All DacPacs contain at least…
- an XML file that represents an XML ‘model’ of the database’s metadata
- a file containing information about the DAC framework that produced the DACPAC file
DacPac is merely a zip file. Just rename its extension to .zip to see its content and read XML files. [Sample DacPac as zip file]

Dealing with Schema Changes
Say suppose we got a schema change to the Products table. We intend to add new column CreatedDate of type datetime to the table. So, go ahead and open the Products.sql file under Tables folder. Add new column either in design tab or add necessary script in T-SQL tab.

Notice that as I update the table in design mode… its corresponding script has been generated in T-SQL mode. Nice, isn’t it…
To Compare Data-Tier Application Changes with the Database Itself
After the changes we made to the Products table in Visual Studio Data-Tier project, let’s compare it with what we initially have in database before we apply these changes back to database.
Go to SQL Server under Tools menu and select New Schema Comparison… and save the comparison file Project_Database.scmp to the database project. [Download Project_Database.zip]

Choose Data-Tier Project DacPac as Source Schema:

Choose Northwind database as Target Schema:

Click "Compare" button and wait to see the difference between the Data-Tier Project and Database. Once comparison is complete, we will see the table change as new column being added to the Products table in Visual Studio.

Publish Data-Tier Project Changes to Database
There are three different ways to apply SQL Server Database project changes back to the database:
- Publish the project from Visual Studio and select target database
- Using SQLpackage.exe command, and
- DacFx (Advanced concept)
In this article, we are going to see Publish… from project and SQLPackage.exe options. DACFx is an advanced concept and a bit complicated but is the right choice to achieve CD as part of Database Lifecycle Management (DLM).
#1 Publishing Changes from the Database Project
Before publishing the Data-Tier application, we need to build the project first so that there is a valid build artifact DacPac file in Bin/Debug folder. Right click on the project and select Publish…

Publish Database Dialog
This is the window where we will select “Target Database connection”, “Database name” and the file name. Also, we can Create, Save and Load publish settings as a profile (.publish.xml) for later usage.
Once we select Target database connection with Database name, we can either hit "Generate Script" button which will only produce a .publish.sql file with the changes and can then be executed separately on the database as T-SQL.

Or hit "Publish" button, which will not only generate .publish.sql file but also applies changes to the selected database.
Note: Publish option will create new database if we do not specify database name in “Target database connection” connection string but uses “Database name” value.
We see the Data Tool Operation failed to apply the change to the database and raised the error message “Rows were detected. The schema update is terminating because data loss might occur".
Error Description: The column [dbo].[Products].[DateCreated] on table [dbo].[Products] must be added, but the column has no default value and does not allow NULL values. If the table contains data, the ALTER script will not work. To avoid this issue, you must either: add a default value to the column, mark it as allowing NULL values, or enable the generation of smart-defaults as a deployment option.
Makes sense...

To fix the error, we will allow Products table new column DateCreated to accept null values.

Save the file and build it to generate new DacPac file. Now publish the project again. But, this time with one advance option “Block incremental deployment if data loss might occur” unchecked. This will allow the operation to continue even if there might have been any data loss.

Now, after fixing the design flaw with the table and with advanced option, we successfully updated changes to database.
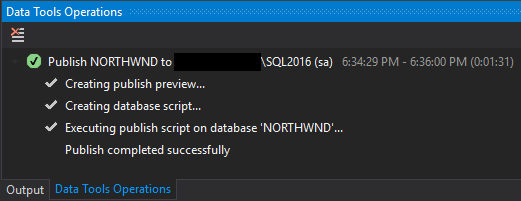
Now, if we compare our Data-Tier project with the database… both look identical.

#2 Using SQLpackage.exe Command
SqlPackage.exe is a command line utility that automates several database development tasks like Extract, Publish, Export, Import, DeployReport, DriftReport and Script. This command line allows you to specify these actions along with action specific parameters and properties.
In this article, we are looking at Publish action. Publish incrementally updates a database schema to match the schema of a source .dacpac file. If the database does not exist on the server, the publish operation will create it. Otherwise, an existing database will be updated.
A SqlPackage.exe publish operation incrementally updates the schema of a target database to match the structure of a source database. Publishing a deployment package that contains user data for all or a subset of tables will update the table data in addition to the schema. Note that data deployment will overwrite the schema and data in existing tables of the target database. Data deployment will not change existing schema or data in the target database for tables not included in the deployment package.
Refer to MSDN for more details about "Publish" action and its properties.
The benefits of using SqlPackage are:
- It's straight-forward and the API is clear.
- You can include it in a batch file.
- You can use it to automate your deployment process.
Here are the basic steps for deploying a DACPAC using SqlPackage from the command line:
- Open a command prompt (cmd.exe).
- Execute SqlPackage.exe with the desired parameters.
Here is the syntax to use SQLPackage command with parameters:
<Path to your Microsoft SQL Server>\DAC\bin\sqlpackage.exe
/Action:Publish
/SourceFile:"<Complete Source Path to the .dacpac file located in Bin/Debug>"
/TargetConnectionString:"<Target Database Connection string>"
Note: If possible, you can create environment specific Batch files (.bak) which include SQLPackage.exe command with predefined parameters to publish database. [Download .Bat file]
#3 Using DacFx
This is the most suitable method to automate Continuous Deployment process for all database related changes. Take a quick look at the article, “Microsoft and Database Lifecycle Management (DLM): The DacPac” written by “Phil Factor” [https://www.red-gate.com/simple-talk/sql/database-delivery/microsoft-and-database-lifecycle-management-dlm-the-dacpac/]
Main Advantages of Using SQL Data-Tier Application
- Having more control over database that ever before
- Time & Resource saving
- Quick deliverables
- No need to manually maintain separate .sql script files for all database changes made
- Brings complete database objects (Tables, Views, Stored Procedures, Triggers, etc.) into Source Code Control System, track changes
- Having single change set for all database changes and its interrelated application (C# or any language) changes
- Very useful when dealing with multi-tenant database applications
- Maintain environment (Dev/QA/Stage/Prod) specific publish profiles
- Continuous Integration & Continuous Deployment as part of Database Life-cycle Management (DLM) and Dev-Ops
- Less database conflicts or mismatch issues avoiding blame game
My Other Articles on CodeProject
- If you like to know more about Database Schema Comparision tool, check my article
- Always Encryption Feature in SQL Server 2016
- Use Dependency Injector "Ninject" to dynamically choose between ORM's (Entity Framework or Dapper) and Databases (SQL Server or Oracle Database)
- RESTful Web API Help Documentation using Swagger UI and Swashbuckle
Hope you learnt something new from this article. Feel free to "Rate This Article", "Bookmark" and give suggestion in "Comments" section below.
History
- 24th October, 2017: Initial version