
Simple Twitter client using Xamarin.Forms, Xamarin.Auth and LinqToTwitter
3.71/5 (4 votes)
A simple Twitter client application targetting iOS and Android using Xamarin.Forms, Xamarin.Auth and the LinqToTwitter library
Introduction
This article/code details how to use Xamarin.Auth along with the LinqToTwitter library to query Twitter APIs, and target iOS, Android with around 80-90% of code sharing including UI using Xamarin.Forms.
Background
Recently I attended a XamarinHackDay in Sydney, which helped me to learn about Xamarin.Forms.
I really liked Xamarin.Forms as it makes it easy to target iOS, Android and Windows Phone with shared UI. Both simple and complex UI/UX is possible with Xamarin.Forms. The tip below is my learning about how to write common UI, what to share and how to write platform specific code outside of Xamarin.Forms.
Using the Code
Joe Sauve has written a very good article "Using Xamarin.Auth with Xamarin.Forms", about how to work around Xamarin.Forms to integrate OAuth using Xamarin.Auth. It's a good starting point if you are looking only for OAuth/OAuth using Xamarin.Auth. I have used that as a reference, including few screenshots and code from the above article.
Here, we will be targetting only iOS, as Android implementation is similar.
For this post, I am using VS 2013 Update 4 Community Edition with Xamarin.iOS and Xamarin.Android installed on Windows 8.1 and Xamarin.iOS build host on Mac.
Let's start by creating a project in Visual Studio (From File -> New -> Project, select Templates -> Visual C# -> Mobile Apps -> Blank App (Xamarin.Forms Portable).
Add name as "XamarinTwitterClient" (or any name of your choice).
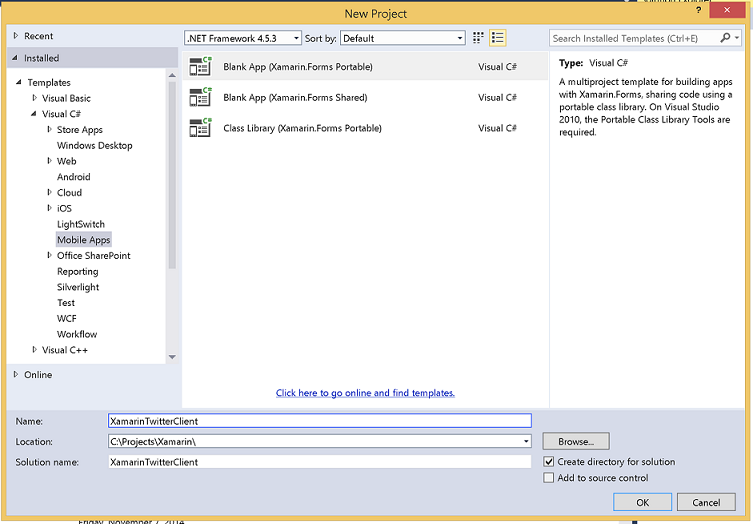
It will create a solution with four projects in it. The first project, XamarinTwitterClient (Portable), which is a shared library. The remaining three projects are platform specific projects (iOS, Android and Windows Phone).

Let's add the first component Xamarin.Auth required for OAuth/OAuth2. We will have to add this in all platform specific projects. This component uses webview to show the authentication screen of the provider (in our case Twitter authentication page). You can download the component from Xamarin Component library (I have used 1.2.3 at the time of writing this tip).
Next, we need to open a common project to add the required classes. The first component or class we need is UserDetails to store the User information retrieved from the authentication provider.
To have basic separation (layers), I have created a folder called Entities and added a new class as follows:
//UserDetails class to store user details retrieved using Twitter API
public class UserDetails
{
    public string TwitterId { get; set; }
    public string Name { get; set; }
    public string ScreenName { get; set; }
    public string Token { get; set; }
    public string TokenSecret { get; set; }
    public bool IsAuthenticated
    {
        get
        {
            return !string.IsNullOrWhiteSpace(Token);
        }
    }
}
Let's update App.cs as follows:
public class App
{
    static NavigationPage _NavigationPage;
    public static UserDetails User;
    public static MessageListPage _MessageListPage;

    public static Page GetMainPage()
    {
        _MessageList = _MessageList ?? new MessageListPage();
        _NavigationPage = new NavigationPage(_MessageListPage);
        return _NavigationPage;
    }

    public static Action SuccessfulLoginAction
    {
        get
        {
            return new Action(() =>
            {
                _NavigationPage.Navigation.PushModalAsync(_MessageListPage.GetTimeline());
            });
        }
    }
}
The NavigationPage is used to add basic navigation in an application.
When a user starts the application, the first screen displayed is MessageListPage().
SuccessfulLoginAction is used to redirect the user to MessageListPage after successful authentication. We will see how it is used when we do platform specific changes.
Let's create a missing MessageListPage which will be used to display the list of messages (tweets) retrieved from Twitter. But before we begin, we will have to create a BaseContentPage which will do the authentication check by comparing user object. If the user is not authenticated, it will redirect the user to LoginPage.
public class BaseContentPage : ContentPage
{
    protected override void OnAppearing()
    {
        base.OnAppearing();

        if(App.User == null)
        {
            Navigation.PushModalAsync(new LoginPage());
        }
    }
}
Now let's look at the MessageListPage, which inherits from BaseContentPage and displays simple messages. We will be revisiting this page again to improve the UI and display actual messages from Twitter.
public class MessageListPage : BaseContentPage
{
    public MessageListPage()
    {
        Content = new StackLayout
        {
            VerticalOptions = LayoutOptions.Center,
            Children =
            {
                new Label
                {
                    XAlign = TextAlignment.Center,
                    Text = "Welcome to Xamarin!!"
                }
            }
        };
    }
}
As we will be having platform specific LoginPage implementation of Xamarin.Auth, we don't need any specific implementation in the common project. However, we do need to add an empty LoginPage which will be resolved at runtime and substituted by actual implementation (more details below).
We are now almost done with changes in the common project.
Let's move on to the iOS project (Android implementation is similar). We need to add LoginPageRenderer which will be used by Xamarin.Auth to display webview for OAuth.
[assembly: ExportRenderer(typeof(LoginPage), typeof(LoginPageRenderer))]
namespace XamarinTwitterClient.iOS.Pages
{
    public class LoginPageRenderer : PageRenderer
    {
        bool showLogin = true;
        public override void ViewDidAppear(bool animated)
        {
            base.ViewDidAppear(animated);

            if (showLogin && App.User == null)
            {
                //Twitter with OAuth1
                var auth = new OAuth1Authenticator(
                    consumerKey: "Add your consumer key from Twitter",
                    consumerSecret: "Add your consumer secrete from Twitter",
                    requestTokenUrl: new Uri("https://api.twitter.com/oauth/request_token"),
                    authorizeUrl: new Uri("https://api.twitter.com/oauth/authorize"),
                    accessTokenUrl: new Uri("https://api.twitter.com/oauth/access_token"),
                    callbackUrl: new Uri("http://twitter.com")
                );

                auth.Completed += (sender, eventArgs) =>
                {
                    DismissViewController(true, null);

                    if (eventArgs.IsAuthenticated)
                    {
                        App.User = new Entities.UserDetails();
                        App.User.Token = eventArgs.Account.Properties["oauth_token"];
                        App.User.TokenSecret = eventArgs.Account.Properties["oauth_token_secret"];
                        App.User.TwitterId = eventArgs.Account.Properties["user_id"];
                        App.User.Name = eventArgs.Account.Properties["screen_name"];

                        //Store details for future use,
                        //so we don't have to prompt authentication screen everytime
                        AccountStore.Create().Save(eventArgs.Account, "Twitter");

                        App.SuccessfulLoginAction.Invoke();
                    }
                };

                PresentViewController(auth.GetUI(), true, null);
            }
        }
    }
}
The most important line is the 1st line in the above code snippet, which is as follows:
[assembly: ExportRenderer(typeof(LoginPage), typeof(LoginPageRenderer))]
It uses Xamarin.Forms DependencyService which maps LoginPageRenderer to LoginPage.
After that, we will have to create the OAuth1Authenticator and pass the required details of Twitter for authentication like ConsumerKey and ConsumerSecret.
If you are new to Twitter development and need more details about how to create and register apps on Twitter, please follow this guide. After creating an app, update the ConsumerKey and ConsumerSecret in the code above.
That's it, we have completed with the first part - Authentication. The app is now ready for first run to test authentication against Twitter. Select an iPhone simulator of your choice and click run to start your application on Mac. Make sure you have Xamarin.iOS Build Host running and paired with Visual Studio. You will see the Twitter Authentication page. After entering Username and Password, you will be redirected to the dummy MessageListPage, which shows screen with text "Welcome to Xamarin!!"

Calling Twitter APIs
Let's move on to next part of calling Twitter APIs using the LinqToTwitter library. We will be doing these changes in the common project.
We begin by adding a reference to the library "LinqToTwitter" using NuGet Package Manager.
To call APIs using the LinqToTwitter library, we will have to create a TwitterContext. Let's add this code in a separate file TwitterService to keep the UI and business logic separate.
private static TwitterContext GetTwitterContext()
{
    var auth = new XAuthAuthorizer()
    {
        CredentialStore = new InMemoryCredentialStore
        {
            ConsumerKey = "Twitter Consumer Key",
            ConsumerSecret = "Twitter Consumer Secret",
            OAuthToken = App.User.Token,
            OAuthTokenSecret = App.User.TokenSecret,
            ScreenName = App.User.ScreenName,
            UserID = ulong.Parse(App.User.TwitterId)
        },
    };
    auth.AuthorizeAsync();

    var ctx = new TwitterContext(auth);
    return ctx;
}
Now, add a simple function which will search for the parameter passed and return List<Message>.
//In TwitterService.cs file
public static List<message> Search(string searchText = "xamarin")
{
    try
    {
        var ctx = GetTwitterContext();

        var searchResponses = (from search in ctx.Search
                                where search.Type == SearchType.Search
                                && search.Query == searchText
                                select search).SingleOrDefault();

        var tweets = from tweet in searchResponses.Statuses
                        select new Message
                        {
                            Value = tweet.Text,
                            Id = tweet.TweetIDs,
                            ImageUri = tweet.User.ProfileImageUrl,
                            UserName = tweet.User.ScreenNameResponse,
                            Name = tweet.User.Name,
                            CreatedAt = tweet.CreatedAt,
                            ReTweets = tweet.RetweetCount,
                            Favorite = tweet.FavoriteCount.Value
                        };

        return tweets.ToList();
    }
    catch (Exception ex)
    {
        ex.Message.ToString();
    }
    return new List<message>();
}
Let's use the Message entity to store values fetched using the APIs.
//Message.cs under Entities folder
public class Message
{
    public string Id { get; set; }
    public string Value { get; set; }
    public string ImageUri { get; set; }
    public string UserName { get; set; }
    public string Name { get; set; }
    public DateTime CreatedAt { get; set; }
    public int ReTweets { get; set; }
    public int Favorite { get; set; }
}
Now let's add the last piece of the puzzle in the MessageListPage to get the message list from the service and bind it to the data template.
public Page GetTimeline()
{
    var listView = new ListView
    {
        RowHeight = 50
    };

    listView.ItemsSource = TwitterService.Search();
    listView.ItemTemplate = new DataTemplate(typeof(TextCell));
    listView.ItemTemplate.SetBinding(TextCell.TextProperty, "Value");

    return new ContentPage
    {
        Content = new StackLayout
        {
            VerticalOptions = LayoutOptions.FillAndExpand,
            Children = { listView }
        }
    };
}
That's it! we have successfully finished the development for iOS. When you run the project, you will see tweets with the "xamarin" search string.

Code Repository
Code for the article is available on GitHub, along with Android implementation. If you find any bugs or want to improve the sample, please issue pull request.