
Test Suites and Assertions in soapUI
4.80/5 (4 votes)
A closer look at test suites and assertions
Test Suites
Test suites are nothing different here in soapUI and are similar to those in any other testing tool. Test suites are hierarchically divided here in soapUI. A test suite may have several test cases and a test case in turn may have several test steps. Let's get started with creating test suites in soapUI. Let us consider a new web service here which is a temperature unit conversion service. The wsdl for the same is http://www.webservicex.net/ConvertTemperature.asmx?WSDL. Create a new soap project as described in the earlier blog, name it “temperature conversion” or anything you like and add the above wsdl to it.
Now the view of the workspace will be like the figure shown below:

Now click on ‘Request 1' to open the request editor. Replace the question marks with suitable values. Like the temperature should be a numerical value, ‘FromUnit’ and ‘ToUnit’ should be ‘degreeCelsius’ or ‘degreeFahrenheit’ or other temperature units in similar format. See the service description of the wsdl for other units supported. Run the request to see the conversion result.
Now suppose we want to create a test case, we can click on the button next to the run button on the request editor. See the image below:

After clicking on the button, a dialog box appears which asks for the name of the test suite. Provide a suitable name for your test suite and click on OK. After clicking on OK, another similar dialog box appears asking for the name of the test case you want to create. Provide a suitable name for the test case and click on OK. Now another dialog box shall appear which looks like the image below.

This is the “add request to test case” dialog box. For now let's go with the default settings, just click on OK and the first suite and test case are created. The work space now should look somewhat like the image shown below:

You can see there is a test suite in which there is a test case. In the test case, there is a test step where our current request exists. You can modify the test case by clicking on the test step editor which is highlighted in the above image. You can add as many test steps you want per test case and as many test cases per test suite. Try your hands on by adding a few more test cases and test suites.
Assertions
Assertions are an important part of test cases, aren’t they? The help us determine if the result is the same as that of expected result or is it something different, thus helping us in determining whether the test has passed or not. You can add assertions to your test steps in soapUI as well. Any number of assertions can be added to a test step and a test step fails if any of the assertions fails. There are some predefined assertions in soapUI which we will be discussing now.
1. Contains Assertion
The ‘Contains assertion’ scans the response message for the expected value and if found, the assertion passes. If the expected value is not present in the response message, the assertion fails. The regular expression for the same is in the format (?s).*(“expected value”).* . But for most strings, the value can be directly written in the fields as plain text. Let us see how the contains assertions can be added to a test case. Open the test case editor by clicking on the ConvertTemp Request 1 as shown in image 4. The button next to ‘run’ is the ‘add assertions’ button. Click on the button to see various assertions of soapUI. The ‘add assertion’ window appears like the image shown below:

From the left hand pane, select ‘Property Content’ and see a list of assertions under this category. Select ‘Contains’ assertion and click on ‘Add’ button. The ‘Contains Assertion’ dialog box appears like this:

In the content field, add the string you expect to be present in the response message. In this case, we are sending the temperature as 100 degrees Celsius and are requesting it in Fahrenheit unit. So as per the temperature conversion formula, temperature in Fahrenheit = (temperature in Celsius * 9/5) + 32.
Therefore 100 degree Celsius is equal to 212 degree. So we can add an assertion that the response message should contain the string 212. So simply write 212 in the content field and click on ‘OK’. Now when we run the test case, we see that the assertion has passed because the response message contains the string 212. You can also write the regular expression but be sure to check the check box shown in the above image.
2. Not Contains Assertion
‘Not Contains’ assertion is similar to Contains assertion. The difference here is that the assertion will pass if the string token you entered as expected value, is not present in the response message. The assertion fails if the expected value is present in the response message. The regular expression is similar to that of the ‘Contains’ assertion. It can be added in a similar way just like the ‘Contains’ assertion.
3. Not SOAP Fault Assertion
The ‘Not SOAP Fault’ assertion checks if we get a valid soap response instead of a soap fault. In case there is a soap fault, the assertion fails. If the response is valid, then the assertion passes. It can be added just like the other assertions. There are no parameters or values to be passed with this assertions as it only checks if the response is valid or not. Add a ‘Not SOAP Fault’ assertion to the test case and rerun the test case with the previous values. See that the assertion passes. Now let us see the condition where the assertion fails. In the test case editor, pass some random values. Like we can pass ‘F’ in the FromUnit and ‘C’ in the ToUnit. When we run the test case again, we see that the assertion has failed as the response is a soap fault.

4. SOAP Fault Assertion
The ‘SOAP Fault’ assertion is similar to the ‘Not SOAP Fault’ assertion. The difference is that the assertion passes if there is a soap fault and fails if there is no soap fault. It can be added in the same manner as the ‘Not SOAP Fault’ assertion is added.
5. XPath Match Assertion
This assertion is used to compare the result of an XPath expression with a predefined value. We can check the ConvertTemp response if it has the expected fault code or fault string in case there is a soap fault. This assertion is present under the ‘Property Content’ assertions. Now select the assertion and click on ‘add’ button. The XPath Match configuration window appears. Here we need to declare the namespaces before we using any expression. In this case, we do it as:
declare namespace soap=’http://schemas.xmlsoap.org/soap/envelope/';
Now the XPath expression goes as:
//soap:Fault/faultcode
Alternatively, soapUI does the declaration of namespaces for us if we click on the ‘declare’ button as shown in the image below.
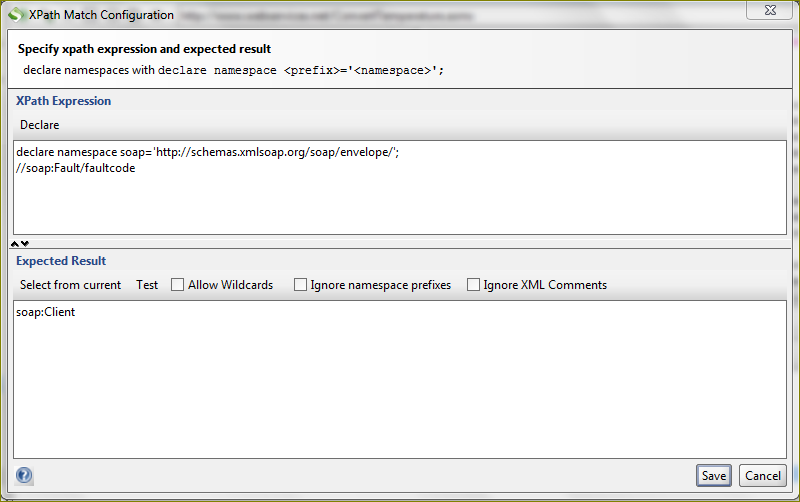
In the expected value, we write the value of the ‘faultcode’ nodes as seen in image 7. So the expected value here is ‘soap:Client’. This is how an ‘XPath Match assertion’ is added.
There are a lot more assertions and you can explore through all those to have a good grip on them.
This was some basic know-how on test cases and assertions in soapUI. Hope this helps.
NOTE: The wsdl was obtained from http://www.webservicex.net.