
Learning WPF by Playing League of Legends? Well... It's Possible :)
4.56/5 (3 votes)
I've had enough reading WPF tutorials and wanted to test learned skills in a real-life application. As I've always had problems with memorizing LoL items, I thought I could do something about this and kill two birds with a one stone.
Introduction
As a typical programmer, I really like playing computer games. Not that long time ago, I found League of Legends an interesting game, that is quite challenging to master. Unfortunately, I could never find time to take a look into its mechanics, get more familiarized with the items, builds, strategies, etc. Instead, I had to study more about WPF library as my manager told me to do so. At first, I started reading some books about the framework, but quickly noticed I tend to forget/confuse many concepts. So I said: why not kill two birds with one stone? As a result, I came up with an idea of writing an application that would allow users to construct their own build to see the statistics and compare different ideas on building their LoL champions.
Let me say that the application is at the VERY early stage of development and needs a lot of time and love. However, I decided to write an article about it for two reasons:
- The basic functionality is almost ready to use and to achieve it, a reasonably small amount of additional work is required.
- Any feedback is very precious - so the faster I hear it, the better effects are expected.
Using the Application
The set of functionalities is very limited at the moment, but I'm working on improving the applications.
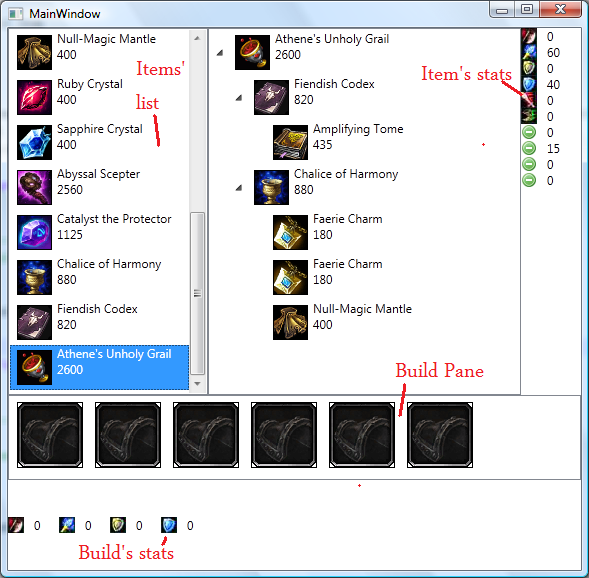
- Select an item from the Items' list to see its construction, cost and stats.
- Double click the button in the Items' list to add it to the Build Pane.
- Double click an item in the Build Pane to remove it from the build.
- View the overall stats of your current build.
Any feedback is very welcome.
Using the Code
As I decided to employ the MVVM pattern, the solution contains four projects with pretty straightforward names:
LoLItems(Model)LoLItemsVMLoLItemsViewLoLItemsTest
In many cases, this is a huge overengineering, but - as I said - my goal was to learn something useful. Who knows? Maybe in the future, I'll be motivated to create another application (e.g. connected with LoL heroes) and this split might turn out to be very useful then.
Important thing - I decided not to use any MVVM library (I know there are some like "Caliburn" or "MVVM Light"). My Math teacher at High School taught me a very useful thing: It's always good to do something from scratch for the first time so as to understand the idea better. That's why I would like to implement everything on my own. As a result, some logic contained in LoLItemsVM project should have been extracted into a separate project. I'll take care of this soon.
Model
The main concern of the application is to present information about LoL Items. So it's obvious the main class in the model is responsible for storing information about them:
    // Store information about items
    public class Item
    {
        public int ID { get; set; }
        public int CombineCost { get; set; }
        public string Name { get; set; }
        // where a file with an image of an item ?
        public string Path { get; set; }
        // what does the item really do ?
        public ItemStatistics Stats { get; set; }

        // How to build an Item ?
        // Note: the property is "virtual" as I tried to use Entity Framework - Code First
        public virtual List<Item> Recipe { get; set; }

        public Item() { }

        public Item(string name, int cost, string path, ItemStatistics stats, List<Item> recipe = null)
        {
            Name = name;
            CombineCost = cost;
            Path = path;
            Stats = stats;
            Recipe = recipe;
        }

        // How much the item is ?
        public int TotalCost
        {
            get
            {
                return Recipe.Sum(item => item.TotalCost) + this.CombineCost;
            }
        }

        // How many levels of items there are ?
        public int Tier
        {
            get
            {
                return (this.Recipe == null || this.Recipe.Count == 0) ? 1 : 1 + this.Recipe.Max(item => item.Tier);
            }
        }
    }

    // Store information about an item's stats
    public class ItemStatistics
    {
        public int AD { get; set; }
        public int AP { get; set; }

        public int Armor { get; set; }
        public int MR { get; set; }

        public int ManaRegen { get; set; }
        public int HealthRegen { get; set; }

        public int HP { get; set; }
        public int MP { get; set; }

        public double AttackSpeed { get; set; }
        public double MoveSpeed { get; set; }

        private static ItemStatistics empty = new ItemStatistics();
        public static ItemStatistics Empty { get { return empty; } }
    }
Items are stored as static members of a class:
static class Items
    {
        private static Item createItem
            (string name, int cost, string path, ItemStatistics stats, params Item[] items)
        {
            return new Item(name, cost, path, stats, new List<Item>(items));
        }

        // Tier: Basic
        public static Item amplifyingTome = createItem(ItemNames.AmplifyingTome,
            435, "amplifying-tome.gif", new ItemStatistics { AP = 20 });
        public static Item bfSword = createItem(ItemNames.BFSword, 1550,
            "b-f-sword.gif", new ItemStatistics { AD = 45 });
        // ...

        // Tier: Advanced
        public static Item abyssalScepter = createItem(ItemNames.AbyssalScepter, 980,
        "abyssal-scepter.gif", new ItemStatistics { AP = 70, MR = 45 }, blastingWand, negatronCloak);
And then, they are dynamically loaded by another class via reflection. Thanks to this solution, it's enough to add an item's definition in "Items" class and everything gets done automatically.
class DatabaseInitializer
    {
        public List<Item> GenerateItems()
        {
            List<Item> items = new List<Item>();
            foreach(var field in typeof(Items).GetFields())
            {
                items.Add((Item)field.GetValue(null));
            }
            return items;
        }
    }
Note there are some additional lines of code in the source code that are commented out. I've tried to use Entity Framework - Code First to store all the items in an external database, but I gave up as it requires a self-relation with duplicates allowed (think about it: an item can contain other items and might need multiple instances of them - e.g. the Athene's Unholy Grail). One day, I'll come back to this idea.
ViewModel
As a "messenger", this project contains its own versions of data types. You can easily find classes like "ItemViewModel", "ItemStatisticsVM", etc., that are almost exact copies of the corresponding types defined in Model. This might seem redundant, but:
- It doesn't always happen like that - in most of the cases, a model contains much greater set of data and it is up to a
ViewModelto pick the desired ones, wrap them into nice data types and prepare for a View to display. - Thanks to this division, the View is less vulnerable to changes to Model - we can modify it in a far more flexible way.
Moreover, the project contains additional classes that support MVVM pattern:
ViewModelBase- implementsINotifyPropertyChangedinterface that helps in defining properties that are expected to use for BindingDelegateCommand- Helps in binding commands to functions in aViewModel- Commands - Allows to bind events to functions defined in a
ViewModel
The third case is particularly interesting, as it's an example of WPF Attached Properties in use. In my project, I needed to bind to two events and the others are left unimplemented. I consider extracting these features into a separate project as it grows. There are many articles about this topic (e.g. this one). Just search for "Binding Events to Commands, WPF" or similar.
View
As it's required by the MVVM pattern, the View of my application doesn't contain any logic - it's responsible for displaying data only. To achieve this, I have created a set of User Controls:
-
StatsPanel- A way to display item's/build's statistics (don't get discouraged - I was missing some icons).
Note that this is exactly the same control as the one displayed at the bottom of the window (however, the latter one is truncated due to an error in placing elements - can you find it?). Thanks to this, any change to this control will need to be applied only in one place in the code.
-
LabeledImage- As its name says, these are two controls (anImageand aTextBlock) bound together.StatsPanelis constructed using these. -
ItemTree- To display a structure of items, I used a slightly modifiedTreeView. It doesn't look like the representation in Riot's game, but is a nice placeholder. In the future, I'm planning to override its Control Template to get the desired outlook.
The last one is pretty interesting, as I found it quite difficult to implement to display the whole tree expanded by default. After spending some time Googling, I managed to find the correct answer:
    <Grid>
        <Grid.ColumnDefinitions>
            <ColumnDefinition Width="*" />
            <ColumnDefinition Width="60" />
        </Grid.ColumnDefinitions>

        <TreeView>
            <TreeViewItem
                Header="{Binding ElementName=this, Path=Item}"
                ItemsSource="{Binding ElementName=this, Path=Item.Recipe}">
                <TreeViewItem.ItemContainerStyle>
                    <Style TargetType="{x:Type TreeViewItem}">
                        <Setter Property="IsExpanded" Value="True" />
                    </Style>
                </TreeViewItem.ItemContainerStyle>
            </TreeViewItem>
            <TreeView.ItemContainerStyle>
                <Style TargetType="{x:Type TreeViewItem}">
                    <Setter Property="IsExpanded" Value="True" />
                </Style>
            </TreeView.ItemContainerStyle>
        </TreeView>
        <controls:StatsPanel
                Grid.Column="1"
                Orientation="Vertical"
                ItemStatistics="{Binding ElementName=this, Path=Item.Stats}" />
    </Grid>
The key was to override ItemContainerStyle in both TreeView and TreeViewItem objects. Removing any of these has an effect in a wrong display. If there's a better way of doing this, please let me know.
Points of Interest
The application turned out to be a great idea - I managed to improve a lot my understanding of WPF. It's obvious that you won't learn anything by just reading a manual. The real-life challenge is always the most beneficial way of learning.
As I mentioned earlier, the application has a lot of limitations. Here's the ToDo list for the most urgent fixes:
- Improve
ItemStatsandStatsPaneto include all the stats. - Find a way to represent unique items' abilities.
- Implement Drag'n'Drop functionality (I guess this is a more natural way of adding/removing items to/from a build).
- Add information about all the items in the game.
- Pay greater attention to Unit Tests.
- Improve the visual outlook.
And here are some possible extensions:
- Move all the items to a database (Entity Framework)
- Implement more of the MVVM functionalities and extract them into a separate project
- Modify the outlook of the
ItemTreecontrol to look more like the one from LoL - Add information about characters/runes/masteries/etc. (as they all have impact on statistics)