
Installing a DLL into the Global Assembly Cache (GAC)
4.65/5 (14 votes)
How to add a DLL to the GAC
Introduction
This article provides a simple explanation of how to install a DLL into the Global Assembley Cache (GAC).
There are several reasons you might want to do this:
Sharing and Versioning the Assembly
The assembly may be used by more than one application and more than one version of the assembly may be required. Multiple versions can sit side-by-side in the GAC.
Security
The GAC is held in the system root so is likely to be more secure out-the-box. You also don't have to secure it multiple places.
Assembly Searching
The GAC is checked after the local folder and before probing and checking the codebase information.
Getting Started
Create a strong name key pair:
Firstly we need to create a strong name key file. This will be in the format: sn –k <filename and location>. An example is shown below. This creates a file containing a public\private key pair.

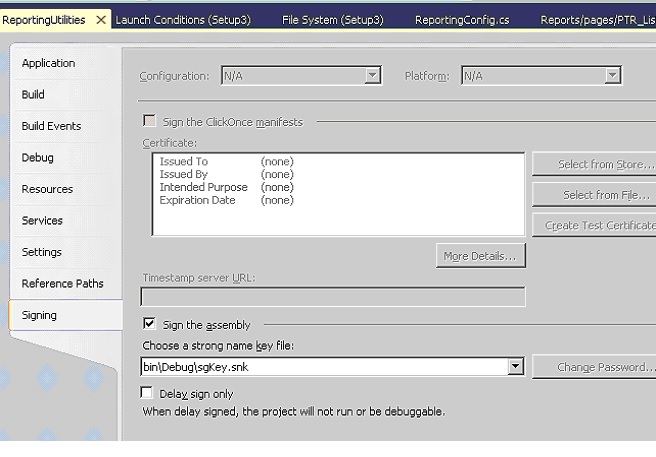
Sign the assembly via Visual Studio
Signing the assembly is very easy - you could do it the hard way using an assembly linker but why would you? Right click on the project and go to properties. Select the signing tab then select the ‘sign the assembly’ check box. Point to the key pair file you created above. In this example I have copied the key file into the bin\debug folder and I am using it to sign a ReportingUtilities DLL which is generated in the same folder.
Installing into the GAC
Now that we have a signed assembly we can install it into the GAC. Run the Visual Studio command prompt (in visual studio tools) and write the following instruction in the format: gacutil –I <assembly name >. In this example I have changed the cmd prompt directory to the location of the DLL - you can do this or put the full assembly path in the assembly name.

Install into the GAC via an MSI
In a production environment the reality is that you won’t have visual studio installed.
Not to worry. To install a DLL into the GAC is still quite easy - you just need to create a deployment project.
In Visual Studio add a deployment project to your visual studio solution.
- Choose a standard set up program – not wizard.
- Right click on the project, select view, file system
- Right click on the File System on target machine and select GAC

- Right click on the generated GAC folder and select the primary output from the DLL project as shown below. Make sure you select the correct project from the drop down!

The project will also add a launch condition for the .NET framework. Make sure this version is set to the version that is going to be on the target machine as it will default to the latest version on your development machine (which might be greater).
To change this version:
- Right click on the project and select launch conditions
- In the launch conditions select the .Net Framework
- Click the properties tab. You may need to reselect the launch condition to highlight the correct properties. It should look like so:

You can now build your project and copy the files to the environment where you need to install the DLL.