
Free Gamma: Precisely Calibrate Your Display
5.00/5 (2 votes)
Alter your display gamma-ramp to correct & calibrate it

Introduction
With time and usage, colors in LCD displays often get distorted, for example, all red and blue pixels become weaker in comparison to green ones, resulting in your screen becoming yellowish in overall, or similarly it may go bluish, and so on. These changes also affect gamma and contrast of your screen in many cases affecting display quality and making it fatiguing to the eyes.
Most displays provide brightness, contrast and gamma adjusting methods along with color correction that can help to a point (there are many software tools too), but in medium to extreme cases, they simply can’t help, that is because brightness, contrast and gamma adjustments control the screen’s gamma-ramp (the response function of a screen) in a fixed, predefined way for every one of them, while the deviation itself that occurs in a faulty screen can be represented in irregular gamma-ramp. That’s why I came to the idea that if we can adjust the gamma ramp freely - not using a predefined function - we can achieve better results, and that is what Free Gamma does. I know there is a way to fix such deviations using software that require special measuring equipment, but on the other hand, you have Free Gamma at no cost but learning to use it.
Background: The Defect and the Solution

The gamma-ramp curve is a representation of the response function that operates a screen, how much brightness should appear as output for a certain amount of input signal for all pixels on the screen. As you can expect, the normal is a straight line like the green one in figure 'a', i.e., a direct proportional linear relation between the input (numeric information representing a pixel from the picture being displayed) and the amount of luminance that result from that input [1]. But by daily usage, LCD screen pixels become faulty resulting in a distorted equivalent gamma-ramp.
The purple line in figure 'a' represents a faulty gamma-ramp, taking into consideration that brightness correction is moving the whole gamma-ramp up or down, and contrast correction is rotating it around its center point, this case can be corrected using brightness and contrast corrections all together (note that lifting that line a little up and rotating it a little anticlockwise will make it align with the ideal one).
But in many cases, the defect can actually be represented by a curve like the green one in figure 'b'. In this case, no brightness-contrast adjustment can correct it, not even a normal gamma correction can, since it is a multi-steep curve. The only way to correct that is to make a gamma-ramp curve that is the subtract of the faulty curve from the ideal one, that will be approximately like the black curve in figure 'b', and doing that is possible using Free Gamma.
Finally, for some advanced users like designers and photographers, etc., they may want to calibrate even brand-new monitors for very accurate colors, those can also benefit from Free Gamma quite a lot.
Using the App
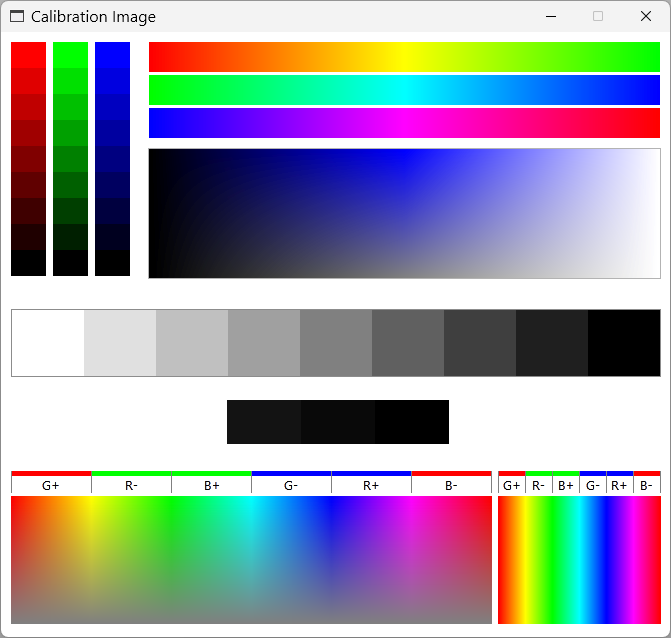
There are no physical devices connected to this software to measure the faulty ramp curve, so you're to do it simply using your sight. The first thing to do is to open the ‘Calibration Image’ found inside the app (figure 'c'). Looking carefully at the gray shades (found in the center of the image) will give you an idea about low and high areas in the gamma-ramp of your device, seek and recognize shades that are brighter or darker than they should be. In the graph that represents the ramp function that is to be set, move the points up and down in an inverted manner with respect to what you see in the gray shades in the calibration image, points on the left are the darker shades and those to the right are the brighter ones. While moving the graph points, you will notice change on the screen immediately, and you will be able to save what you've done. If you did that quite correctly, you will find that your screen now is noticeably better. Now take a look at the three color shades found up-left the calibration image. If you find that they are different in their apparent steepness, change the calibration mode from ‘Mixed Channels’ to ‘Discreet Channels’, and repeat what you’ve done previously to every color of the three until you are satisfied with the gradient of every one of them, starting by copying the ramp you've created for the gray scale to each of the three colors. If you successfully accomplished that, then now your screen is calibrated and you will see that it is now much better, note that it is normal not to achieve this from the first time, additionally, you can get good help by displaying the calibration image in a nearby good display and compare before starting.
Notes
- You can start directly by working in the 'Discreet Channels' mode if you noticed from the start that the three color shades are different in their steepness.
- Keep in mind that it's normal for the whole shades of blue to appear a little darker compared to red and green shades.
Under the Hood
The core of this application is built around Win API functions GetDeviceGammaRamp and SetDeviceGammaRamp.
[DllImport("gdi32.dll")]
public static extern bool SetDeviceGammaRamp(int hdc, ref RAMP ramp);

[DllImport("gdi32.dll")]
public static extern bool GetDeviceGammaRamp(int hdc, ref RAMP lpv);
GetDeviceGammaRamp reads the device gamma-ramp as a structure of three 16-bit integer arrays, one array for each basic color (red, green and blue).
Each array represents a 2D graph, the index of an element is the x-axis value of the graph, that is the input value which only varied between 0 and 255. The value contained in an element is the y-axis value of the graph, which is the output value or a number that represents how much luminance should be paired to that input.
The gamma-ramp then stored not as a complete array but as number of points (and hence a number of line segments) that approximate a graph of the retrieved or modified gamma ramp, these points are then be drawn on panel in a way that they can be moved by the user to change the ramp. When a chosen graph is to be applied to screen, the ramp's three arrays are rebuilt from the line segments of the graph, then they are fed to SetDeviceGammaRamp Win API function that immediately updates the screen with the new gamma-ramp.
-----------------------------------------------
[1] Some will argue that the ideal gamma-ramp is not linear but rather a non-linear curve that is represented by Vout = c (Vin )y , which is set that way because the non-linearity human eyes perceive light with and also for a non-linearity in older CRT displays. In fact, either this is not so important in modern displays due to human perceiving is the minor factor or the case with LCD displays is different. What I noticed in my experimenting with this app is that a better result can be achieved with linear steepness in gray and color shades. Anyhow, no matter the case, you can definitely enhance your screen visual performance using this app and the described method above.
History
- 9th June, 2023: Initial version