Create a WCF Service using wsHttpBinding and use in a Windows Forms application
Create a WCF service using wsHttpBinding and use in a Windows Forms application.
Introduction
In this article, I would like to create a WCF service application with wshttpbinding and use it in a Windows Forms application.
Creating a WCF Service Application
- Open Visual Studio, choose File => New => Project .
- Choose WCF Service Application and enter the name:
- Add a new class to the project for the custom validator:
- Choose class, enter the name, and click the Add button.
- Here is the sample code for the custom validator:
- Change the web config in system service model as below:
- When trying to run the service, it will show an error like below, so we need to configure the project:


using System;
using System.Collections.Generic;
using System.Linq;
using System.Web;
using System.ServiceModel;
using System.IdentityModel.Selectors;

namespace TestService
{
    public class CustomValidator : UserNamePasswordValidator
    {
        public override void Validate(string userName, string password)
        {
            if (userName == null || password == null)
            {
                throw new ArgumentNullException();
            }

            if (!(userName == "a" && password == "a"))
            {
                throw new FaultException("Password or name is wrong");
            }
        }
    }
}
<system.serviceModel>
    <behaviors>
      <serviceBehaviors >
        <behavior name="ServiceBehaviors"  >
          <!-- To avoid disclosing metadata information,
          set the value below to false and remove the metadata endpoint above before deployment -->
          <serviceMetadata httpGetEnabled="True"/>
          <!-- To receive exception details in faults for debugging purposes,
          set the value below to true.  Set to false before deployment
          to avoid disclosing exception information -->
          <serviceDebug includeExceptionDetailInFaults="False" />
          <serviceCredentials>
            <serviceCertificate findValue="localhost" x509FindType="FindBySubjectName"
                             storeLocation="LocalMachine" storeName="My" />
            <userNameAuthentication userNamePasswordValidationMode="Custom"
             customUserNamePasswordValidatorType="TestService.CustomValidator, TestService" />
          </serviceCredentials>
        </behavior>
      </serviceBehaviors>
    </behaviors>
    <bindings>
      <wsHttpBinding>
        <binding>
          <security mode="Message">
            <message clientCredentialType="UserName"/>
          </security>
        </binding>
      </wsHttpBinding>
    </bindings>
    <services>
      <service name="TestService.Service1" behaviorConfiguration="ServiceBehaviors" >
        <endpoint contract="TestService.IService1" binding="wsHttpBinding" />
        <!-- This endpoint does not use a secure binding and should be secured or removed before deployment -->
        <endpoint address="mex" binding="mexHttpsBinding" contract="IMetadataExchange"/>
      </service>
    </services>
    <serviceHostingEnvironment multipleSiteBindingsEnabled="true" />
</system.serviceModel>

Right click, add the project, and choose Use IIS Express...

Choose Yes

Choose OK.

Choose the project and at the properties window, set SSL Enabled to true.

The service will be ready to use.

Use the service in a Windows Forms application
- Right click, add the solution, and choose Add New Project.
- Choose Windows Forms Application, enter the name, and click the OK button.
- Right click, add the project, and choose Add Service Reference.
- Enter the service address and click the OK button.
- Add controls to the form as in the below picture.
- Here is the sample code of the form. Add an event for button click:
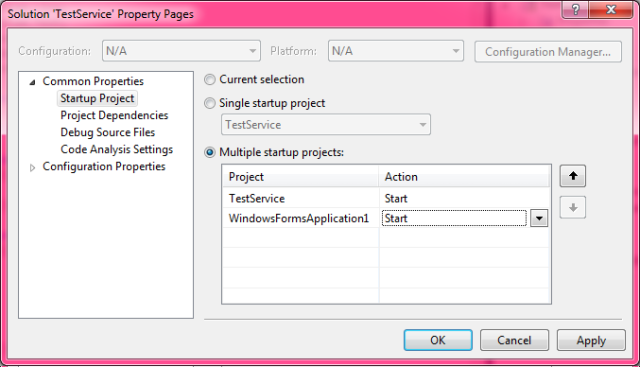
- Change the solution properties to run two projects at the same time.
- Try to submit the data with a random username and password.
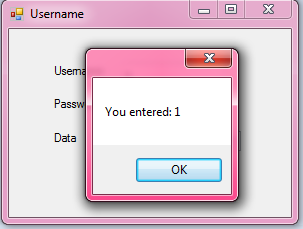
- Here is the sample if the username and the password is correct.


using System;
using System.Collections.Generic;
using System.ComponentModel;
using System.Data;
using System.Drawing;
using System.Linq;
using System.Text;
using System.Windows.Forms;
using WindowsFormsApplication1.ServiceReference1;
using System.ServiceModel.Security;

namespace WindowsFormsApplication1
{
    public partial class Form1 : Form
    {
        public Form1()
        {
            InitializeComponent();
        }

        private void button1_Click(object sender, EventArgs e)
        {
            try
            {
                Service1Client c = new Service1Client();
                c.ClientCredentials.UserName.UserName = textBox1.Text;
                c.ClientCredentials.UserName.Password = textBox2.Text;
                c.ClientCredentials.ServiceCertificate.Authentication.CertificateValidationMode =
                                    X509CertificateValidationMode.None;
                MessageBox.Show(c.GetData((int)numericUpDown1.Value));
            }
            catch (Exception ex)
            {
                MessageBox.Show(ex.InnerException.Message);
            }
        }
    }
}