
Let's Build iOS App in Xamarin.iOS Part I - An Introduction
5.00/5 (2 votes)
Understand the basics of how iOS applications are constructed and how Xamarin helps you to do so in C#
Introduction
In terms of cross platform mobile technology, Xamarin is no longer novice player. It has established itself to be the coolest kid on the block. And of course, it has opened new avenues for C# developers. C# developers now can easily port their skills into Android and iOS, whereas earlier C# developers' scope was limited to the Windows Phone only. But it is no longer the case.
Who Should Read This?
If you have Xamarin tools set up in your Mac development machine or if you have build host set up with Visual Studio 2012+, then you are good to go with this tip. It means you will be able to run the stuff that we are going to build. In our example, we are going use Xamarin Studio in Mac but interchangeably the same is applied for Visual Studio in Windows.
One word of caution in case you are using Visual Studio with Build host. Make sure you have both Windows and Mac Xamarin.iOS updated to the latest stable version.
If you have only heard about Xamarin and bumped into this tip, then my suggestion would be to go through some other introductory stuff. Below, I have mentioned few links:
- https://developer.xamarin.com/guides/ios/getting_started/ ~ A very good one to get started with the environment set up.
- If you are one of those geeks who loves to know how things are happening underhood, this link might help you.
If you are new to this, let me tell you the most exciting part of Xamarin. You can achieve whatever you could do in an iOS application using Objective C and Xcode. Xamarin studio and C# lets you use all the native platform features.
Background
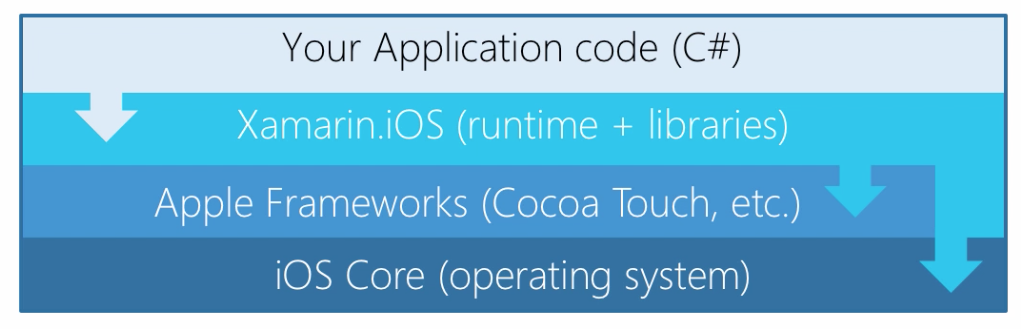
Xamarin.iOS is based on the open source mono project and provides a layer over iOS that lets you write code in C# and .NET, while still utilizing the native features of iOS.
Let's Dive In
So it's time we create our first project - but before that, let's see what are the different kinds of projects we could create using Xamarin.Studio. In your Xamarin Studio, if you go to New Solution --> iOS , you will see the below options:
- Single view
- Master Detail app
- Page based app
- Webview app
- Tabbed App
So far, we will concentrate on Single view app. Other than Webview, the differences are merely on navigation so let's save that discussion for some other day.
So we will create a SingleView app. Let's name it as InterestCalculator. Uncheck the iPad option as we are targeting only iPhone. Also don't worry about the Bundle identifier. We will talk more about it in later parts. Press next, let's keep all other things to default.

Breaking It Down

So congratulations, you have successfully created your first Xamarin.iOS app. Isn't that cool? Now let's have a look into what exactly we have created:
- In the Solutions explorer, you will find the References folder. Over there, you could see all the C# system references you are familiar with as a .NET developer. One of the extra link library you will be able to see is Xamarin.iOS that basically does all the trick part for you. That is equivalent to mscorlib in desktop/web environment. In this references folder, we can add our Xamarin.iOS build components and PCLs.
- In the components folder, you can add as many Xamarin.iOS supported components. You can explore this part by yourself if you want and see how many components are available over there.
- In the packages folder of your solution, you can add Nuget packages. Again, the restriction applies the component you add has to be PCL or build for Xamarin.iOS.
Understanding the difference between these 3 folders is essential. - Also, there is the Resources folder - you add all the images that your application is going to use over here. There are a good number of restrictions that Apple imposes upon us regarding application icon and images. We will have a look into that later.
- Then you see the LaunchScreen.xib. Here Xib stands for Xcode interface builder. With the latest version of Xamarin studio, you will be able to edit the Xib file. This file allows your app to use the same launch screen around multiple type of apple devices like iPhone 4s, iPhone 6s+, etc.
- Then, there comes the Main.cs file. This file is your entry point to the iOS application. That is the first set of manager code that is being run. This happens to AppDelegate.cs file.
- ViewController.cs: This is where the behavior of our application is going to go. iOS forces us to write code in MVC approach.
- Main.Storyboard: This is the one where the UI is declared. We will discuss this in detail in some other part of our tip.
- Then there are Entitlements.plist and info.plist. There are metadata files which allow you to declare stuff like suppose you want to use Apple Pay services, you have to declare it here. Info.Plist stores the metadata data information for application itself like Application name, launch screen (did I say launch screen again... yes I did but the better and latest approach is to use Launchscreen.xib as it is adaptive in nature), deployment target, version, etc.
Points of Interest
So we are trying to keep it simple. We have created our first project and break it down to understand the solution structure. This will definitely make our life easier. In the next part, we will explore iOS terminology and start writing code for our app. Here goes the 2nd part.
History
- Version 1.0