
SharePoint Lists and Libraries
4.57/5 (4 votes)
The article gives brief on how to create and manage Sharepoint web applications using SharePoint Central Administration Website.
Introduction
In this article we are going to look at the following topics:
- Lists
- Columns
- Site Columns
- Content Types
- Lists definition
- Lists Instance
- Site definition
Lists
In SharePoint, the data is stored in the forms of Lists/Library, which in general means they are equivalent to tables in a database (at least, for the time being we can consider them as such).
Lists in SharePoint are generally used to save data in the form of records/items and Libraries are used to store documents and other files. One of the main purposes of SharePoint is it can be used as Repository for Storage of files in a central location which can be shared among teams. When we talk about storage of data/files or repository, in SharePoint we are actually talking about the content database, as all the content of SharePoint is stored in a database which is called the "content database."
The following steps are used to create Lists in the SharePoint:
- Click on Site Actions Ribbon available on the top right side of the site.

- Click on Site Contents, it navigates to the Site Contents page where we can find all the available Lists/Libraries.

- There is an option called "add an app," on clicking on that it takes us to the landing page of List Templates from which we choose the required list template

- Choose Custom List from the available list templates, and enter the Name as "Employeedetails" in the pop up window and click on create.


- This completes the creation of SharePoint List. The created SharePoint list is available in the View all Site Contents page of the SharePoint Site.
Columns
Columns in SharePoint are available as two types Lists/Library Columns and Site Columns. We can create columns in SharePoint in the same manner as we create the columns in a database table. Columns are used to hold the data and each column has a specific data type.
The following steps are used to create columns in a SharePoint Lists/Library using SharePoint UI.
- In this Section we can create the columns to the above created "Employeedetails" List.
- Navigate to the "Employeedetails" list and on the ribbon click on Create Column or Click on List Settings and got to Create Column Page.

- In the Create New Field Page we have the following options:
- Name
- Data Type
- Description
- Maximum no of characters and
- Column Validation.
- Give the appropriate values for the columns and repeat the steps 1 to 3 to create different columns to the Employeedetails lists.

- For our example we'll just create the following fields. a) EmployeeId – Integer b) EmployeeName – Single Line of text. c) Visadetails – Single Line of text. d) ProjectName – Single Line of text.
- We will learn about Column Validation in the upcoming articles of the series.
Site Columns
As we have already discussed, we can create Columns within a particular List/Library or across the sites in Site Collection. The Columns created at the site level are called site columns and can be used within a Site Collection for available Site and Sub Sites.
As per best practices, we generally go for Site Columns when compared with list columns, as Site Columns have multiple advantages. Site Columns are reusable, easily available for searching, can be used with search web parts like content query web part, easier for migration, also provides effective structure and are helpful in reorganizing the structure of the site.
The following Steps are used to create Site Columns:
- Click on the Site Actions => Site Settings.
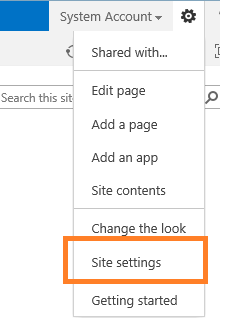
- This will navigate to the site settings page in the Site Settings Page, under the "Web Designer Galleries" Section, click on Site Columns.
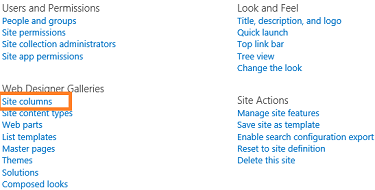
- Site Columns page is displayed with all the available site columns grouped together.

- Now click on create and the page is redirected to the "Create Column" page: Provide the following options for the column to be created:
- Name (EmployeeId)
- Data Type (Integer)
- Group (Check the "New Group" radio button and give the name of the group as Employee).
- We can choose the options for unique and mandatory for the created field.

- Repeat the above steps to create EmployeeName and Visadetails fields. Except at 4th step instead of creating new group choose the existing "Employee" group, which is already being created.

Content Type
Content Types in SharePoint are used to hold the collection of Site Columns. In a broader meaning: Content Types are reusable settings which enable us to manage the Meta data and behavior of the content.
The following are the steps used to create content types:
- Click on Site Actions Ribbon => Site Settings.
- Go to Site Settings page, under "Web Designer Galleries," click on Site Content types.

- Site Content Types page shows all the available Content Types Grouped together.
- We can filter the content types based on group by using the drop down available at the top right of the page.

- Now to create new content type click on "Create." This redirects to the New Content Type page, where we can give the name, description, select parent content type and we can add the content type to the existing group or we can create new group.

- The Created content type is available in the Site Content type gallery under the respective group.
- Once the content type is created, we can go ahead and start adding the columns to the content type.
- The completed content type looks as below:
List Definition and List Instance
List definition helps us to create a new custom list based on the existing list type, from which we can create multiple instances of the same list. While we can create a new custom list from UI without using Visual Studio and save the list as a template to create multiple instances, the list definition helps us in deploying custom lists to multiple environments/servers. The other advantage of using list definition is it helps in easier customization of List Forms.
Site definition
Site definition helps us to create a new site from the Site Actions ribbon. We can create Site definitions using Visual Studio and deploy it to the server. Once deployed, the site definition is available in the site template from which we can choose the site definition and create a new site.
Site definition helps us to choose all the components required for a site like Lists, Libraries and Features and so on.
Activity Developing site definition and adding Site Columns, Content types and lists to the Site definition using Visual Studio.
Scenario
For example, consider a simple situation where we are supposed to save the details of employees in a list. Now in the same list if we want to have different fields for Onsite Employees and Offshore Employees then we achieve this with the help of Content types. So we will create two content types one for Onsite Employee and the other for Offshore Employees and add these two Content types to the List.
In this demonstration we will create a simple Site template which holds the Employee details list. As part of our example we are creating only limited columns you can add more columns, list and content type as per the requirements by repeating the below steps.
Site Columns
Method 1
Creating Site Column using Visual Studio:
- Click on Start Menu and Open Visual Studio in Administrator mode.
- Create a new project by clicking on New Project option in the Visual Studio. Choose Empty SharePoint Project from the template window and give Project Name as SPSTraining.

- Enter the SharePoint Site URL and Choose "Deploy as Farm Solution" option. Click on validate button to validate the site URL and then click on Finish.

- Right click on the Solution in the Solution Explorer and click on Add New Item and choose Site Column from the template window.

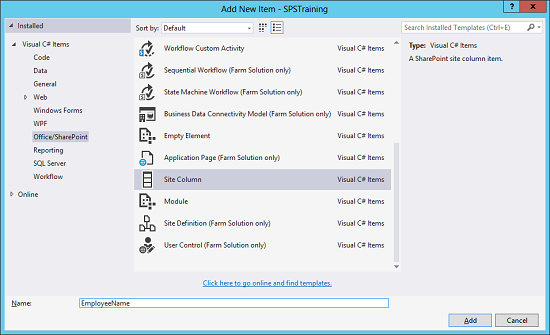
- The following lines of code is generated in the XML file created.
<?xml version="1.0" encoding="utf-8" ?> <elements xmlns="http://schemas.microsoft.com/sharepoint/"> <field id="{7c5d5cc0-17e6-4678-afc3-79b0fbea7e95}" name="EmployeeName" displayname="Employee Name" type="Text" required="FALSE" group="Custom Site Columns"> </field> </elements> - Repeat the above steps to create the following Site Columns.
- EmployeeName.
- EmployeeId
- Visadetails
- ProjectName
Method 2
We can also create the Site Columns in Visual Studio by using Empty Element. The following steps show the same.
- Right click on the solution in the explorer and click on Add New Item and choose Empty template from the template window.
- Give the name to the template as Employee Fields.
- Click on the Elements.xml file and add the below code
- Repeat the above steps to add required columns.
Content Types
The following steps are used to create the Content type using Visual Studio:
- Right click on the Solution in the Solution Explorer and click on Add New Item and Choose Content Type from the template window.
- Add the columns in the created content type and choose the required data type for the created fields as shown below.
- Repeat the above steps to create the content types "OnSiteEmployees" and "OffShoreEmployees"
The following table shows the tables of content types with their respective columns.
- Off Shore Employees
- Name
- Designation
- Id
- Department
- On Site Employees
- Name
- Designation
- Id
- Department
- Visa details.
| Content Type | Columns |
|---|---|
| 1. Off Shore Employees |
|
| 2. On Site Employees |
|
List definition
The following steps are used to create list definition using the visual studio.
- Right-click on the Solution in the Solution Explorer and click on Add New Item and Choose List from the template window.
- Give the name as Employeedetails and click on Add. This creates Employeedetails list definition and Employeedetails list instance.
- Click on the Content Types button in the List and the existing content types which we have created earlier and choose OffshoreEmployees as default Content type.
Site definition
We can create a site definition and the above create fields, content types and lists to the site by using the site definition.
The following are the steps are used to create the site definition and add the lists to it:
- Right click on the solution in the solution explorer and click on Add New item and choose Site definition template from the template window.
- Give the name as Project Portal and click on Add.
- Once the site definition is added the following files are added to our solution. "default.aspx" page, onet.xml file and webtemp_ProjectPortal.xml.
- Onet.xml file is used to specify the lists, libraries, features (Site and Web), Navigation items, files and other modules available in the site.
- Now right click on the feature in the explorer and click on properties. Properties window is opened; now double click on the feature to open the get the properties of the feature.
- From the properties window copy the Feature Id
- Add a new tag called Feature under WebFeatures tag and paste the id attribute value, which was earlier copied.
- This completes our sample site definition.
- Now this solution is ready for deployment.
Points of Interest
This article is part of series of articles on Sharepoint for beginners.
Below are the list of articles on "Sharepoint for beginners."
- SharePoint - Web Application Management
- SharePoint Lists and Libraries