
Installing Windows 10 IoT core on Raspberry Pi 2
5.00/5 (12 votes)
Quick guide and preview of process of installing Windows 10 IoT Core to Raspberry Pi 2
Introduction
This tip is for everyone who would like to see how this process looks like and would like to try it.
Background
To see more information about Windows 10 IoT, you can read my previous article here.
Preparing SD Card
Installing Windows 10 IoT is basically only a process of preparing your SD card and there making everything ready to load your Windows. This entire process is done by tools from Microsoft, which are now very easy to use.
To prepare your SD card, you have to download IoT dashboard from Microsoft. Here is the link. To install it, you need Running Windows10 OS (Or virtual machine with this system). It will not install on Windows 8 or 7.
After installation, you will see the IoT dasboard user interface.

When you select "set up a new device", you will see a very intuitive interface where you will choose what device you are going to set up and where your SD card is located to write files. (If you use a virtual machine, usually it has no access to your build in SD card reader, please use USB SD card reader.)
After you click "download and install", the program will start to download the latest version of Windows 10 IoT and after that, it will install it on your SD card.

When installation image is downloaded, it will start dism tool automatically to create partitions on the SD card.

When SD card is ready, you will be notified. (The entire process takes about 10 minutes.)
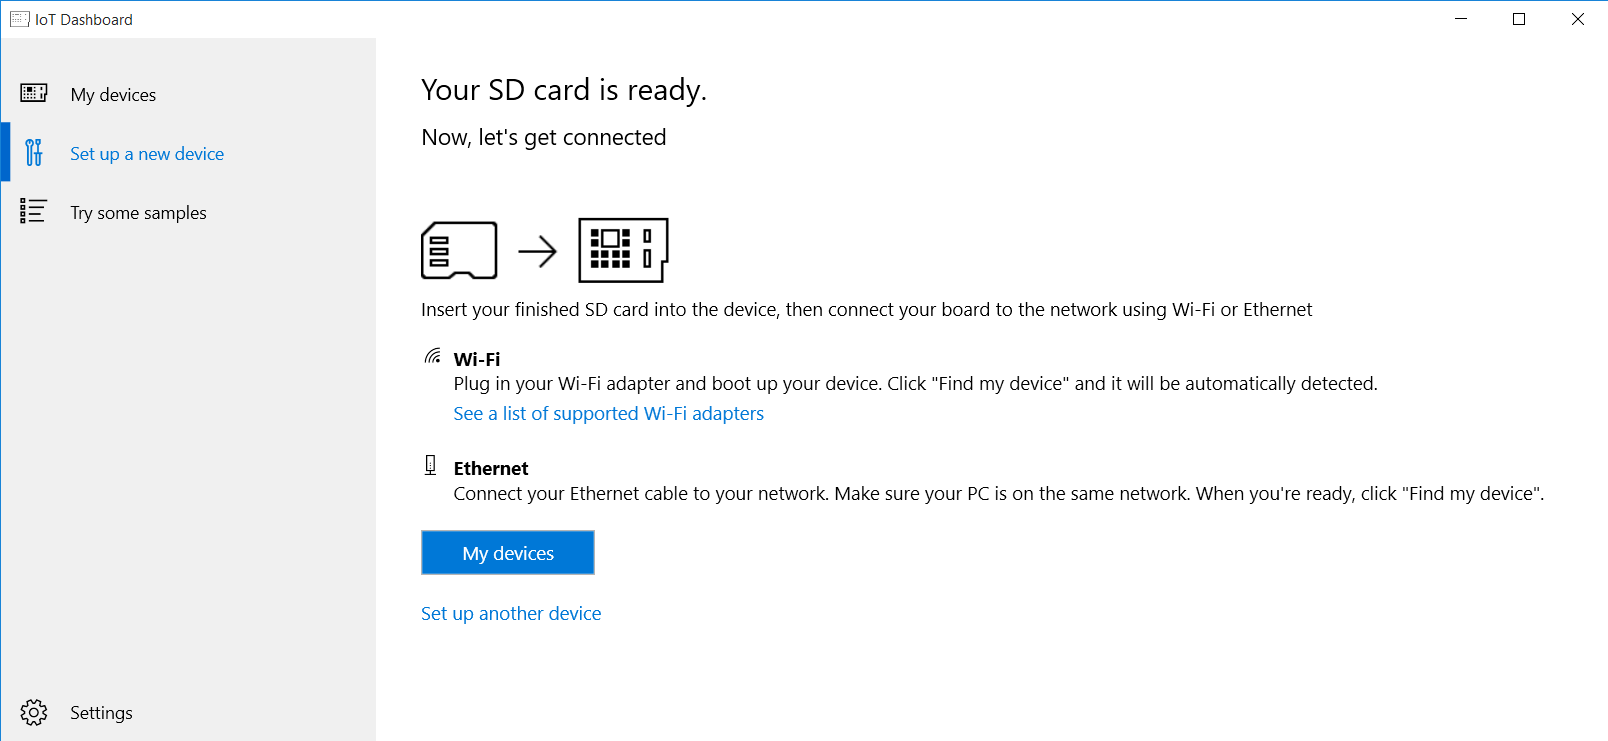
Now you can remove the SD card from the PC and plug it into the Raspberry pi. (I use 16GB SD cards, but probably even 8GB will work.) When you have newer TV with USB ports, you can plug HDMI cable from TV into Raspberry pi and power cable into USB port. Normally, I did not have a problem with this setup, everything seems to be working OK, only I get notification about low voltage (Rainbow colored square in top right corner) to see how first boot looks like, see in video.
So as you can see, first boot time is quite long, and you have to be patient. Later boot is much faster.
Conecting to Device
Now when your device boot up, you can connect it to your home network or directly with network cable to your computer to access web interface of device. For this, you don't need HDMI display to be connected, it will work even with no display.
I connect device using ethernet cable directly to my laptop and connect power cable to one of USB ports of laptop. then after a while (2-3 minutes), you should be able to find raspberry usind IoT dashboard. If you use virtual machine, please make sure that you set up network to "Bridged: connected directly to physical network" (I use WMVare player).
When it is all set up correctly, you will see device in IoT dashboard:

From here, you can go to settings (using pencil icon) and change password, or open device portal (using globe icon).
Default credentials for device are:
- Username: Administrator
- Password: p@ssw0rd
Of course, it is recommended you to change this password before production release.
You can acess device web portal directly from web browser just by typing an IP address, so in my case:
http://169.254.93.138:8080/ and it should open. Sometimes, I had problems with this direct cable connection, and it will not open in Microsoft edge, then try Chrome, or try to open this web portal from your host computer not from virtual machine. To check for connectivity, you can use cmd and type command "ping 196.254.93.138".
If you connect to device, you will see device web interface:

As a first thing, I will set up Wifi to connect to my home network. So you click on "networking" menu and if you have wifi adapter plugged in, you will see a list of all avaiable wifi networks. (I am using TP-LINK TL_WN725N adapter - not every wifi adapter is supported currently.)

To connect to wifi, just choose wifi network and fill in the password. If the device connects sucessfully, you will see a checkmark next to this wifi. Device will connect to this wifi automatically on every startup.
When your device is connected to wifi network and you want to access it from virtual machine, change your network settings to NAT in your virtual machine.
So at this point, you should have all set up, and you can start developing your first app. In my next tip, I will write about various settings on raspberry pi config and about ways in which you can connect to device.