
How to Add Source Codes to GIT Source Control and Publish
4.33/5 (4 votes)
How to add source codes (solution) to GIT source control and publish it in www.VisualStudio.com site.
Introduction
With many reasons, I decided to use GIT instead of TFS. Anyway, I want to teach you how to add your source codes (Solution) to GIT source control and publish it in http://www.VisualStudio.com site.
Step 1
First of all, go to http://www.VisualStudio.com site, login and then select your account.
Step 2
Create your repository:

Step 3
After creating your repository, automatically site redirect you to the repository section. Now click on [Code] link:

Step 4
You will see the code section of your repository:

Note: In this address, you see the [_git] in your address bar. This part of url address is too important. We need this address for publishing our source code in visual studio application to http://www.VisualStudio.com site.
Step 5
Now create a new application or open some of you application. After opening of your application, in solution explorer, right click on you solution and in left menu, click on "Add Solution to Source Control":

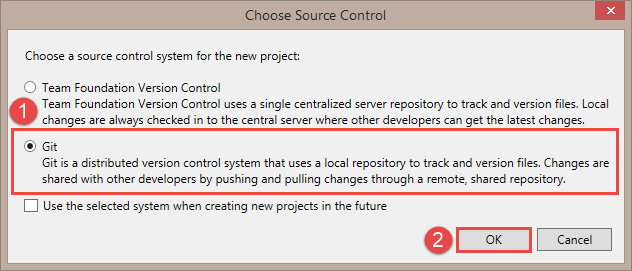
Step 6
After clicking on "Add Solution to Source Control" menu item, a dialog box will be appear. In this dialog box select Git Source Contorl and then click on OK button:
Step 7
After step 6, you will see a green cross icon in left site of each of your source code files:

Step 8
For adding "Team Explorer" view in visual studio, select View sub menu and then click on "Team Explorer" menu item:

Step 9
Again in solution explorer, right click on your solution and in opened menu select "Commit":

Step 10
In "Team Explorer" dialog and in its "Chagnes" part, you should write your comment or description about this committing and the click on "Commit" button:

Step 11
After clicking on "Commit" button, you will see this message: "Commit {random characters} created locally...":

Step 12
In "Team Explorer" dialog and in its "Home" part, you should click on "Unsynced Commits":

Step 13
You should login in visual studio application by your own Microsoft Live account, and after loging, you will see your name in top and right side of visual studio application

Step 14
In "Team Explorer" dialog and in its "Unsync Commits" part, write your repository url that we show you in step 4, and then click on "Publish" button


After clicking on "Publish" button you will see:

and then:

In this step, you will see this message: "The origin remote has been added and the current branch has been published."
Step 15
The last step is to click on "Sync" button, and then you will see this message: "Successfully synchronized incoming and outgoing commits."

Note
If you open the container folder of your application, besides of your .sln (Solution) file, you will see one folder and two files. This means that your application added to GIT source control.
