XCoHtml
4.53/5 (9 votes)
A tool to support the embedding of expandable / collapsible HTML content

Introduction
Quite often, when I was in high-school, I was dealing with learning and communication materials. The biggest challenge was mostly to classify information as relevant or not relevant at a specific point in time, and to establish a desired level of detail, tailored to my needs or my auditorium respectively. All of that come to me by means of courses and presentations over the intranet. The higher the ability to combine expandable content with hyperlinks, graphics and navigation buttons, the faster I was able to reach my goals.
Surfing the internet to find out the ways in which other people deal with such aspects (one could say I am young and restless given my high-school age), I learned several JavaScript approaches to using expandable/collapsible HTML content, ranging from pretty simple (nevertheless valuable) ones like Samir Nigam's expandable panel control and continuing with more elaborate ones, among which Bill Seddon's web control and Tittle Joseph's Custom Control Nugget could be mentioned. Some 'expandable and contractable text blocks' can also be seen at elle A Designs. And, yes, all the collapsible code snippets populating the articles here at CodeProject are equally helpful.
To make the HTML part of my life easier, I managed to program a small tool in C# (well, if 'program' is not too much to say in my case) helping me to efficiently edit the HTML content, expanding and collapsing it my way, whenever I need to.
Working with the XCoHtml Tool
XCoHtml is a "top-most window" tool, providing the JavaScript and CSS files right in-place to support expandable/collapsible content for HTML pages, as well as helping to quickly embed that content within a page.
Normally, you should start by having the page you work on opened in some editor. At the beginning, XCoHtml positions itself on the top-left corner of your screen. Begin by choosing the folder where you want the CSS/JavaScript support to be copied to. Click on CSS / JS path.
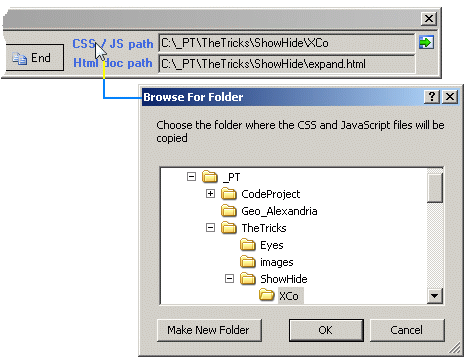
In the popup dialog, select the destination path. Once you have decided on the right destination, click the icon next to the control showing the selected destination, in order for the necessary supporting files to be copied there.
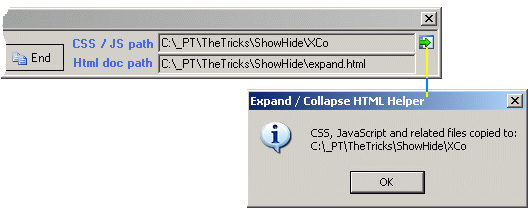
The following files will be copied to the selected location:
- collapse.gif (the icon for the collapse command)
- expand.gif (the icon for the expand command)
- ShowHide.css
- ShowHide.js
Then select the path to the HTML file you are currently working on, by clicking the HTML doc path label. This will allow the tool to check for ID duplicates further on.
In order for your HTML page to take advantage of the CSS/JavaScript support for expandable/collapsible content, you must make the page aware of the CSS and JavaScript provided files, by clicking the dedicated button of the XCoHtml tool.

As a general rule, whenever you give an alike command to the tool, the scripting to be added to the HTML page goes to the clipboard automatically. This allows you, once you return to the editor loaded with your page, to simply paste the content of the clipboard directly into the HTML document, as shown in the above image. The necessary <link> and <script> tags with the correctly completed attributes go to the <head> section (so, be sure you are positioned in the <head> section when getting the content of the clipboard).
Now that the CSS/JavaScript support is fully available, you can start expanding and collapsing your HTML content. As I will explain later in this article, you will need to specify two IDs for two HTML elements (tags): the ID for the expand/collapse icon and the ID for the expandable/collapsible content. Provide those IDs in the corresponding input fields of the tool and check for duplicates by clicking the corresponding blue labels. Also provide a caption for the content.
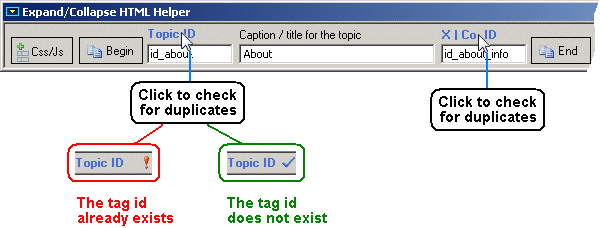
Now, click the Begin button on the tool and position the cursor within the HTML file where you want to start embedding the expandable/collapsible content. Paste the content of the clipboard (as you have already learned, the scripting is made available to you through the clipboard).
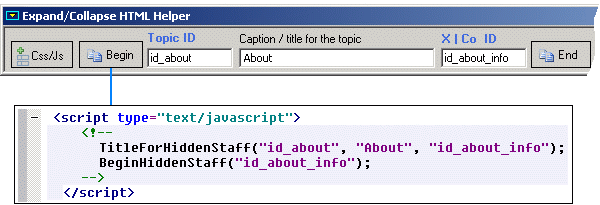
Immediately beneath the script block, write down whatever HTML code you need to be collapsed or expanded. Of course, that code might be already there; in that case you only need to place the scripting as mentioned.
End that HTML block with the termination script, by clicking the End button on the tool and pasting the received content through the clipboard at the desired position.

An Example
Here is an example with an HTML content detailed on two levels of relevance.

Click the expand icon to reach the first level of detail:

And now click the expand icon to reach the second level of detail:

Things can go as deep as you need or want. The HTML content to be expanded and collapsed is entirely up to you.
How Everything Works
The expand ![]() and collapse
and collapse ![]() icons are brought as background images within
icons are brought as background images within <span> tags:
<span id=idTitle class='expand' onClick='ShowOrHide(idHiddenInfo, id)'> </span>
In the example above, idTitle would be 'id_about'. The style used for showing the expand icon is as follows:
.expand
{
  background-image:url('expand.gif');
  background-repeat: no-repeat;
  cursor:pointer;
  width:24px;
}
while the style for the collapse icon looks like:
.collapse
{
  background-image:url('collapse.gif');
  background-repeat: no-repeat;
  cursor:pointer;
  width:24px;
}
A small observation here: a couple of a non-breaking spaces must be used with the <span> tag, as the width attribute for <span> does not work in Firefox and Chrome browsers.
The caption for the expandable/collapsible content is governed by the following style:
.topic
{
  font-family: Tahoma, Arial, Helvetica, sans-serif;
  font-size:12pt;
  font-weight: bold;
}
The result of expanding and collapsing the HTML content by clicking the corresponding icon is achieved through the following function in JavaScript:
function ShowOrHide(idTarget, idCmd)
{
  var whatToShowOrHide = document.getElementById(idTarget); // the shown or hidden staff
  var clickedIcon = document.getElementById(idCmd); // the clicked icon (to show / hide)
  if (clickedIcon.className == 'expand')
  {
    whatToShowOrHide.style.display = "block"; // show the staff
    clickedIcon.className = "collapse"; // toggle icon
  }
  else
  {
    whatToShowOrHide.style.display = "none"; // hide the staff
    clickedIcon.className = "expand"; // toggle icon
  }
}
To make some HTML content expandable/collapsible, that content must be guarded with a begin and an end specification.
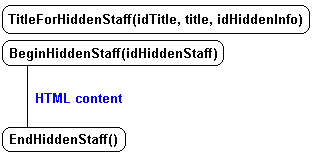
The begin specification is implemented through a call to the TitleForHiddenStaff() followed by a call to the BeginHiddenStaff():
function TitleForHiddenStaff(idTitle, title, idHiddenInfo)
{
  document.write("<span id='" + idTitle +
	"' class='expand' onClick='ShowOrHide(\"" + idHiddenInfo + "\", id)'>");
  document.write("-non breakable spaces here-</span><span class='topic'>");
  document.write(title);
  document.write("</span>");
}

function BeginHiddenStaff(idHiddenStaff)
{
  document.write("<table id='" + idHiddenStaff + "' style='display:none'>");
  document.write("<tr><td width='19px'>-non breakable space-</td><td>");
}
The end specification is implemented through a call to the EndHiddenStaff() function:
function EndHiddenStaff()
{
  document.write("<td></tr></table>");
}
Hints
- The tool has been tested with:

- (Double) click the client area of
XCoHtmlor press F1 when the tool has the focus to pop-up a quick reference guide for using the tool. - Make sure you have saved your work in the HTML editor after pasting anything from the tool, so that the ID duplicate checking be done next time on the latest version of the HTML file.
- You can add using a script the expandable/collapsible content to your HTML page by calling the
AddHiddenStaff(staff)function, too.
History
- 25th June, 2010: Article posted
