
Remote Method Invocation (RMI)
5.00/5 (3 votes)
The main purpose of this article is to describe the advantages of using RMI in the process of developing distributed applications using Java. RMI is one of the classic methods compared to other modern methods (e.g. .NET Remoting, WCF Services etc.), used for accessing objects remotely.
1. Introduction
RMI is used when we have to invoke methods from distance on remote objects (these objects are located on other systems). RMI is very limited (is the single thing which is able to do it) and it give us a platform-independent understanding.
When we start to use RMI, the programming of streams and sockets disappear. By having the objects remotely stored somewhere, the access to them becomes very transparent for the programmer.
I would like to mention from start that the article is for those (students and not only) who wish to understand the basic principles of accessing objects remotley. The examples from here are based on original examples from [1].
In order to use a remote object, we have to gain a reference for that object. The methods that will be used for that object are invoked in the same way as the local objects. RMI is using byte streams in order to transfer data and method calling (invocations). This process is done automatically by the RMI infrastructure.
2. How is done?
What we have stated above is a simplification of what actually is happening. The server component will control all the objects by registering them using a naming service. After this process is realized, this interface will be accessed by client programs.
The interface is composed from the signatures of the methods specific to the object for which the server will make available publicly. By using the same naming service, the client will obtain a reference to the interface, called stub. In the stub, which is local placeholder, the remote object is stored. On the server system, which is remotely, there is a skeleton. In the moment when the client will invoke a method specific to the remote object, it will appear to the client like being invoked directly on the object. In reality, there is a method that is equivalent is called in the stub. The stub will forward the calling and all the parameters to the skeleton that is placed on the remote server. The parameters that can be used are some primitive’s types which implements Serializable interface. The process of serializing these types of parameters, is known as marshalling [3]. Next, the skeleton from the server will convert the stream as a method call with the give parameters. The parameters are de-serialized and the process is known as unmarshalling [3]. In the end, the skeleton will invoke the method (which is implemented on the server). The phases that we have described above are depicted in the Figure 1. The figure shows a very simplified way of what actually is done at network level. Two more layers are implied at each end of the transmission, transport layer and remote reference layer. In order to gain more knowledge regarding the network layers, go here [2] and here [3]. Starting with J2SE 1.2, the skeleton was totally removed and the servers components are communicate with the reference layer. The foundation and the main phases (principles) remain the same and Figure 1 depict a very useful representation of how the things are done.

Figure 1. Invoking methods for a remote object [1]
What is happening if we have a method that return a value? The process depicted above is reversed, and the returned value is serialized on the server (by whom? by the skeleton) and de-serialized on the client (by whom? by stub).
3. How is implemented?
In order to use RMI in programming, we have to add the following packages:
- java.rmi
- java.rmi.server
- java.rmi.registry
After doing the including of the packages, we have to follow some basic steps. The list of the steps is described in the followings.
3.1. Creating the interface;
3.2. Developing a class which implements the interface from 3.1;
3.3. Develop the server component (process);
3.4. Develop the client component (process).
Before starting the implementation of the steps, let’s describe a simple application as an example on which we will apply the steps described above.
The first example of application consists in a simple displaying of a greeting message to a client that is using the interface, registered with the naming service in order to invoke the method implementation associated on the server. In a real application, we will have more methods to be invoked, methods that are implemented to some class (this will be shown in a next example).
For the above example, let’s start to implement the specific steps.
3.1. Create the interface
The interface will always:
- Import the package java.rmi;
- Extend Remote class, which as Serializable interface is a ‘labeled’ or ‘tagging’ interface which does not have any signatures of methods. In our case the definition of the interface has to include a signature for the method getGreetingMessage(). The method will be available to the clients.
- This method will throw the RemoteException.
The interface will look like in Figure 2 and code listening 1. For everything to go perfectly, please, keep the files as they are shown in pictures. Later you will understand why.

Figure 2. The interface
Listnening 1 - Structure of the interface
import java.rmi.*;

public interface IHello extends Remote
{
    public String getGreetingMessage() throws RemoteException;
}
3.2. Developing a class which implements the interface from 3.1 (Figure 2)
The class that will implements the interface, should:
- Import packages java.rmi and java.rmi.server;
- Extend the class RemoteObject or some subclasses specific to this class (in some real applications you will find a frequently extension of subclass UnicastRemoteObject, because of the fact that the class has point-to-point communication with some streams over TCP);
- Implements the interface from 3.1 IHello. Here will implements the body of the getGreetingMessage() method.
- It is necessary to provide a constructor for the implemented object. If we don’t have any implementation for the object, we will leave it empty. The constructor needs to throw RemoteException. In order for everything to be OK and understandable, we will add (append) Implementation keyword next to the name of our interface with the goal to form the name of the class that is implemented.
The class that will implements IHello will look like in Figure 3 and code listening 2. The keyword @Override shows us that the method getGreetingMessage() is overridden.

Figure 3. Implementing the IHello (see step 3.1) interface
Listening 2 - Implementation of the IHello interface
import java.rmi.*;
import java.rmi.server.*;

public class HelloImplementation extends UnicastRemoteObject
        implements IHello {

    public HelloImplementation() throws RemoteException {
        //There is no action need in this moment.
    }

    @Override
    public String getGreetingMessage() throws RemoteException {
        return ("Hello there, student.");
    }
}
3.3. Develop the server component (process)
The task of the server component is to create object(s) from the class that we have implemented above. The next step is to register them with the help of a naming service, called registry.
The registration process is done with a rebind() method of class Naming (this class is from java.rmi package) and it has two argument:
- A string that keeps the name of the remote object. The string has a URL form that is preceded by the rmi protocol.
- A reference to the object that is remote (as a parameter of type Remote).
Next we will provide the code (Figure 4 and code listening 3) for the server component. The server contains one single method, main. In order to catch the different types of exception, the method main throws Exception.

Figure 4. The server
Listening 3 - Implementation of the server
import java.rmi.*;

public class HelloServerComponent {

    private static final String host = "localhost";

    public static void main(String[] args) throws Exception {
        //** Step 1
        //** Declare a reference for the object that will be implemented
        HelloImplementation temp = new HelloImplementation();

        //** Step 2
        //** Declare a string variable for holding the URL of the object's name
        String rmiObjectName = "rmi://" + host + "/Hello";

        //Step 3
        //Binding the object reference to the object name.
        Naming.rebind(rmiObjectName, temp);

        //Step 4
        //Tell to the user that the process is completed.
        System.out.println("Binding complete...\n");
    }
}
The method will set a connection between the name of the object and his reference. The clients will have the possibility to use the remote object’s name in order to retrieve a specific reference of that object using the registry.
The URL string indicates the name of the remote object that is stored on a host machine. In order to keep it simple, we will use localhost (the default value that RMI is assuming). The default port of RMI is 1099 and it can be changed if you wish.
3.4. Develop the client component (process)
The client goal is to obtain a reference for the remote object through the registry. In order to accomplish this, we use the lookup method which can be found in Naming class. The lookup method receive as a parameter the URL that the server generated when binding the object reference to the object’s name in the registry. The lookup method returns a Remote reference. This reference need to be typecast into a Hello reference (and not a HelloImplementation reference!). After the Hello reference is obtained, it can be used to invoke (call) the method that we have made it available in the interface.
The code is listed below, in Figure 5 and code listening 4.

Figure 5. The client
Listening 4 - Client Implementation
import java.rmi.*;

public class HelloClientComponent
{
    private static final String host = "localhost";

    public static void main(String[] args)
    {
        try
        {
            //We obtain a reference to the object from the registry and next,
            //it will be typecasted into the most appropiate type.
            IHello greeting_message = (IHello) Naming.lookup("rmi://"
                    + host + "/Hello");

            //Next, we will use the above reference to invoke the remote
            //object method.
            System.out.println("Message received: " +
                    greeting_message.getGreetingMessage());
        }
        catch (ConnectException conEx)
        {
            System.out.println("Unable to connect to server!");
            System.exit(1);
        }
        catch (Exception ex)
        {
            ex.printStackTrace();
            System.exit(1);
        }
    }
}
4. How the running process is done?
In order to run the application, we need to compile all the four files. This is done from the Command Prompt window using javac command. First, we have to navigate to the path where we have the files, in my case it will be on E:\Proiecte\Java\RMI\src (see Figure 6). In case that you have created your files with NetBeans (which I recommend for the beginning to do like this), the files are stored in src folder.

Figure 6. The location of the files
Next, we will compile the files (use the same order as I give you) using javac command as it follows:
- javac IHello.java
- javac HelloImplementation.java
- javac HelloServerComponent.java
- javac HelloClientComponent.java
When you try to compile one of the file and if you receive the message from Figure 7, then you have two options: first, you can copy all the files in your Java folder (path in my case is C:\Program Files\Java\jdk1.8.0_40\bin) or second, you can add it as an environment variable (see the annexes of the article to see how to proceed).

Figure 7. Command javac not found
Step 1 - After you have configured your javac command to the environment variables, let’s start to compile all the files. If everything is going OK, your command prompt should look like in Figure 8.

Figure 8. Compiling the files
Step 2 - Next, execute the rmic command for HelloImplementation (see Figure 9). Read the message after the command has been executed.

Figure 9. Running rmi command
Step 3 – Run rmiregistry command (see Figure 10). You will not receive any message, just a blinking pointer on the next line of your window and the title of the window is changed.

Figure 10. Running rmiregistry command
Step 4 – Open a new command prompt, and run java HelloServerComponent (see Figure 11). Is OK, if you receive the message Binding complete….

Figure 11. Running HelloServerComponent
Step 5 – Open a new command prompt, and run java HelloServerComponent. If everything goes perfect, you should receive the following message (see Figure 12): Message received: Hello there, student.

Figure 12. Running HelloClientComponent
In this moment, we have covered all the basic steps that we need in order to set RMI client-server application.
5. Annexes
5.1. Add javac as environment variable
In order to add javac as environment variable, follow the next steps:
- Enter your Start menu, and type environment and wait for a couple of seconds and choose Edit the system environment variables (Figure 13).

Figure 13. Access environment variable
- The window is opened (Figure 14), and press the Environment variables… button from the bottom of the window.

Figure 14 System Properties for adding environment variables
- You can add your javac command as environment variable in two ways (you decide):
- As user variable for your windows account, or
- As system variable for the entire computer.
After you have decided where you want to place your path, select the variable Path, and press Edit (Figure 15).

Figure 15. Choosing the desired type of variable
- Go at the end of the entire string with different paths, and add your path to javac file. In my case it will be: C:\Program Files\Java\jdk1.8.0_40\bin, and press OK button (Figure 16).
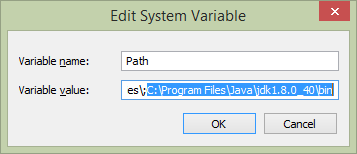
Figure 16. Setting the path
- In order to verify that your path is set correctly, open a command prompt and type java –version. If everything is OK, you should receive the message shown in figure 17.

Figure 18. Path checking
6. References
[1] Jan Graba, An Introduction to Java Networking Programming, 2013, Springer Publishing House, ISBN: 978-1-4471-5253-8.
[2] Internet Protocol Suite (TCP), http://en.wikipedia.org/wiki/Internet_protocol_suite
[3] System Architecture, http://www.cs.mun.ca/~michael/java/jdk1.1-beta2-docs/guide/rmi/rmi-arch.doc.html
History
08.03.2015: Release of the first article version
09.03.2015: Code listening for files has been added. The archive with the files of the project has been attached.