
JAX-WS: Using Apache CXF to Create a Bottom-Up Web Service, Web Service Client, and Securing the Web Service
5.00/5 (8 votes)
We’ll be using Java 7 and the Apache CXF framework for implementing a web service and client within the Eclipse IDE.
Introduction
After reading this article and following the examples, the reader should be able to create a bottom-up (code first) SOAP web service, along with a client which utilizes the web service, while implementing message-level encryption to protect the message payload.
Background
When I first encountered SOAP web services, I spent a significant amount of time searching the internet, reading articles, and reviewing technical specifications in hopes of understanding and ultimately being able to connect to existing web services and stand up my own web services. I found pieces of information scattered across various websites, but had always hoped to find a single source which presented a complete example that I could understand. This article is my attempt at helping other developers who may be encountering SOAP web services for the first time, by providing a tutorial from the ground up.
While my goal is to provide a cohesive example of a SOAP web service, I will not be explaining, in detail, most aspects of SOAP messages, the WSDL file, the Apache CXF libraries, or the WSS4J libraries. This article is more of a "how" to get it done, rather than a detailed explanation of the technologies.
In addition to creating a basic web service and client, the article goes a step further by showing how to encrypt the web service message payload, providing message-level encryption for web services. WS-Security is a complicated topic on its own, so, again, this article will only cover basic use of the WSS4J implementation of WS-Security for SOAP messages.
Environment
This article will be using the Eclipse IDE (Kepler), Java 7, and the Apache CXF framework for implementing a web service and client. Apache Tomcat will function as the web server for hosting the web service. As an alternative to Apache CXF, the Apache Axis libraries can be used, but, personally, I have more experience with CXF. Various articles on the internet explain the differences between CXF and Axis.
Java
Java JDK 1.7.0_60
http://www.oracle.com/technetwork/java/javase/downloads/java-archive-downloads-javase7-521261.html
IDE
Eclipse Kepler Service Release 2
http://eclipse.org/downloads/packages/release/Kepler/SR2
Web Server
Apache Tomcat 7
http://tomcat.apache.org/download-70.cgi
Web Services Framework
Apache CXF 2.6.13
https://cxf.apache.org/cxf-2613-release-notes.html
WSS4J 1.6.16
http://archive.apache.org/dist/ws/wss4j/1.6.16/
Creating a Bottom-Up Web Service
Web services can be created in two ways: Top-Down or Bottom-Up.
A top-down web service starts with the creation of a WSDL (Web Service Definition Language) file, followed by the generation of Java code conforming to the specifications set by the WSDL.
A bottom-up web service starts with the creation of Java code, followed by the generation of a WSDL file describing the operations and messages necessary to interact with the Java code.
This article will focus on bottom-up web services. I believe this approach is easier to follow than top-down service creation, especially for a Java developer new to SOAP services. Essentially, we'll create a basic utility written in Java, which could be part of a standalone application, and utilize web services frameworks to expose that utility as a web service.
Create an Eclipse Project
Create a project workspace

Create a Dynamic Web Project


Create the Logic to Expose as a Web Service
For this example, we'll be creating a MathUtility class which exposes two methods for manipulating numbers. There is nothing inherently special or web service-related about this logic; it could easily be used, on its own, outside of the context of SOAP web services.
Create a new package under the Java Resources / src directory

Create a new class under the package. This class contains the logic that will be exposed as web service operations.

Create the logic
package com.math.utility;

public class MathUtility {

    public int addIntegers(int firstNum, int secondNum) {
        return firstNum + secondNum;
    }

    public int factorial(int n) {
        int result = 1;
        for (int i = 1; i <= n; i++) {
            result = result * i;
        }
        return result;
    }
}
Web Server Configuration
The Apache Tomcat server, which will host the web service, needs to be configured in the Eclipse IDE.
Click on the “Server” tab at the bottom of the UI

Select “Create a New Server” and then Select “Apache” – “Tomcat 7”

Select the Tomcat Installation Directory

Select “Finish”. Tomcat is now added to the Servers listing
Apache CXF 2.x Configuration
The Eclipse IDE needs to be configured to use the Apache CXF web service framework for creating and communicating with web services.
Select “Window” – “Preferences” – “Web Services” – “CXF 2.x Preferences”.
Under “CXF Runtime” select “Add” and find the location in which you unpacked the CXF libraries

Select “Apply” and “Ok” to complete this step.
Finally, select “Server and Runtime” underneath “Web Services” and set the Server Runtime to Tomcat 7. The Web Service Runtime should be set to Apache CXF 2.x.

Select “Apply”, then “OK” to finish.
Create the Web Service
After creating the logic that we'd like to expose as a service, along with configuring the Eclipse workspace to use Tomcat and CXF, we are able to build the Web Service and run it.
Right Click Java Resources – New – Web Service
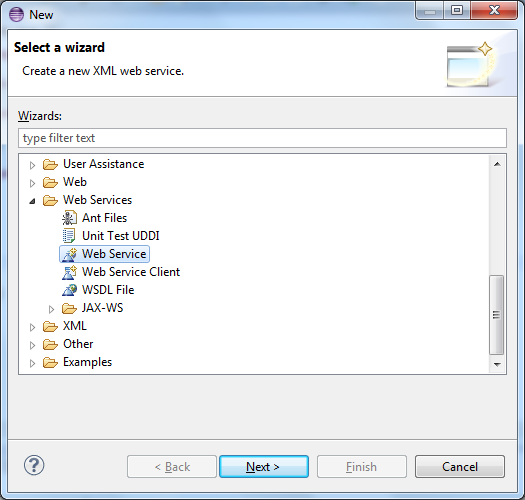
“Browse” for the Service Implementation to use for the Web Service. In our case, this will be “MathUtility”.
Move the Slider Bar to “Test Web Service” and select "Finish".

At this time, the Eclipse IDE uses Apache CXF to generate a WSDL file and associated schema to create a web service based on the MathUtility logic. After creating the necessary files, the tool adds these files to the "wsdl" directory within "WebContent".
After the web service creation is completed, the web service is started, along with a utility allowing us to verify that the logic is exposed as a web service and works correctly.
Once the web server has started, a Web Services Explorer window will appear with service details.

If you select an Operation, you can test that Service. In this sample, select "factorial". Then enter a number in the textbox.

Select “Go” and the operation is executed. The “Status” window shows the Response of the web service call.

The logic within “MathUtility” has now been exposed as a SOAP web service, deployed to an Apache Tomcat web server, and tested using the Web Services Explorer feature built-in to the Eclipse IDE.
Creating a Web Service Client
While the Web Services Explorer allows us to interact with the web service and test functionality, in order to programatically interact with the utility, a web service client needs to be created. The web service client will take the form of a standalone Java application.
Create an Eclipse Project
In Eclipse Project Explorer, Right Click and Select “New” – “Project” – “Java Project”

Create a Project Named “MathUtilityClient”

Right Click on “src” and select “New” – “Package”. Name the new package. This package will eventually contain Apache CXF auto-generated code for interacting with the previously created web service.

Generating the Client Stubs
We will now utilize the wsdl2java tool which is packaged as part of the Apache CXF distribution. The wsdl2java tool will take a WSDL document and generate Java code for interacting with the web services defined in the WSDL.
Open a Command Prompt and navigate to the directory containing the WSDL which was generated using Apache CXF

Now, use the wsdl2java tool to generate the Java classes needed for interacting with the web service.

"C:\Program Files (x86)\apache-cxf-2.6.13\apache-cxf-2.6.13\bin\wsdl2java.bat" -fe jaxws21 -autoNameResolution -p com.schema.mathutility -d "C:\Users\cjswidj2\Desktop\MathUtilityClient\generated" mathutility.wsdl
There are several options specified in this example. The most important are the package name for generated classes (-p) and the output directory for the files (-d). A comprehensive list of options can be found on the Apache CXF website: http://cxf.apache.org/docs/wsdl-to-java.html.
The generated classes have been created and placed in the directory which we defined when executing the wsdl2java command.

Copy all the generated files from the temporary directory into the empty Eclipse package within the MathUtilityClient project which was created earlier.

Invoke the Web Service
We need to create a test class which will connect to the MathUtility web service using the generated classes and return a result.
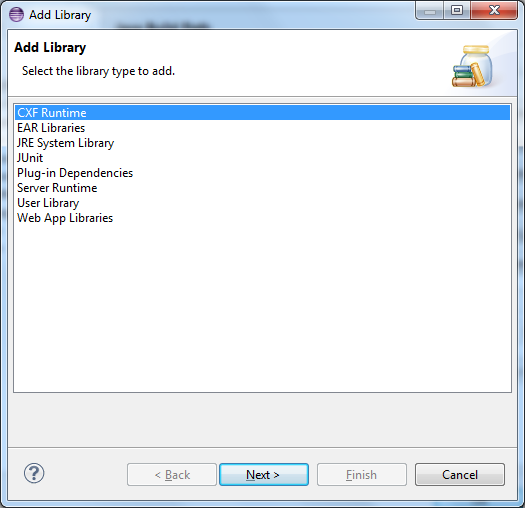
First, configure the client project to have the Apache CXF libraries in the build/class path.

Create a package to contain the test class.

Create the class with a main method to run our test.

Add logic to the main method for connecting to the SOAP web service and executing an operation.
package com.mathutility.test;

import org.apache.cxf.jaxws.JaxWsProxyFactoryBean;
import com.schema.mathutility.MathUtility;

public class TestMathUtility {

    public static void main(String[] args) {

        JaxWsProxyFactoryBean factory = new JaxWsProxyFactoryBean();

        // Use the URL defined in the soap address portion of the WSDL
        factory.setAddress("http://localhost:8080/MathUtility/services/MathUtilityPort");

        // Utilize the class which was auto-generated by Apache CXF wsdl2java
        factory.setServiceClass(MathUtility.class);

        Object client = factory.create();

        try {

            // Call the Web Service to perform an operation
            int response = ((MathUtility)client).factorial(4);

            System.out.println(response);

          } catch (SecurityException e) {

            e.printStackTrace();

          } catch (IllegalArgumentException e) {

            e.printStackTrace();

          }
    }
}
Run the test class
The client’s console output shows the creation of a service and the invocation of a method on the service, along with the service’s output.

The Apache Tomcat console shows the SOAP Payloads, including both the Inbound and Outbound SOAP messages, from the web service server perspective.

We have now connected to a SOAP web service hosted on an Apache Tomcat server and executed an operation exposed by that web service.
Securing the SOAP Web Service
There are several ways to secure SOAP web services, but this article will focus specifically on message-level encryption. Message-level encryption dictates that parts of the SOAP message be encrypted from the origin of the message to the destination of the message. In order to provide message-level encryption for this web service, we will utilize the Apache WSS4J libraries to encrypt the payloads of the web service requests. Specifically, the body of the SOAP message will be encrypted.
As an important note, when applying message-level encryption in a production setting, both the request and corresponding response would likely be encrypted, protecting the contents of the message, roundtrip.
In this example we will just encrypt the traffic from the web service client to the web service, showing basic encryption and decryption.
Creating a Public / Private Key Pair
A pair of keys will be necessary for encrypting and decrypting the message at their respective locations.
The Apache CXF website provides an example of how to create and package X.509 certificates to be used for web service security: http://cxf.apache.org/docs/ws-security.html. I'm reiterating the basic steps.
The Java keytool will be used for generating the keys and manipulating the keystore. If "keytool" is not on your PATH, you can set it as follows:
set PATH=%PATH%;"C:\Program Files\Java\jdk1.7.0_60\bin"
Create a Public / Private Key Pair and Store the Private Key in a Keystore
keytool -genkey -alias testkey -keystore keystore.jks -storepass storepass -dname "cn=testkey" -keyalg RSA
Export the Public Key from the Private Keystore
keytool -export -alias testkey -file publickey.rsa -keystore keystore.jks -storepass storepass
Import the Public Key into a New Keystore
keytool -import -alias testkey -file publickey.rsa -keystore clientkeystore.jks -storepass clientstorepass
After performing these steps, two keystores have been created:
- clientkeystore.jks
- The Public Keystore will be used by the Web Service Client for encryption of the message payload
- keystore.jks
- The Private Keystore will be used by our Web Service for decrypting the message payload
Configure the Client to Encrypt the Message
Apache CXF relies on a WSS4J "interceptor" to manipulate the web service message and apply security. The interceptor is a Java class essentially "catching" the web service message and transforming it according to specifications provided via configuration.
In the Client example, we will programmatically add the WSS4J interceptor in our main method.
In the Server example, the WSS4J interceptor configuration will be provided in an XML file (cxf-beans.xml). CXF will internally use to Spring to load the configuration file and instantiate the necessary WSS4J classes.
Add the Keystore to the Web Service Client Project
Copy the clientkeystore.jks file created using the keytool into the Client project.

Create a Client Keystore Properties File
A properties file is required to specify the keystore file to be loaded along with properties regarding this keystore.
clientKeystore.properties:
org.apache.ws.security.crypto.provider=org.apache.ws.security.components.crypto.Merlin
org.apache.ws.security.crypto.merlin.keystore.file=clientKeystore.jks
org.apache.ws.security.crypto.merlin.keystore.password=clientstorepass
org.apache.ws.security.crypto.merlin.keystore.type=jks
After creating the properties file, it needs to be added to the Client project.

Create a Password Callback Class
Although the keystore password is provided in the keystore properties file, WSS4J requires that the password for accessing a keystore is loaded through the use of a Password Callback class. Ideally, this class would retrieve the password from an encrypted file or other datastore, instead of hardcoding a value in the class, itself.
Create a New Java Package

Create a Client Password Callback Class

package com.math.utility.security;

import java.io.IOException;

import javax.security.auth.callback.Callback;
import javax.security.auth.callback.CallbackHandler;
import javax.security.auth.callback.UnsupportedCallbackException;

import org.apache.ws.security.WSPasswordCallback;

public class ClientPasswordCallback implements CallbackHandler {

    @Override
    public void handle(Callback[] callbacks) throws IOException,
            UnsupportedCallbackException {

        WSPasswordCallback pc = (WSPasswordCallback) callbacks[0];

        // set the password for our message.
        pc.setPassword("clientstorepass");

    }

}
Programmatically Apply Security
For our client, the WSS4J output interceptor will be added programmatically, instead of using Spring Inversion of Control. The Java code will create a Map of properties required by the WSS4J libraries and instantiate an interceptor using these properties.
In the sample code, I have also added Logging Interceptors which will show the outbound and inbound messages. The log4j.properties file is included in the project source .zip.
WSS4J Interceptor Configuration
As a Point of Interest, the "ENCRYPTION_PARTS" property of the WSS4J Interceptor specifies exactly what parts of the SOAP message require encryption:
        // Set up WS-Security Encryption
        // Reference: https://ws.apache.org/wss4j/using.html
        Map<String, Object> props = new HashMap<String, Object>();
        props.put(WSHandlerConstants.USER, "testkey");
        props.put(WSHandlerConstants.ACTION, WSHandlerConstants.ENCRYPT);
        props.put(WSHandlerConstants.PASSWORD_TYPE, "PasswordText");
        props.put(WSHandlerConstants.ENC_PROP_FILE, "clientKeystore.properties");
        props.put(WSHandlerConstants.ENCRYPTION_PARTS, "{Content}{http://schemas.xmlsoap.org/soap/envelope/}Body");
        props.put(WSHandlerConstants.PW_CALLBACK_CLASS, ClientPasswordCallback.class.getName());

        WSS4JOutInterceptor wss4jOut = new WSS4JOutInterceptor(props);

        ClientProxy.getClient(client).getOutInterceptors().add(wss4jOut);
Complete Client Code:
package com.mathutility.test;

import java.util.HashMap;
import java.util.Map;

import org.apache.cxf.frontend.ClientProxy;
import org.apache.cxf.interceptor.LoggingInInterceptor;
import org.apache.cxf.interceptor.LoggingOutInterceptor;
import org.apache.cxf.jaxws.JaxWsProxyFactoryBean;
import org.apache.cxf.ws.security.wss4j.WSS4JOutInterceptor;
import org.apache.ws.security.handler.WSHandlerConstants;

import com.math.utility.security.ClientPasswordCallback;
import com.schema.mathutility.MathUtility;

public class TestMathUtility {

    public static void main(String[] args) {

        JaxWsProxyFactoryBean factory = new JaxWsProxyFactoryBean();

        // Use the URL defined in the soap address portion of the WSDL
        factory.setAddress("http://localhost:8080/MathUtility/services/MathUtilityPort");

        // Utilize the class which was auto-generated by Apache CXF wsdl2java
        factory.setServiceClass(MathUtility.class);

        Object client = factory.create();

        // Adding Logging Interceptors
        LoggingOutInterceptor loggingOutInterceptor = new LoggingOutInterceptor();
        loggingOutInterceptor.setPrettyLogging(true);
        ClientProxy.getClient(client).getOutInterceptors().add(loggingOutInterceptor);

        LoggingInInterceptor loggingInInterceptor = new LoggingInInterceptor();
        loggingInInterceptor.setPrettyLogging(true);
        ClientProxy.getClient(client).getInInterceptors().add(loggingInInterceptor);

        // Set up WS-Security Encryption
        // Reference: https://ws.apache.org/wss4j/using.html
        Map<String, Object> props = new HashMap<String, Object>();
        props.put(WSHandlerConstants.USER, "testkey");
        props.put(WSHandlerConstants.ACTION, WSHandlerConstants.ENCRYPT);
        props.put(WSHandlerConstants.PASSWORD_TYPE, "PasswordText");
        props.put(WSHandlerConstants.ENC_PROP_FILE, "clientKeystore.properties");
        props.put(WSHandlerConstants.ENCRYPTION_PARTS, "{Content}{http://schemas.xmlsoap.org/soap/envelope/}Body");
        props.put(WSHandlerConstants.PW_CALLBACK_CLASS, ClientPasswordCallback.class.getName());

        WSS4JOutInterceptor wss4jOut = new WSS4JOutInterceptor(props);

        ClientProxy.getClient(client).getOutInterceptors().add(wss4jOut);

        try {

            // Call the Web Service to perform an operation
            int response = ((MathUtility)client).factorial(4);

            System.out.println(response);

          } catch (SecurityException e) {
            e.printStackTrace();
          } catch (IllegalArgumentException e) {
            e.printStackTrace();
          }

    }

}
Configure the Web Service to Decrypt the Message
For the server-side, WSS4J configuration is provided via an XML file (cxf-beans.xml). CXF internally uses Spring to load the configuration file and instantiate the necessary WSS4J classes.
Note: Configuration, Keystore, and Properties need to be on the application classpath, so verify the classpth settings to make sure the files are found at runtime.
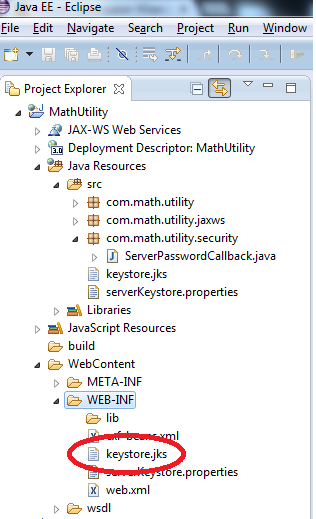
Add the Private Keystore to the Web Service Server Project
Copy the keystore.jks file created using the keytool into the Server project.
Create a Properties file for using the Keystore
A properties file is required to specify the keystore file to be loaded along with properties regarding this keystore.
serverKeystore.properties:
org.apache.ws.security.crypto.provider=org.apache.ws.security.components.crypto.Merlin
org.apache.ws.security.crypto.merlin.keystore.file=keystore.jks
org.apache.ws.security.crypto.merlin.keystore.password=storepass
org.apache.ws.security.crypto.merlin.keystore.type=jks
After creating the properties file, it needs to be added to the Server project.

Create a Password Callback Class
Even though the keystore password is provided in the keystore properties file, WSS4J requires that the password for accessing a keystore is loaded through the use of a Password Callback class. Ideally, this class would retrieve the password from an encrypted file or other datastore, instead of hardcoding a value in the class, itself.
Create a New Java Package

Create a Server Password Callback Class

package com.math.utility.security;

import java.io.IOException;

import javax.security.auth.callback.Callback;
import javax.security.auth.callback.CallbackHandler;
import javax.security.auth.callback.UnsupportedCallbackException;

import org.apache.ws.security.WSPasswordCallback;

public class ServerPasswordCallback implements CallbackHandler {

    @Override
    public void handle(Callback[] arg0) throws IOException,
            UnsupportedCallbackException {

        WSPasswordCallback pc = (WSPasswordCallback) arg0[0];

        // set the password for our message.
        pc.setPassword("storepass");

    }

}
Update the Configuration File to Apply Security
The cxf-beans.xml file must now be updated to include the relevant components which have been added for applying message-level security. These updates include referencing the password callback class, along with the declaring the WSS4J interceptor. As a Point of Interest, the "decryptionParts" element of the WSS4J Interceptor specifies exactly what parts of the SOAP message require decryption.
cxf-beans.xml:
<?xml version="1.0" encoding="UTF-8"?>
<beans xmlns="http://www.springframework.org/schema/beans"
    xmlns:xsi="http://www.w3.org/2001/XMLSchema-instance" xmlns:jaxws="http://cxf.apache.org/jaxws"
    xsi:schemaLocation="http://www.springframework.org/schema/beans http://www.springframework.org/schema/beans/spring-beans-2.5.xsd http://cxf.apache.org/jaxws http://cxf.apache.org/schemas/jaxws.xsd">
    <import resource="classpath:META-INF/cxf/cxf.xml" />
    <import resource="classpath:META-INF/cxf/cxf-extension-soap.xml" />
    <import resource="classpath:META-INF/cxf/cxf-servlet.xml" />

    <bean id="myPasswordCallback" class="com.math.utility.security.ServerPasswordCallback"/>

    <jaxws:endpoint xmlns:tns="http://utility.math.com/" id="mathutility"
        implementor="com.math.utility.MathUtility" wsdlLocation="wsdl/mathutility.wsdl"
        endpointName="tns:MathUtilityPort" serviceName="tns:MathUtilityService"
        address="/MathUtilityPort">
        <jaxws:features>
            <bean class="org.apache.cxf.feature.LoggingFeature" />
        </jaxws:features>

            <jaxws:inInterceptors>
              <bean class="org.apache.cxf.ws.security.wss4j.WSS4JInInterceptor">
                 <constructor-arg>
                    <map>
                       <entry key="user" value="testkey"/>
                       <entry key="action" value="Encrypt"/>
                       <entry key="passwordType" value="PasswordText"/>
                       <entry key="decryptionParts" value="{Content}{http://schemas.xmlsoap.org/soap/envelope/}Body"/>
                       <entry key="decryptionPropFile" value="serverKeystore.properties"/>
                       <entry key="passwordCallbackRef">
                          <ref bean="myPasswordCallback"/>
                       </entry>
                    </map>
                 </constructor-arg>
              </bean>

           </jaxws:inInterceptors>

    </jaxws:endpoint>
</beans>
Run the Web Service and Client
Everything is configured, now the Web Service can be launched and the client can be connected.
Under the "Server" tab, right-click the Tomcat Server and select "Start".

Once you see "Started, Synchronized", the server has launched and completely initialized

Next, navigate to the MathUtilityClient project and run the TestMathUtility client

The "Console" will show that the web service client starts, sends a web service request to the server, and receives a response.

Because the code also utilizes the LoggingIn and LoggingOut interceptors, which are part of CXF, we have access to the "pretty print" version of the XML messaging, clearing showing the encrypted outbound message, and the clear text web service response.
Outbound Web Service Request:
Jan 22, 2015 2:23:57 PM org.apache.cxf.services.MathUtilityService.MathUtilityPort.MathUtility
INFO: Outbound Message
---------------------------
ID: 1
Address: http://localhost:8080/MathUtility/services/MathUtilityPort
Encoding: UTF-8
Content-Type: text/xml
Headers: {Accept=[*/*], SOAPAction=[""]}
Payload: <?xml version="1.0" encoding="UTF-8"?><soap:Envelope xmlns:soap="http://schemas.xmlsoap.org/soap/envelope/">
  <SOAP-ENV:Header xmlns:SOAP-ENV="http://schemas.xmlsoap.org/soap/envelope/">
    <wsse:Security xmlns:wsse="http://docs.oasis-open.org/wss/2004/01/oasis-200401-wss-wssecurity-secext-1.0.xsd" xmlns:wsu="http://docs.oasis-open.org/wss/2004/01/oasis-200401-wss-wssecurity-utility-1.0.xsd" soap:mustUnderstand="1">
      <xenc:EncryptedKey xmlns:xenc="http://www.w3.org/2001/04/xmlenc#" Id="EK-D34D3D857E2A1163BA14219582374121">
        <xenc:EncryptionMethod Algorithm="http://www.w3.org/2001/04/xmlenc#rsa-oaep-mgf1p"/>
        <ds:KeyInfo xmlns:ds="http://www.w3.org/2000/09/xmldsig#">
          <wsse:SecurityTokenReference>
            <ds:X509Data>
              <ds:X509IssuerSerial>
                <ds:X509IssuerName>CN=testkey</ds:X509IssuerName>
                <ds:X509SerialNumber>79151085</ds:X509SerialNumber>
              </ds:X509IssuerSerial>
            </ds:X509Data>
          </wsse:SecurityTokenReference>
        </ds:KeyInfo>
        <xenc:CipherData>
          <xenc:CipherValue>ldC0JEkug/dwXejftXu9r9DmuvUeiU5Eq+L5OAAysHVFMUVOIWPV2FRfZ9rZcuiAefPbiGpj1eh5OG+Bx/GPITz+sTJ4xCLGLatAEdhBuP2iPeH/cfX8bNwLyGR1Fs71Q7pql1fySSNv/b+q/Yp7KUsxlKnVfFEJbAJc24O9uuzCUUXanHGOkMG/24HMbYEr25VjLCwcGdlqEOdeaIp88ywpse2luiULVvDiY7TA0U0C7/CY+PtRzN4j7OdyWwc9bp2etWvtT05cMiwcQPrb3ZM/w7/0g81Tgyhi/lFt6TGY1nf+Usd5kEeGX8bohkXAZWcq8oq2N1nJudRxycuKaw==</xenc:CipherValue>
        </xenc:CipherData>
        <xenc:ReferenceList>
          <xenc:DataReference URI="#ED-D34D3D857E2A1163BA14219582374282"/>
        </xenc:ReferenceList>
      </xenc:EncryptedKey>
    </wsse:Security>
  </SOAP-ENV:Header>
  <soap:Body>
    <xenc:EncryptedData xmlns:xenc="http://www.w3.org/2001/04/xmlenc#" Id="ED-D34D3D857E2A1163BA14219582374282" Type="http://www.w3.org/2001/04/xmlenc#Content">
      <xenc:EncryptionMethod Algorithm="http://www.w3.org/2001/04/xmlenc#aes128-cbc"/>
      <ds:KeyInfo xmlns:ds="http://www.w3.org/2000/09/xmldsig#">
        <wsse:SecurityTokenReference xmlns:wsse="http://docs.oasis-open.org/wss/2004/01/oasis-200401-wss-wssecurity-secext-1.0.xsd" xmlns:wsse11="http://docs.oasis-open.org/wss/oasis-wss-wssecurity-secext-1.1.xsd" wsse11:TokenType="http://docs.oasis-open.org/wss/oasis-wss-soap-message-security-1.1#EncryptedKey">
          <wsse:Reference URI="#EK-D34D3D857E2A1163BA14219582374121"/>
        </wsse:SecurityTokenReference>
      </ds:KeyInfo>
      <xenc:CipherData>
        <xenc:CipherValue>Ww2p8p9K/Fdx3YDBDTcjwNCQFbUmBCcoaefFND9OwX24HP1FcDfRx91YQaDbmZSfqZGOlqgR0QZqKivp8kgT2I6z+mMbq8xwskRZg/OL7OuAG4BpmQloSq3ixHB0nlbJJ21s2itsCZMNYVtFNqTiBg==</xenc:CipherValue>
      </xenc:CipherData>
    </xenc:EncryptedData>
  </soap:Body>
</soap:Envelope>
Inbound Web Service Response:
Jan 22, 2015 2:23:58 PM org.apache.cxf.services.MathUtilityService.MathUtilityPort.MathUtility
INFO: Inbound Message
----------------------------
ID: 1
Response-Code: 200
Encoding: UTF-8
Content-Type: text/xml;charset=UTF-8
Headers: {content-type=[text/xml;charset=UTF-8], Date=[Thu, 22 Jan 2015 20:23:58 GMT], Server=[Apache-Coyote/1.1], transfer-encoding=[chunked]}
Payload: <?xml version="1.0" encoding="UTF-8"?><soap:Envelope xmlns:soap="http://schemas.xmlsoap.org/soap/envelope/">
  <soap:Body>
    <ns2:factorialResponse xmlns:ns2="http://utility.math.com/">
      <return>24</return>
    </ns2:factorialResponse>
  </soap:Body>
</soap:Envelope>
Done.
The reader should now be able to:
- Create a Web Service using Apache CXF
- Run the Web Service on a Tomcat Server
- Create a Client to utilize the Web Service using Apache CXF
- Secure the message payload between the Client and Server using WSS4J