
HttpClient SSL Tomcat and Eclipse
4.83/5 (6 votes)
This article presents an example on consuming https web content using Apache HttpComponents HttpClient in the development environment in Eclipse.
Introduction
This article presents an example on consuming https web content using Apache HttpComponents HttpClient in the development environment in Eclipse.
Background
Normally web content should be consumed through the web browsers, but it is not uncommon that you may want to consume them in your applications using the Apache HttpComponents HttpClient. You may find that it is nice to have a good development and debug environment to work on these applications. This article presents an example on consuming https web content using Apache HttpComponents HttpClient in the development environment in Eclipse. In this example, I will address the following topics:
- How to set up Tomcat to use https;
- How to import a multi-module Maven project into Eclipse;
- In the development environment, the certificate used set up the https is normally not signed by a certificate authority. I will show you how to accept the development certificate when you develop and debug your applications.
Configure Tomcat to Use Https
How to Create a Key Store
To configure Tomcat to use https, we need to first create a key store. A key store is a file that contains the encryption key pairs used to initiate the https communication. The JDK comes with the "keytool.exe" to manage the key stores. But I prefer the more user-friendly GUI keystore explorer. You can download the keystore explorer from this link. The version of the keystore explorer used in this example is "kse-51".

To generate a key store file, we can click the "File" -> "New" from the keystore explorer menu.
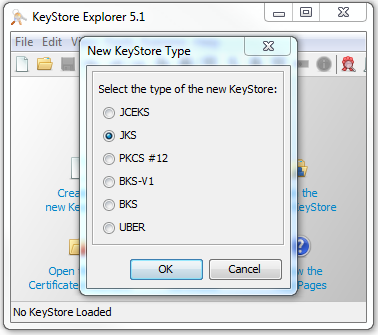
We can then select the "JKS" type and click the "OK" button to generate an empty key store.

Right click on the blank section of the empty key store to bring up the context menu and click on "Generate Key Pair" to add a key pair into the empty key store.

Select the "RSA" algorithm, the key size and click the "OK" button to continue.
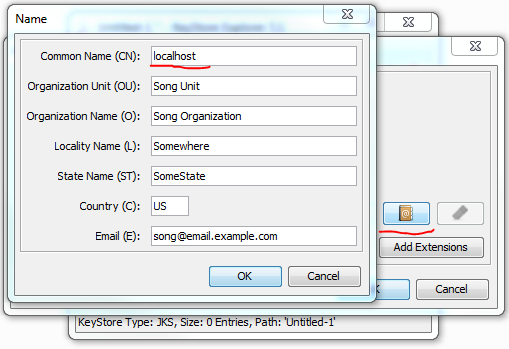
We can then fill in the required information to complete the generation of the key pair. You should pay some attention to the "Common Name (CN)" field. Although it is not absolutely necessary, it is good if you give it the value that matches the host name of your web site. When saving the key store, the keystore explorer will ask us the following information:
- It will ask us a password for the key pair in the key store and a password for the key store file itself. In order that the key store can be used by Tomcat, we should make the two passwords the same;
- It will ask us an alias for the key pair. It is a good idea to simply use the value chosen for the "Common Name (CN)" field as the alias. In my case, I simply use "localhost" as the alias of the key pair.
We can then select a desired folder location and give a name to save the key store file. In my case, I saved it as "C:\Keystores\Stores\TestKeyStore.keystore".
How to Sign the Key by a Certificate Authority
- In a production environment, it is always required to sign the key by a certificate authority;
- In a test or development environment, the key used to set up https is almost never signed because we have neither the time nor the money to get it signed.
In this article, I am not going to talk about the signing of the key. If you need to set up a production web site, I believe you should be able to get help from a certificate authority, because they want your business and money.
How to Configure Tomcat to Use the Key Store
Depending on the version of the Tomcat, the configuration may be slightly different, but it should be almost the same. In this example, I use Tomcat 7.0.54. In the Tomcat installation folder, you can find the "server.xml" file in the "conf" folder. You can open the "server.xml" file with any text editor. If this file is never modified, you can find the following section:
    <!--
    <Connector port="8443" protocol="org.apache.coyote.http11.Http11Protocol"
               maxThreads="150" SSLEnabled="true" scheme="https" secure="true"
               clientAuth="false" sslProtocol="TLS" />
    -->
You can un-comment this section and replace it with the following:
    <Connector port="8443" protocol="org.apache.coyote.http11.Http11Protocol"
               maxThreads="150" SSLEnabled="true" scheme="https" secure="true"
               clientAuth="false" sslProtocol="TLS"
           keystoreFile="C:\Keystores\Stores\TestKeyStore.keystore"
           keystorePass="password"/>
By specifying the correct location of the key store file and the password to the key store (This password should be the same password to the key pair), we have configured the Tomcat instance to use https. If you now start the Tomcat and type the url "https://localhost:8443/" in a web browser, the browser will give you a warning that the certificate used for the https communication is not signed by a certificate authority. If you ignore the warning and proceed to the web page, you should see the following page.

Antomatic Redirection
If you want Tomcat to automatically redirect the web requests to the HTTPS, you can add the following section in the "web.xml" file before the closing tag of "/web-app".
<security-constraint>
         <web-resource-collection>
             <web-resource-name>Protected Context</web-resource-name>
             <url-pattern>/*</url-pattern>
         </web-resource-collection>

         <!-- auth-constraint goes here if you requre authentication -->
         <user-data-constraint>
             <transport-guarantee>CONFIDENTIAL</transport-guarantee>
         </user-data-constraint>
</security-constraint
Import the Multi-module Maven Project into Eclipse

The attached project is a multi-module Maven project. In the project folder, you can find the parent POM file and two folders. One of the folders is the server project and the other one is the client project. The parent POM is implemented as the following:
<project xmlns="http://maven.apache.org/POM/4.0.0"
    xmlns:xsi="http://www.w3.org/2001/XMLSchema-instance"
    xsi:schemaLocation="http://maven.apache.org/POM/4.0.0
    http://maven.apache.org/xsd/maven-4.0.0.xsd">

  <modelVersion>4.0.0</modelVersion>
  <groupId>com.song.httpclientexample</groupId>
  <artifactId>httpclientexample</artifactId>
  <packaging>pom</packaging>
  <version>0.0.1-SNAPSHOT</version>

  <modules>
        <module>httpclientexample-server</module>
        <module>httpclientexample-client</module>
  </modules>

  <build>
        <finalName>${project.artifactId}</finalName>
        <plugins>
            <plugin>
                <artifactId>maven-compiler-plugin</artifactId>
                <version>3.1</version>
                <configuration>
                  <source>1.7</source>
                  <target>1.7</target>
                </configuration>
            </plugin>
        </plugins>
    </build>

</project>
Eclipse has pretty good Maven support. The version of Eclipse that I used is Eclipse Java EE IDE for Web Developers Version Kepler Service Release 2. To import the multi-module Maven project into Eclipse, you can create an empty folder as the workspace to launch the Eclipse. You can then go to "File" -> "Import..." to open the project import wizard.

After selecting the "Existing Maven Projects", you can then click the "Next" button to proceed to importing the Maven project.

You need to browse to the folder which has the parent POM, the Eclipse will automatically search for the child POMs for you. You can then click the "Finish" button to import the multi-module Maven project. During the importing process, Eclipse may show you some importing errors, but if you are patient enough and let the Eclipse to finish its work, the project should be imported without a problem.
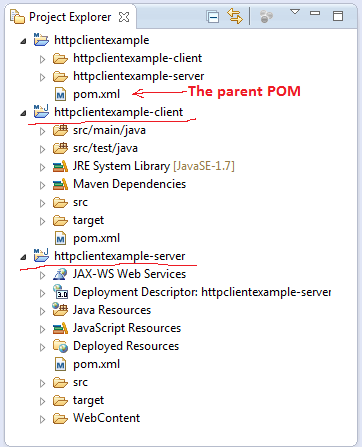
After the multi-module Maven project is imported successfully, you can see three projects in the project explorer.
- The "httpclientexample" project is simply a container project for the parent POM;
- The "httpclientexample-server" is a Spring MVC project to implement a simple REST service;
- The "httpclientexample-client" is a Swing application to consume the REST service implemented in the "httpclientexample-server" project.
The "httpclientexample-server" Project

The "httpclientexample-server" project is a Spring MVC application. The "pom.xml" file is defined as the following:
<project xmlns="http://maven.apache.org/POM/4.0.0"
    xmlns:xsi="http://www.w3.org/2001/XMLSchema-instance"
    xsi:schemaLocation="http://maven.apache.org/POM/4.0.0
    http://maven.apache.org/xsd/maven-4.0.0.xsd">

    <parent>
        <groupId>com.song.httpclientexample</groupId>
        <artifactId>httpclientexample</artifactId>
        <version>0.0.1-SNAPSHOT</version>
    </parent>

    <modelVersion>4.0.0</modelVersion>
    <artifactId>httpclientexample-server</artifactId>
    <packaging>war</packaging>

    <properties>
        <spring.version>4.0.7.RELEASE</spring.version>
        <tomcat.version>7.0.55</tomcat.version>
    </properties>

    <dependencies>
        <!-- Minimal dependencies for Spring MVC -->
        <dependency>
            <groupId>org.springframework</groupId>
            <artifactId>spring-core</artifactId>
            <version>${spring.version}</version>
        </dependency>

        <dependency>
            <groupId>org.springframework</groupId>
            <artifactId>spring-web</artifactId>
            <version>${spring.version}</version>
        </dependency>

        <dependency>
            <groupId>org.springframework</groupId>
            <artifactId>spring-webmvc</artifactId>
            <version>${spring.version}</version>
        </dependency>


        <!-- Sevlet jars for compilation, provided by Tomcat -->
        <dependency>
            <groupId>org.apache.tomcat</groupId>
            <artifactId>tomcat-servlet-api</artifactId>
            <version>${tomcat.version}</version>
            <scope>provided</scope>
        </dependency>
    </dependencies>

    <build>
        <finalName>${project.artifactId}</finalName>
        <plugins>
            <plugin>
                <artifactId>maven-war-plugin</artifactId>
                <version>2.4</version>
                <configuration>
                    <warSourceDirectory>WebContent</warSourceDirectory>
                    <failOnMissingWebXml>true</failOnMissingWebXml>
                </configuration>
            </plugin>
        </plugins>
    </build>

</project>
The "web.xml" file and the "mvc-dispatcher-servlet.xml" file are defined as the following:
<?xml version="1.0" encoding="UTF-8"?>
<web-app xmlns:xsi="http://www.w3.org/2001/XMLSchema-instance"
    xmlns="http://java.sun.com/xml/ns/javaee"
    xsi:schemaLocation="http://java.sun.com/xml/ns/javaee
        http://java.sun.com/xml/ns/javaee/web-app_3_0.xsd"
    id="WebApp_ID" version="3.0">

    <display-name>Spring Web Example</display-name>
    <welcome-file-list>
        <welcome-file>index.jsp</welcome-file>
    </welcome-file-list>

    <filter>
        <filter-name>nocachefilter</filter-name>
        <filter-class>com.song.example.filter.NocacheFilter</filter-class>
    </filter>
    <filter-mapping>
        <filter-name>nocachefilter</filter-name>
        <url-pattern>/*</url-pattern>
    </filter-mapping>

    <servlet>
        <servlet-name>mvc-dispatcher</servlet-name>
          <servlet-class>
              org.springframework.web.servlet.DispatcherServlet
          </servlet-class>
          <load-on-startup>1</load-on-startup>
    </servlet>
    <servlet-mapping>
        <servlet-name>mvc-dispatcher</servlet-name>
        <url-pattern>/api/*</url-pattern>
    </servlet-mapping>
</web-app>
<?xml version="1.0" encoding="UTF-8"?>
<beans xmlns="http://www.springframework.org/schema/beans"
    xmlns:xsi="http://www.w3.org/2001/XMLSchema-instance"
    xmlns:p="http://www.springframework.org/schema/p"
    xmlns:context="http://www.springframework.org/schema/context"
    xmlns:mvc="http://www.springframework.org/schema/mvc"
    xsi:schemaLocation="
        http://www.springframework.org/schema/beans
        http://www.springframework.org/schema/beans/spring-beans-3.2.xsd
        http://www.springframework.org/schema/context
        http://www.springframework.org/schema/context/spring-context-3.2.xsd
        http://www.springframework.org/schema/mvc
        http://www.springframework.org/schema/mvc/spring-mvc-3.2.xsd">

     <context:component-scan base-package="com.song.example.controller" />
     <mvc:annotation-driven />
</beans>
The REST service is implemented by the "ExampleController" class:
package com.song.example.controller;

import java.io.IOException;

import javax.servlet.http.HttpServletResponse;

import org.springframework.stereotype.Controller;
import org.springframework.web.bind.annotation.RequestMapping;
import org.springframework.web.bind.annotation.RequestMethod;

@Controller
public class ExampleController {

    @RequestMapping(value = "/getStudent", method = RequestMethod.GET)
    public void getAStudent(HttpServletResponse response) throws IOException {
        response.setContentType("application/json");

        response.getWriter().write("{\"name\": \"Song Li\", \"score\": 100}");
        response.flushBuffer();
    }
}
This is a very simple Rest service, which simply responds a hard-coded Json string upon receiving the request. The whole purpose of this service is to show you how to consume the web content in the development environment with https configured by a certificate that is not signed by a certificate authority. To launch the MVC application in Eclipse, you can attach the project to a Tomcat server. You can refer to this link on how to attach a Tomcat server in Eclipse. If you have multiple instances of Tomcat on your computer, you need to make sure to select the Tomcat instance that we have configured and Eclipse will honor the configurations and the certificate key store.

After attaching the Tomcat instance, you can launch the MVC application in Eclipse by right clicking the "httpclientexample-server" project -> "Run As" -> "Run on Server" to launch the MVC application. You can then type the url "https://localhost:8443/httpclientexample-server/api/getStudent" into a browser to make sure that the service is running. When you launch the MVC application, you need to make sure that there is no other Tomcat instance running on your computer, otherwise you may not be able to launch the MVC application successfully.

The "httpclientexample-client" Project

The "httpclientexample-client" project is simple Swing project. Its POM is defined as the following:
<project xmlns="http://maven.apache.org/POM/4.0.0"
    xmlns:xsi="http://www.w3.org/2001/XMLSchema-instance"
    xsi:schemaLocation="http://maven.apache.org/POM/4.0.0
    http://maven.apache.org/xsd/maven-4.0.0.xsd">

    <parent>
        <groupId>com.song.httpclientexample</groupId>
        <artifactId>httpclientexample</artifactId>
        <version>0.0.1-SNAPSHOT</version>
    </parent>

    <modelVersion>4.0.0</modelVersion>
    <artifactId>httpclientexample-client</artifactId>

    <properties>
        <httpclient.version>4.3.6</httpclient.version>
        <commons-io.version>2.4</commons-io.version>
    </properties>

    <dependencies>
        <dependency>
            <groupId>org.apache.httpcomponents</groupId>
            <artifactId>httpclient</artifactId>
            <version>${httpclient.version}</version>
        </dependency>

        <dependency>
            <groupId>commons-io</groupId>
            <artifactId>commons-io</artifactId>
            <version>${commons-io.version}</version>
        </dependency>
    </dependencies>
</project>
- The dependency "httpclient" will be used to consume the REST service in the Swing application;
- The dependency "commons-io" will be used to serialize the data received from the REST service for display purpose.
In order that we can use the key store that is not signed by a certificate authority in the development environment, the "HttpClientFactory" class is created.
package com.song.example.httpclientutility;

import java.security.cert.CertificateException;
import java.security.cert.X509Certificate;

import org.apache.http.conn.ssl.SSLConnectionSocketFactory;
import org.apache.http.conn.ssl.SSLContextBuilder;
import org.apache.http.conn.ssl.TrustSelfSignedStrategy;
import org.apache.http.conn.ssl.TrustStrategy;
import org.apache.http.impl.client.CloseableHttpClient;
import org.apache.http.impl.client.HttpClients;

public class HttpClientFactory {
    public static CloseableHttpClient
        getHttpClient(SSLCertificateTrustLevel trustLevel) throws Exception {

        if (trustLevel == null) {
            return getHttpClient();
        }

        CloseableHttpClient client = null;
        SSLContextBuilder builder = null;
        SSLConnectionSocketFactory sslsf = null;

        switch (trustLevel) {
            case ANYCERTIFICATE:
                builder = new SSLContextBuilder();
                builder.loadTrustMaterial(null, new TrustStrategy(){
                    public boolean isTrusted(X509Certificate[] chain, String authType)
                            throws CertificateException {
                                return true;
                            }
                });

                sslsf = new SSLConnectionSocketFactory(builder.build(),
                        SSLConnectionSocketFactory.ALLOW_ALL_HOSTNAME_VERIFIER);
                client = HttpClients.custom().setSSLSocketFactory(sslsf).build();

                break;
            case SELFSIGNED:
                builder = new SSLContextBuilder();
                builder.loadTrustMaterial(null, new TrustSelfSignedStrategy());

                sslsf = new SSLConnectionSocketFactory(builder.build());
                client = HttpClients.custom().setSSLSocketFactory(sslsf).build();

                break;
            case DEFAULT:
                client = getHttpClient(); break;
        }

        return client;
    }

    public static CloseableHttpClient getHttpClient() {
        return HttpClients.createDefault();
    }
}
The enum "SSLCertificateTrustLevel" is defined as the following:
package com.song.example.httpclientutility;

public enum SSLCertificateTrustLevel {
    DEFAULT, SELFSIGNED, ANYCERTIFICATE
}
The simple Swing application is implemented by the "ClientMain" class.
package com.song.example;

import java.awt.GridLayout;
import java.awt.event.ActionEvent;
import java.awt.event.ActionListener;
import java.io.InputStream;

import javax.swing.JButton;
import javax.swing.JFrame;
import javax.swing.JOptionPane;

import org.apache.commons.io.IOUtils;
import org.apache.http.HttpEntity;
import org.apache.http.client.methods.CloseableHttpResponse;
import org.apache.http.client.methods.HttpGet;
import org.apache.http.impl.client.CloseableHttpClient;
import org.apache.http.util.EntityUtils;

import com.song.example.httpclientutility.HttpClientFactory;
import com.song.example.httpclientutility.SSLCertificateTrustLevel;

public class ClientMain extends JFrame {
    private static final long serialVersionUID = 1L;

    private String url = "https://localhost:8443/httpclientexample-server/"
            + "api/getStudent";

    private ClientMain() {
       setTitle("HttpClient Example");
       setSize(600, 400);
       setLayout(new GridLayout(2, 1));
       setLocationRelativeTo(null);
       setDefaultCloseOperation(EXIT_ON_CLOSE);

       add(createButton("ACCEPT ONLY TRUSTED CERTIFICATE",
               SSLCertificateTrustLevel.DEFAULT));
       add(createButton("ACCEPT ANY CERTIFICATE",
               SSLCertificateTrustLevel.SELFSIGNED));
    }

    private JButton createButton(String label,
            final SSLCertificateTrustLevel trustLevel) {

        JButton btnAction = new JButton(label);
        btnAction.addActionListener(new ActionListener() {
               public void actionPerformed(ActionEvent e) {
                   String webContent = null;
                   try (CloseableHttpClient httpclient = HttpClientFactory
                           .getHttpClient(trustLevel)) {

                       HttpGet httpGet = new HttpGet(url);
                       try (CloseableHttpResponse response = httpclient.execute(httpGet)) {
                           HttpEntity entity = response.getEntity();

                           if (!entity.getContentType().getValue().toLowerCase()
                                   .contains("application/json")) {
                               throw new Exception(entity.getContentType().getValue());
                           }

                           InputStream stream = entity.getContent();
                           webContent = IOUtils.toString(stream, "UTF-8");

                           EntityUtils.consume(entity);
                       }

                   }catch(Throwable ex) {
                       System.out.println(ex.getMessage());
                       JOptionPane.showMessageDialog(null, "Rest service call failed");
                       return;
                   }

                   JOptionPane.showMessageDialog(null, webContent);
               }
           });

        return btnAction;
    }

    public static void main(String[] args) {
        ClientMain frame = new ClientMain();
        frame.setVisible(true);
    }

}
- For simplicity, the url "https://localhost:8443/httpclientexample-server/api/getStudent" is hard-coded in the program;
- Two buttons are added to the "JFrame". Each triggers a call to the REST service. One uses the default HttpClient, and the other uses an HttpClient that can bypass the check for the certificate authority and the host name validation.
Run the Client Application
Make sure that the MVC application is running, you can then right click the "httpclientexample-client" project in Eclipse -> "Run As" -> "Java Application" to launch the client program.

If you click on the "ACCEPT ONLY TRUSTED CERTIFICATE" button, the program will call the MVC application using the default HttpClient, and your call will fail.

But if you click on the "ACCEPT ANY CERTIFICATE" button, you call to the service will succeed.

Points of Interest
- This article presented an example on consuming https web content using HttpClient in the development environment in Eclipse;
- This example showed you how to set up Tomcat to use https;
- The attached project is a multi-module Maven project. I have showed you how to import the multi-module project into Eclipse;
- In the development environment, the certificate used set up the https is normally not signed by a certificate authority. I have showed you how to accept the development certificate when you develop and debug your applications;
- It is important to point out that bypassing the check for the certificate authority and the host name validation should only be done in the development and validation environment. In the production environment, we should always use a certificate signed by a certificate authority unless we have a good reason not to do so;
- I hope you like my postings and I hope this article can help you one way or the other.
History
First Revision - 1/19/2015