
Stage 3: Live Weather Station With Arduino and ThingSpeak
4.97/5 (18 votes)
This article is a beginners walk through of Developing an IoT framework for Arduino without Ethernet/WiFi shield using ThingSpeak Services with a real time Online Weather Station
Contents
2.1 Configuring LM 35 with Arduino
2.2 Configuring LDR with Arduino
3. Getting Started With ThingSpeak
3.2 Read and Write Data Operations In Channel
4. Configuring ThingSpeak With C#
5. Updating ThingSpeak Channel with Arduino Data
- Download WeatherStationArduinoSketch.zip - 882 B
- Download ArduinoThingSpeakIntegration-noexe.zip - 247.7 KB
- Download ArduinoThingSpeakIntegration.zip - 247.7 KB
1. Background
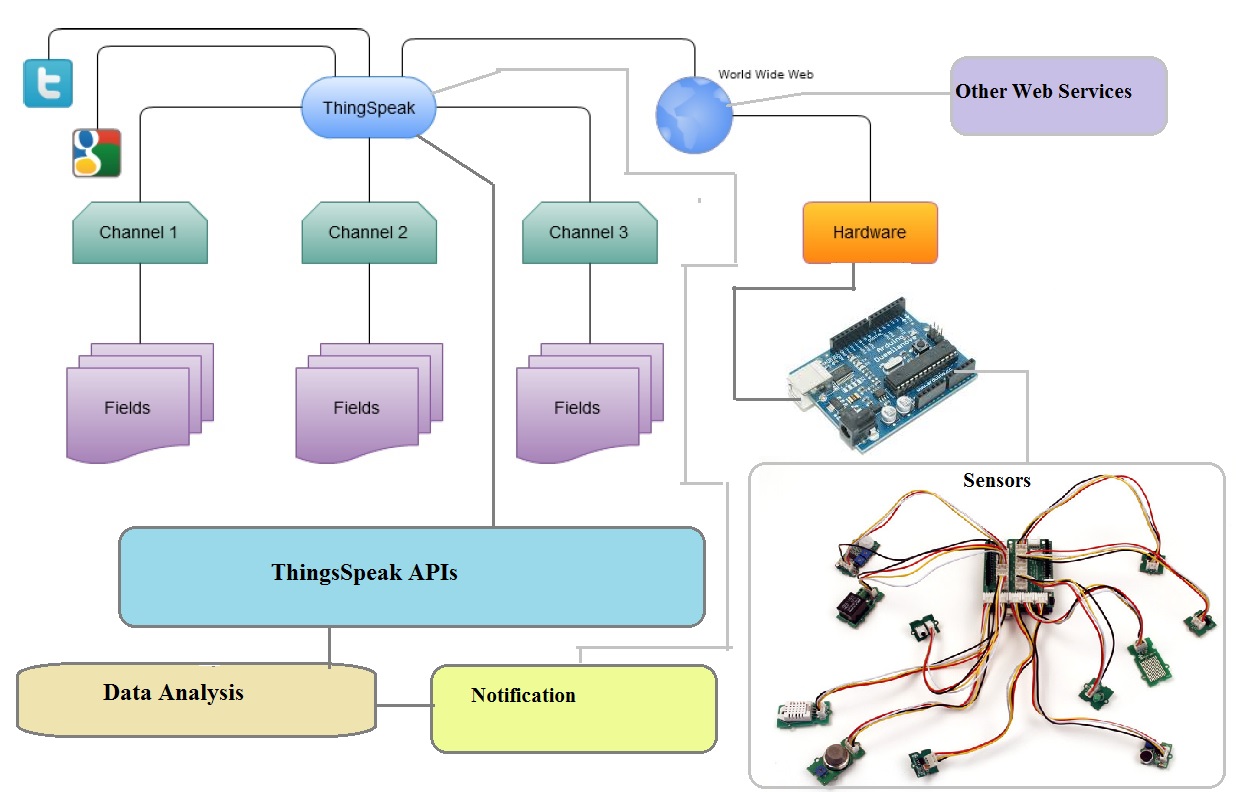
Figure 1.1: Architecture of IoT Framework with ThingSpeak
ThingSpeak is a IoT cloud service provider. Embedded IoT devices like Arduino, Raspberry Pi can be connected to internet. These boards then can fetch data or upload data to ThingSpeak storage using APIs. The data stored by a device can be accessed by other client entities like Mobile, Tablet, laptop connected to internet using ThingSpeak APIs. So in short ThingSpeak is an IoT service provider that provides APIS to upload, retrive and visualize data from IoT devices over cloud.
Having learnt what ThingSpeak is, let us try to understand it in bit more detail. Basically when a Device like Arduino Yun, Intel Edison, Intel Gallileo, Raspberry Pi is connected to internet, they can access other nodes in the internet ( like Google, facebook or any other websites). But in order to exclusively connect these devices as Masters or servers from which other clients over Internet can fetch data needs a lot of networking setup which includes assigning unique IP address to nodes, setting up server and so on. An easy alternative to this problem is to deploy a middleware that can handle the communication. It acts like global message space for the device. Device takes command from the server, sends it's data to the server. Other nodes like a Mobile device can fetch data of the device from the server. Hence it does not require any exclusive networking protocols.
This is where IoT service providers comes handy. They provide easy and secured APIs for the devices to access the data from cloud. ThingSpeak is a great solution for IoT as it not only provides easy time stamped data access mechanism over cloud, but at the same time also integrates Social Network services. Thus generating a Social Notification ( like updating Facebook Status Message, Sending an Email, Publishing a tweet) based on an event ( like Gas leakage, Flood, Over Temperature or a timer event) becomes easier.

Figure 1.2 Simple Service Architecture of ThingSpeak
Figure 1.2 is a simple depiction of ThingSpeak services which is demonstrated in Figure 1.1. In simple term a device connected to internet can use ThingSpeak services to upload the data in a Web Database. Other clients can fetch the data using ThingSpeak services.
Along with data store and fetch services ThingSpeak also provides Connection As a Service interface for easily enabling Arduino devices to access the services from their Sketch without using any High Level Client.
Now a question is how is this data provided? ThingSpeak allows the user to create their Own Channel. A user can select a channel to be either public or private. In simple terms you can visualize a channel to be like a database table. Every channel can have several properties ( upto 8 now) which can be visualized as being the database fields. Every channel provides a set of APIs: for reading data and for writing data. Public channel data can be read all other users without any key, but for writing the data, you need a API key specific to that channel.
So data is stored securedly from a node and can be consumed by several other nodes. ThingSpeak also provides data visualization services which offers easy way to visualize data in charts and graphs. ThingSpeak services are also extended to analyze services which provides statistical operations on the data.
There are several public channels which allows you to fetch data in real time from your mobile. So you can actually create Mobile Apps that access such public channel. look at following figure 1.3 for some public channels.

Figure 1.3: Some Featured Public Channels of ThingSpeak
So anyone can use the channel and acquire data using JSON. So developers can now develop apps for real weather monitoring of a place, disaster management, earthquake alert system and plenty more.
So what is this tutorial all about? Check out figure 1.1. You can see "Hardware" interface which is the internet gateway of connections of the devices to ThingSpeak cloud. ThingSpeak also offers connection services to Arduino which can directly use ThingSpeak APIs from it's sketch itself. However there is still a wide range of good microcontrollers including Arduino baords without Ethernet Shield and other than Yun which can not be directly connected to Cloud. However most of the modern day microcontroller devices can communcate with PC/Laptop with serial interface. We can therefore extended the IoT cloud services offered by ThingSpeak through APIs to all these basic devices by developing an framework in the Serial Communication Client that can interface these devices.
The objective of this article is to help you develp your own ThingSpeak C# Client which would bind ThingSpeak services to your Arduino board using serial communication. The tutorial will also provide an abstraction of hardware communication logic with that of cloud services.
What's more? Unlike our previous tutorials, we are going to do some real stuff here. We are going to build a ThingSpeak channel that provides Temperature and Light Intensity values. We will connect the Sensors with Arduino, Develop a code to fetch the sensor values periodically, send the sensor values through Serial communication to our C# client. We will create a ThingSpeak channel to store these values. We will integrate C# Client with ThingSpeak such that it can transmit the acquired sensor data to ThingSpeak cloud. We will also design an Android client to enable users to visualize the data from their mobiles.
2. Hardware Setup
We would also need some basic hardware. The reson behind my choice of opting for some basic sensors for this tutorial is to not only demonstrate ThingSpeak integration but at the same time I also want to demonstrate a practical application of it. Therefore I have chosen Light and Temperature Sensor as They have wide utility, are cheap and easy to connect and code.
Table 1 enlists the components that you will need for this tutorial.
|
Part |
Specs |
Pic |
Estimated Unit Price |
Quantity |
|---|---|---|---|---|
|
Arduino Duemilanove |
|
|
$12 |
1 |
|
Temperature Sensor |
LM35 |
|
$1.5 |
1 |
|
LDR Sensor |
|
|
$4 |
1 |
|
Resistor |
470 Ohm |
|
$.01 |
1 |
|
|
4.7k Ohm |
|
$.01 |
1 |
|
Connecting Wires |
|
|
$0.02 |
6 |
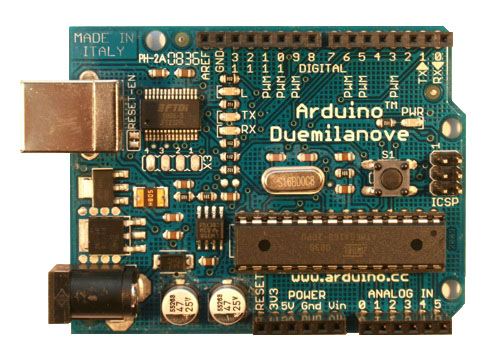


Table 1: Parts List Needed for This Tutorial
Our objective is to measure Temperature and Light Intensity values and keep updating them through Things speak so that any other application can obtain the information over Internet.
2.1 Configuring LM 35 with Arduino
We will begin with configuring our hardware and testing it first. We would follow it by integrating the setup with Internet f Things.
We will begin with Temperature sensor LM 35. This is possibly one of the cheapest and effective sensors to kick start with your Arduino DIY. It is a three pin sensor which operates between 0-5V range and used for measuing temperature in the range of 0-92'c.
If you are a hardware beginner and just starting to learn your hardware then it is always a good idea to study the data sheet of the components before working with them. It gives you electrical and logical understanding essential for working with those devices.
You can download LM35 Datasheet from here.
LM35 has three pins, which are to be connected to Ground, Vcc and Analog pin of Arduino. You can provide it power directly from Arduino 5V pin and connect the output pin to any of the analog pins. I have connected it to pin 5. See figure 2.1 to understand the circuit.

Figure 2.1 : LM 35 Connected with Arduino
You might wonder how to connect those three pins to Arduino.Plenty of tutorial will suggest you to use bread board. So you can either use bread board or use three pin connector. I prefer short three pin connector as shown in figure 2.2. So you insert the LM35 pins into the three slots of the connector and insert the wires into respective Arduino slots.

Figure 2.2: Connecting LM 35 With Arduino Using 3-Pin Connector
Now before we code LM 35, a little understanding of Concept isn important.
LM35 Converts temperature to voltage of range 1V. That means When Temperature is about 90'c, output voltage of LM35 will be about 1V. Now how Arduino reads this temperature?
As you have noticed the output voltage of LM35 is connected with Arduino's Analog pin 5, Arduino will read the analog voltage which will be converted to digital value through internal 10 bit ADC. 10Bit ADC means that Arduino reads 1024 (2^10) when voltage is 5 volt. But as output of LM35 will never exceed 1V, 4Vs or about 10% of the precision is lost. This can be overcome simply by changing the reference voltage from 5V to 1.1V. This can be achived using following simple code.
analogReference(INTERNAL);
However, if you use 1.1V as aRef, the equation changes entirely. If you divide 1.1V over 1024, each step up in the analog reading is equal to approximately 0.001074V = 1.0742 mV. If 10mV is equal to 1 degree Celcius, 10 / 1.0742 = ~9.31. So, for every change of 9.31 in the analog reading, there is one degree of temperature change.
Therefore,
Temperature value= Value_Read_By_Pin_5/9.31 with 1.1 reference voltage. Let us write a simple program to probe the temperature once in every Second.
Now we will use ArdOS to build our simple Arduino Sketch to read temperature from after every second. Here I have used Arduino code that we used for our service tutorial and have modified task1 so that the task reads analog voltage, calculates temperature and prints in Serial port.
#include <kernel.h>
#include <queue.h>
#include <sema.h>

#define NUM_TASKS  2

void taskSerialRead(void *p)
{
  int n2=0;
   while(1)
  {

    if(Serial.available())
    {

    n2=Serial.read() ;
    ////////////// Switching Logic///////////
    if(n2>0)
    {

     if(n2==1)
     {
       digitalWrite(13,HIGH);
     }
     if(n2==2)
     {
        digitalWrite(13,LOW);
     }
     /////////////////////////
     /*
       /////////// Uncomment following lines while testing Serial Data
      Serial.print(" DATA RECEIVED AS SERIAL INPUT COMMAND IS :");
      Serial.println(n2);
      */
    }

    OSSleep(100);
    }
  }


}
void taskTemperature(void * p)
{

  int n1=0;
  float tempC;
  while(1)
  {
    n1=analogRead(5);
    tempC= (float)n1 / 9.31;
    Serial.println(tempC);
    OSSleep(1000);
  }
}
void setup()
{
  OSInit(NUM_TASKS);

  // Print a message to the LCD.
  analogReference(INTERNAL);
  Serial.begin(19200);
  pinMode(13, OUTPUT);
  digitalWrite(13,LOW);

  OSCreateTask(0, taskSerialRead, NULL);
  OSCreateTask(1, taskTemperature, NULL);

  OSRun();
}

void loop()
{
  // Empty
}
So taskTemperature is our method for reading and printing Temperature.
Below is the screenshot from reading Temperature!

Figure 2.3: Output of Temperature Sensor With Arduino
You can observe increase of the Temperature when I bring an Incense stick near to the sensor.
2.2 Configuring LDR with Arduino
LDR stands for Light Dependent resistor. As light increases on the surface of LDR, it's resistance increases, resulting in low voltage accross it. As Light reduces, resistance also reduces resulting in high voltage output accross it. Therefore if we connect LDR as one of the resistors in a voltage divider circuit, then voltage accross divider will vary as we vary light intensity. Figure 2.4 shows the Arduino connectivity of the LDR as well as the principle of voltage divider circuit.

2.4: LDR Connection with Arduino explained with Voltage Divider.
As R2=1K/4.7k constant, Vout will decrease if R1 decreases which is when light intensity is low and Vout increase when R1 is high which is when light is higher.
Therefore the logic in Arduino should follow the principle that analog pin value is directly proportional to light intensity value. We can represent the Light intensity as percentage of maximum intensity as follows:
Light_Intensity_In_Percentage= (Analog_Value)*100/1024
Let us create a task to to test Light Intensity variation detection in terms of Percentage using the LDR circuit.
void taskLight(void * p)
{

  int n2=0;
  float lightPc;
  while(1)
  {
    n2=analogRead(4);
    lightPc= (float)(n2)*100 / 1024.0;
    Serial.println(lightPc);
    OSSleep(1000);
  }
}
Having have our task ready, let us use this task to check the light intensity variation. Following figure 2.5 Shows the Serial port reading as light Intensity varies.

Figure 2.5: Light Intensity Variation Detection Using LDR
Now observe that both temperature and light intensity values are in same range( 0-100). Hence it is impossible for any other client application to know from which sensor it is getting the result when more than one sensor's result is returned by the device.
Therefore we shall use certain marker to let client application know which value belongs to which sensor. So we will use sprintf to write both values in string with format like "T=25,L=61". One of the main problems with ArdOS is that when you try to use Serial.println() from more than one task, things goes pretty rough and needs a veru accurate calculation of the timing. Hence we will combine reading of temperature and light intensity from a single function, write the values of both in a single string and print the string. Here is our taskTemperatureLight combined method.
void taskTemperatureLight(void * p)
{

  int n1=0;
  float tempC;
  char s[32];
  int n2=0;
  float lightPc;
  char s1[16];
  while(1)
  {
    n1=analogRead(5);
    n2=analogRead(4);

    tempC= (float)n1 / 9.31;
    lightPc= (float)(n2)*100 / 1024.0;
 //   dtostrf(tempC,5,2,s);
    sprintf(s,"T=%02d,L=%02d\0",(int)tempC,(int)lightPc);
    Serial.println(s);
    OSSleep(1000);
  }
}
Now when you test your application, you would see results like Figure 2.6

Figure 2.6: Result of Combined Task of Monitoring and Printing LDR and LM 35
Having our hardware ready, we are now ready to get started with ThingSpeak.
3. Getting Started With ThingSpeak
3.1 Creating Channel
The main focus of this tutorial is to show how ThingSpeak can be used with our hardware to provide a seamless connectivity with our device from internet. So let us get started by creating an account in ThingSpeak.com
Once you have successfully created your account, Click on channels and select My Channels as shown in Figure 3.1

Figure 3.1: Starting with Creating a ThingSpeak Channel
As mentioned above ThingSpeak channel is like a database field which comes with Custom APIs that can be used to store and retrive data remotely. Those who are particular about specificities of the defination:
Quote:A channel is where you send your data to store. Each channel includes 8 fields for any type of data, 3 location fields, and 1 status field. Once you have a ThingSpeak Channel you publish data to the channel, have ThingSpeak process the data, then have your application retrieve the data.
Once you are into the channel creation page, give an appropriate name for the channel. Try to specify a meanigful name for your channel. That is because, this will be available publically and others are free to use it ( unless you prefer to keep the channel public). Good meaningful name attracts more devs towards using your channel.

Figure 3.2: Creating New Channel in ThingSpeak
While creating Channel, you can see eight fieldds at the bottom. You can enter any number of Fields. As we have two records namely Temperature and LightIntensity, we have used two fields. Specifying location fields namely Latitude and Longitude is optional. But it is always a good idea to specify them. If you are not aware of your area's latitude and longitude, you can always take the help of Google Map or Bing Map.
Also ensure that "Make Public?" check box is selected which will make the channel accessible by one and all.
Description field appears as a description for the general public who might be looking to use your channel. Metadata helps your channel to get identify easily and help it to be correctly categorized. Once you are done with completing your form, click on Save channel to save the information and create the channel.
Once the channel is created, you can see the channel being listed with a channel number in list of channels with all the data provided with the channel as shown in Figure 3.3.

Figure 3.3: Successfull Channel Creation in ThingSpeak
3.2 Read and Write Data Operations In Channel
Now go to Data Import/Export tab. You will see Two Options: Sending data and Viewing data. In Sending data option an URl example is specified with field1. You can form your URL using following pattern:
http://api.thingspeak.com/update?key=C606GJW98AWMN9P9&field1=10&field2=20
You can put more number of fields if your application has one simply by using field number as field1,field2,field3,field4 etc concatenated with the URL with '&'.
key=C606GJW98AWMN9P9 should be replaced by your own API key. As ThingSpeak channel I created is public, you can simply use my channel to get started with your ThingSpeak tutorial.
So we can update the data by changing the parameters in the URL.
Now for testing the data, copy the "Viewing Data" url in browser address and hit enter. It will return the result as json object.
For GulbargaWeather, Read URl is:
http://api.thingspeak.com/channels/18828/feed.json?key=C606GJW98AWMN9P9

Figure 3.4: Result of Data Viewing of a ThingSpeak Channel
But the great thing is that ThingSpeak provides a ready data viewing URl for general public. So once your channel is created and made public, anybody can view the data by just using your channel number in the ThingSpeak channel as shown bellow:
https://thingspeak.com/channels/18828
Figure 3.5 Shows the screenshot of Public View of the Channel:

Figure 3.6: Public View of GulbargaWeather Channel
That's awesome isn't it? So you can create a global weather stattion or earth quake monitoring system or a pollution tracking system without much of Software infrastructure just by connecting your embedded device to cloud using ThingSpeak services.
ThingSpeak has ready APIs for Arduino Yun and above. These devices can directly be connected to Internet. I am using Arduino Duemilanove which does not have either ethernet or WiFi shield. Hence I would need the device to be connected to internet through a Serial Communication C# Client as we have already seen in this tutorial.
Therefore our next responsibility is to Integrate ThingSpeak services to our C# client through which our device would update the channel data.
4. Configuring ThingSpeak With C#
4.1 Updating Data
The logic for calling ThingSpeak Update method for specific Channel is really very simple. Every channel will have independent API key for update method. All we need to do from our program is form an URL of the format:
http://api.thingspeak.com/update?
Now append key=YOUR_KEY_VALUE&field1=FIELD1_VALUE&FIELD2_VALUE
Once the URL is ready we can use HttpWebRequest to request the URl and Obtain the result using HttpWebResponse.
In order to make the method reusable and more generic I have created a Method by name UpdateThingSpeakData which takes parameters as a string array and the api key and returns the result as string.
Here goes our UpdateThingSpeakData method:
  string UpdateThingSpeakData( string []fields,string APIKey)
        {
        string url = "http://api.thingspeak.com/";
        StringBuilder sb = new StringBuilder();
        if (fields.Length > 8)
        {
            throw (new Exception("Can't Handle More than 8 Parameters"));
        }
        sb.Append(url + "update?key=" + APIKey);

        for (int i = 0; i < fields.Length; i++)
        {
            sb.Append("&field"+(i+1)+"=" + HttpUtility.UrlEncode(fields[i]));

        }
        string QueryString = sb.ToString();
            StringBuilder sbResponse = new StringBuilder();
            byte[] buf = new byte[8192];

            // Hit the URL with the querystring and put the response in webResponse
            HttpWebRequest myRequest = (HttpWebRequest)WebRequest.Create(QueryString);
            HttpWebResponse webResponse = (HttpWebResponse)myRequest.GetResponse();
            try
            {
                Stream myResponse = webResponse.GetResponseStream();

                int count = 0;

                // Read the response buffer and return
                do
                {
                    count = myResponse.Read(buf, 0, buf.Length);
                    if (count != 0)
                    {
                        sbResponse.Append(Encoding.ASCII.GetString(buf, 0, count));
                    }
                }
                while (count > 0);
                return sbResponse.ToString();
            }
            catch (WebException ex)
            {
                return "0";
            }

        }
Here you must remember that HttpUtility uses System.Web.dll which is not available with .Net framework Client profile. So ensure that from Project properties you have selected full framework. Now add System.Web reference.
Testing the method is easy. I have added the call from a button click to see if it works or not!
try
            {
                //string s = UpdateThingSpeakData(new string[] { "40", "40" }, "C606GJW98AWMN9P9");
                string s = UpdateThingSpeakData(new string[] { "40", "40}, "C606GJW98AWMN9P9");
            }
            catch
            {
            }
And it does as seen from Figure 4.1.

Figure 4.1: Updation Successful From C# Serial Client
4.2 Retriving Data
Though this particular application we are developing has not much significance in terms of reading data from ThingSpeak, I wanted to cover this section in order to make it a complete package.
Just look at figure 4.1. You definately understand that the response of a query about reading a channel data comes as JSON response. So our C# Code must be able to handle JSON response and deserialize the result right?
A JSON deserialization needs a class that represents the data defination of JSON. So how to construct a relavent C# class by seeing JSON object?
Well, fortunately there is an awesome online tool called json2csharp.
http://json2csharp.com/
All you have to do is paste your by copying it from browser (our URl in this case is: http://api.thingspeak.com/channels/18828/feed.json?key=C606GJW98AWMN9P9)JSON response or URl in the the text box and and click "Generate" button. And Bingo! You have the C# Class ready. You need to just use this class for JSON deserialization. See Json2Csharp in action in figure 4.2

Figure 4.2: Json2Csharp tool for obtaining Class Specific to Json Response
Our method for Obtaining the response is as bellow:
public static ThingSpeak.ChannelData.RootObject FetchThingSpeakData(string ChannelNo, string APIKey)
            {

                string url = "http://api.thingspeak.com/channels/";
                StringBuilder sb = new StringBuilder();

                sb.Append(url + ChannelNo + "/feed.json?key=" + APIKey);

                string requestUrl = sb.ToString();
                try
                {
                    HttpWebRequest request = WebRequest.Create(requestUrl) as HttpWebRequest;
                    using (HttpWebResponse response = request.GetResponse() as HttpWebResponse)
                    {
                        if (response.StatusCode != HttpStatusCode.OK)
                            throw new Exception(String.Format(
                            "Server error (HTTP {0}: {1}).",
                            response.StatusCode,
                            response.StatusDescription));
                        DataContractJsonSerializer jsonSerializer = new DataContractJsonSerializer(typeof(ThingSpeak.ChannelData.RootObject));
                        object objResponse = jsonSerializer.ReadObject(response.GetResponseStream());
                        ThingSpeak.ChannelData.RootObject jsonResponse = objResponse as ThingSpeak.ChannelData.RootObject;
                        return jsonResponse;
                    }
                }
                catch (Exception e)
                {
                    Console.WriteLine(e.Message);
                    return null;
                }

            }
The method returns RootObject which contains channel information and the feed. Feed is nothing but the data. The beuty of ThingSpeak is that there can only be eight fields and Channel metadata is same for all the channels. Thus the Feed class as seen in Figure 4.2 can just be updated to the number of actual fields to deserialize any JSON Object.
You can test the method by passing channel ID and APIKey strings to the method as bellow:
var Response = ThingSpeak.Services.Utility.FetchThingSpeakData("18828", "C606GJW98AWMN9P9");
Response is obviously of type RootObject

Figure 4.3: Test Result of ThingSpeak Response
Putting it all togather, I have made a small section in the form where you can test both posting as well as fetching ThingSpeak data.

Figure 4.4: Testing ThingSpeak C# Integration in Serial Client
One thing that I would want you to note here is that ThingSpeak's API is really wonderful. So When you try to Update the same data it does not permit you and the response is "0".
5. Updating ThingSpeak Channel with Arduino Data
Recall that we are obtaining data from Arduino through Serial port at every second. This data will be available as "T=20,L=30" format. We need to extract Temperature and Light Intensity values respectively from this information and then create send an aggregated result in say every 30 seconds. It is always wise to accumulate and aggregate the sensor data for a period of time and variations in actual parameters like Temperature and Light Intensity will be very slow over the time.
In order to extract temperature and Intensity from serial data and storing it in list we update our display method as bellow.
List<int> tempList = new List<int>();
        List<int> lightList = new List<int>();
        void Display(string s)
        {


            listBox1.Items.Add(s);

            this.Text = s;
            try
            {

                //////// Put Acquired Data in List////////
                string[] parts = s.Split(new char[]{':',',','=','\r'});
                int temp = int.Parse(parts[1]);
                int light = int.Parse(parts[3]);
                tempList.Add(temp);
                lightList.Add(light);
                /////////////////////////
            }
            catch
            {
            }

        }
We use a timer with 30 seconds interval. Every thirty seconds we aggregate the data in both tempList and lightList which are temperature and light intensity values respectively. The mean value is then sent to ThingSpeak channel using Update method we had developed in section 4.
  private void timThingSpeakUpdate_Tick(object sender, EventArgs e)
        {
            timThingSpeakUpdate.Enabled = false;
            try
            {
                double light = Mean(lightList);
                double temp = Mean(tempList);
                tempList.Clear();
                lightList.Clear();

                ThingsSpeak.Services.Utility.UpdateThingsSpeakData(new string[] { string.Format("{0:00.0}", temp), string.Format("{0:0.0}", light) }, "C606GJW98AWMN9P9");
            }
            catch
            {
            }

            timThingSpeakUpdate.Enabled = true;
        }
Note that the mean is of double data type calculated using simple Mean method. In order to keep the decimal precision to only one decimal points, I have used String.Format to format both aggegated temperature and light intensities to one decimal points. Once data is updated, It clears the list. Check Figure 5 which is the Final output of the system.

Figure 5: Updating Weather Info Through Arduino and ThingsSpeak
The bottom right window is display of the circuit board which is acquiring data. Window above it is the Serial client which is aggregating the data and updating it. Left two graphs are live ThingSpeak channel watch through their website.
6. Conclusion
ThingSpeak brings tremendeous amount of value to an embedded platform through It's Cloud Services for IoT. The ability to update real data and having a readymade client for viewing the data in real time makes the platform quite attractive. Arduino on the other is definately one of the most popular choices for Hardware prototyping. With more and more applications being integrated with cloud and a clear new trend towards IoT, both these technologies togather offers immense possibilities. In this tutorial I have tried to show one of the possible techniques of connecting Arduino with ThingSpeak services using Serial Client because this architecture can very well abstract the underneath hardware platform and can be used for other embedded devices and platforms which can be communicated over the Serial port. I hope you have enjoyed the tutorial as much as I enjoyed while writing.