
A sneak peak on Windows Embedded with Galileo
4.58/5 (5 votes)
simple example of Windows Embedded with Intel Galileo(Stage #2 Windows Embedded)
Introduction
This is an article where I will focus on using Intel Galileo board with Windows Embedded setup. The whole concept lies on setting up Intel Galileo with Windows embedded from the external SD card and then making necessary arrangements for the setup. It will be step by step analysis on how to get going with Windows Embedded OS and Intel Galileo Board
Background
This is an article which will form basis for the work to follow. This will focus on a simple example using Visual Studio 2013 and running the sketch on Intel Galileo Board. Assumptions are little bit familiarity with C++ Visual Studio Processing language.
Dev Environment for Windows Embedded
Lets get Started
Setting up Intel Galileo board
Tips:-
Windows Embedded is supported for Intel Galileo Gen1 Board only as of now .The image os Windows Embedded is compliant with Gen 1 board only.
Lets Setup Intel Galileo Board with PC
Things you require First hand
Intel Galileo Board
2 USB cables
PC or Laptop to connect the board.
You need to download Intel Galileo Board software from the following link.
https://communities.intel.com/docs/DOC-22226
You need unzip the Software give a name to the folder where you will keep it.
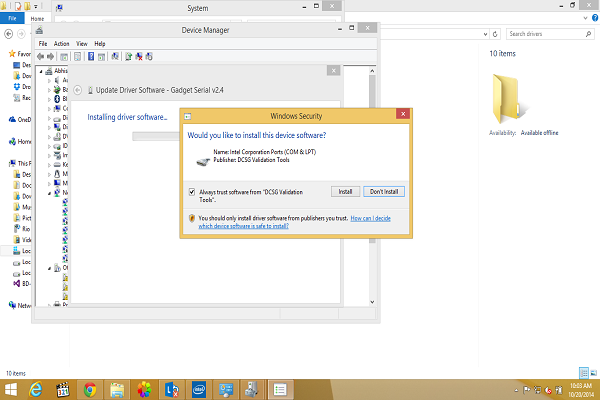
You need power on the Gen1 board the attach the two USB Cables with your PC to get the Intel Galileo recognized you need to go to Device Manager then under other devices you will find something called Gadget Serial v2.4 Right click on it and click on update Software

Browse for the software driver

You will be found under
C:\<Adruino_folder>\arduino-1.5.3-Intel.1.0.4\drivers
It will ask for an Installation for the device software you need to click on yes
You will get a message that Software is successfully installed
You will be able to find it in ports(COM & LPT)
Setting up Windows Embedded
To get Started you need to register yourself at the following link
https://www.windowsondevices.com/signup.aspx
Do a Signup over there so that you have access to utility software that are needed for Windows Embedded
As you register the next step would be to get the softwares
https://connect.microsoft.com/windowsembeddedIoT/Downloads
As my friend was one of the lucky ones who got the pre imaged Windows embedded images as well as Intel Galileo board so my job was to only download the Windows Developer program for IOT MSI installer
I copied the MSI to my computer

Double click and install it

With it you will see that very good utility program gets installed on your Computer Galileo Watcher. It keeps track of Galileo connected to your network.
You need to setup Telnet Client on your Computer
For that you need to go to Control Panel

Go to program and features and then turn windows features on and off

Now we need to install Telnet Client tick Telnet Client as it installs restart your computer.

Now as you restart the computer you will see the Galileo Watcher running

As you haven't configured Intel Galileo board with the PC you will see nothing
Things you need to do
get one LAN cable
attach it to Galileo port and directly to PC or laptop
Put the imaged SD card(which came with Windows embedded installed) to the Galileo Card Slot
power on Galileo
Now run the Galileo Watcher app in administrator mode

The Galileo Watcher will now show the Intel Galileo board

It will show MAC Address IP address
Right Click on Galileo Watcher and then open it up in Web browser

If everything is in order you will get to see the web page for the Intel Galileo

Start Visual Studio
You will see as you have installed MSI package for Galileo the IOT template
under Visual C++ apps

We name the app as Galileo Wiring App1 now click OK
As you click Ok a pop up screen will come up you need to press yes to target Galileo v1

A look at project files

Click on build as Remote Windows Debugger
Now as the build process continues it will ask for Admin privileges of the Intel Galileo the pre-configured
Username is :-administrator password :-admin
and then it will push the code to Galileo and if everything goes well you will see LED blinking in the Intel Galileo board
The code for Main.cpp file
#include "stdafx.h"
#include "arduino.h"

int _tmain(int argc, _TCHAR* argv[])
{
    return RunArduinoSketch();
}

int led = 13;  // This is the pin the LED is attached to.

void setup()
{
    // TODO: Add your code here

    pinMode(led, OUTPUT);       // Configure the pin for OUTPUT so you can turn on the LED.
}

// the loop routine runs over and over again forever:
void loop()
{
    // TODO: Add your code here

    digitalWrite(led, LOW);    // turn the LED off by making the voltage LOW
    Log(L"LED OFF\n");
    delay(1000);               // wait for a second
    digitalWrite(led, HIGH);   // turn the LED on by making the voltage HIGH
    Log(L"LED ON\n");
    delay(1000);               // wait for a second
}
You have successfully run the first program on Intel Galileo using Windows Embedded OS
References
https://dev.windows.com/en-us/featured/windows-developer-program-for-iot
History
1st version of the article