
Uploading Image by File Browsing, Dragging & Dropping and Using Webcam in ASP.NET MVC
4.92/5 (68 votes)
In this article I am explaining three ways to upload image (by Browsing File, by Dragging and Dropping and by Capturing using Webcam) from an ASP.NET MVC web application to server and accessing those back to display on web page.
Introduction
In this article I am explaiing three ways to upload image from an ASP.NET MVC web application to server and accessing those back to display on web page. While creating a web application many times scenarios arise to upload and display an image, for example user profile image and images associated with products, articles, items or events etc. I hope this article would be helpful to implement such scenarios quickly. We will create a sample demo application using Visual Studio to understand the implementations. Following three ways to upload images are explained in this article:
- Uploading Image by Browsing File
- Uploading Image by Dragging and Dropping
- Uploading Image by Capturing using Webcam
Pre-requisite: You should be at intermediate level with C# and ASP.NET MVC, jQuery and HTML to have a good time with this article. For beginners, Please learn the basics of above technologies first and you can put comments below article in case of any query. I will be happy to answer your queries. Thanks.
Acknowledgments: While writing this article, I took help of few blogs and used libraries written by other respected programmers. I have mentioned links to those blogs and libraries in "References" section of this article. Huge thanks to those authors and programmers.
Overview of Sample Demo
To provide a quick idea of what we would be accomplishing at the end of code demo of this article, below is the screenshot of finished application having links to all three demos:

In the sample demo, we have three ways of uploading image but accessing of image is same for all three ways. So attached code solution having one Main View(Index.cshtml) which will use three partial views(GetPVDragDrop.cshtml, GetPVforFileBrowsing.cshtml and GetPVUsingWebCam.cshtml) for different demos. One more partial view (ViewSavedImage.cshtml) is used for accessing and showing the uploaded image. (To learn more about partial views please refer to this link.)
All three different partial views will have similar HTML structure to get same layout but sending image file to the controller’s action method will be different in all of these cases. To keep simple and easy to understand, corresponding to each partial view, three Java Script files are added (file-browsing.js, drag-and-dropping.js and web-cam.js). (So you can see it is somewhat violation of DRY principle as few code replication are there but we will prefer simplicity here over DRY principle).
Note: We assume you have downloaded the attached sample code having the running project. If not, please do so as we are not providing detail or screen shots for all code here.
YouTube Video: Many thanks to sashkhdr for sharing a video based on this article on youtube here. It is having live demo describing the functionality of application which we will be creating in this article. Thanks.
Let us get started by creating a demo application.
Creating ASP.NET MVC 4 Application
Before starting, please note the following points while following the steps given to creating demo applications:
- We used Visual Studio 2012 with ASP.NET MVC 4 to develop the demo so attached code will run perfectly without any change with same setup.
- We have tested the running application on Internet Explorer version 10 and Chrome version 38. Screenshots attached with this article are taken while running application in Chrome browser.
- You can use Visual Studio 2013 also with ASP.NET MVC 4 or 5 installed.
- If you are using older version of Visual Studio/ ASP.NET MVC then you need to create similar solution and be careful for small changes due to different version.
- Basic knowledge of ASP.NET MVC and jQurey is prerequisite.
- For sake of convenience we are saving images in a folder inside application. You can use any database/mechanism as per your convenience and do the necessary changes in code.
Now lets fire up Visual Studio and start building demo:
- Let us create a sample application by selecting ASP.NET MVC4 Web Application template and give it project name as ImageUploadDemo and click ok.

- Select a template as Internet Application and click OK. Visual Studio will create an ImageUploadDemo project solution for you.

- Go to solution explorer and expand Content and Scripts folder. You will get all required jQuery, jQueryUI libraries in Scripts folder and CSS file in Content folder added by Visual Studio for chosen project template.
As a good practice, we should delete the files which we are not using in the application. So let’s remove unnecessary files from application as you can see in downloaded demo that I have removed many. You can compare with downloaded code and do the needful. It is not a necessary step as of now and you can do that latter also.
Now add some JavaScript, CSS file and an ImagesUploaded folder which we will use later, names for those files and folder are given below.
JavaScript Files:- drag-and-dropping.js
- file-browsing.js
- web-cam.js
- jquery.webcam.js
- jscam.swf
- appcss.css
- ImagesUploaded
- In Shared folder, we will modify the existing code in _Layout.cshtml file. First write the following code in head tag:
<head> <meta charset="utf-8" /> <title>@ViewBag.Title - My ASP.NET MVC Application</title> <link href="~/favicon.ico" rel="shortcut icon" type="image/x-icon" /> <meta name="viewport" content="width=device-width" /> <script src="~/Scripts/jquery-1.8.2.min.js"></script> @*Referenced appcss file having custom CSS*@ <link href="~/Content/custom/appcss.css" rel="stylesheet" /> </head> - Write the following code in body tag to create the left side navigation links:
<body> <div class="navigationPanel"> <div style="margin: 40px 25px 2px 25px;"> <span style="color:green;font-weight:bolder; font-size:large">Links to Demostrations</span> <br /> <br /> <span style="color: #CC3300; font-weight: bold; font-style: italic">Uploading Image by</span> <br /> <br /> <a href="~/Home/GetPVforFileBrowsing">Browsing File</a> <br /> <br /> <a href="~/Home/GetPVDragDropUsingjQuery">Dragging and Dropping</a> <br /> <br /> <a href="~/Home/GetPVUsingWebCam">Capturing using Webcam</a> <br /> <br /> </div> </div> <div style="float: left; margin: 25px 2px 2px 80px;"> @RenderBody() </div> </body> - Remove all content from index.cshtml page. As we have already put links in layout page for demo and this index page will show related partial views on click on links.
- Add a model called as ImageModel, which will have two properties. We will use this model to hold latest image detail in Controller and in “ViewSavedImage” partial view as its model to display image name and uploaded image in previous request.
public class ImageModel
{
    public string ImageName { get; set; }
    public string ImagePath { get; set; }
}
So far, we have created basic stuff and written common code which we will be using in all three demos. Further, we will code for each scenario one by one.
Uploading Image by Browsing File
- Add an action method in Home Controller called GetPVforFileBrowsing and write following code:
public ActionResult GetPVforFileBrowsing() { return View(); } - Now add a partial view by right clicking over above method and Write following html code in GetPVforFileBrowsing.cshtml file to create layout and give the reference of file-upload.js file. As of now file-upload.js is an empty file further we will write code in it.
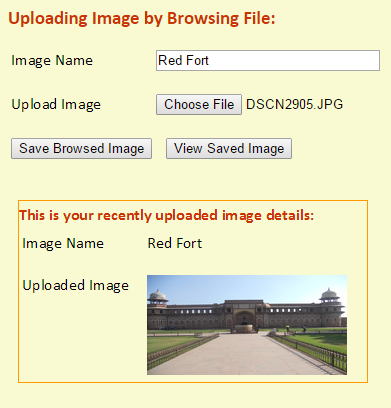
<h3>Uploading Image by Browsing File:</h3> <table> <tr> <td> <span>Image Name</span> </td> <td> <input type="text" id="txtImageName" /> </td> <td> <div id="validateImageInput" class="warrningMessage">Please enter image name</div> </td> </tr> <tr> <td> <br /> <span>Upload Image</span> </td> <td> <br /> <input type="file" id="selectedImage" name="image" /> </td> <td> <br /> <div id="validateSelectedImage" class="warrningMessage">Please browse image file</div> </td> </tr> <tr> <td> <br /> <input type="button" id="btnBrowsedSave" value="Save Borwsed Image" /> </td> <td> <br /> <input type="button" id="btnViewImage" value="View Saved Image" /> </td> </tr> </table> <br /> <br /> @*Container of ViewSavedImage partial view*@ <div id="pvContainerDiv"> </div> <script src="~/Scripts/Js/file-browsing.js"></script> - Write the following code in file-browsing.js file.
$(document).ready(function (){
    $("#btnViewImage").hide();
    $("#validateImageInput ").hide();
    $("#validateSelectedImage").hide();
});
$("#txtImageName").keydown(function () {
    $("#validateImageInput").hide();
});
$("#selectedImage").click(function () {
    $("#validateSelectedImage").hide();
});
$("#btnBrowsedSave").click(function () {
    var imageName = $("#txtImageName").val();
    var formData = new FormData();
    var totalFiles = document.getElementById("selectedImage").files.length;
    var browsedFile = document.getElementById("selectedImage").files[0];
    if (imageName == "")
        $("#validateImageInput").show();
    if (totalFiles == 0)
        $("#validateSelectedImage").show()
    if ((imageName != "") && (totalFiles != 0)) {
        if (browsedFile.type.match('image.*')) {
            formData.append("FileUpload", browsedFile);
            formData.append("ImageName", imageName);
            $.ajax({
                type: "POST",
                url: '/Home/UploadImage',
                data: formData,
                dataType: "html",
                contentType: false,
                processData: false,
                success: function (result) {
                    $("#btnViewImage").show();
                }
            });
        }
        else {
            alert("Please browse image file only.");
        }
    }
});
In above code, first, we are hiding “View Saved Image” button which would be visible when user click on “Save Captured Image” button to see just uploaded image and two div which are having text used for validation purpose. Using Ajax request we are sending uploaded image to UploadImage action method in controller.
- Add an action method which will accept image file via Http request and save in ImagesUploaded folder.
[HttpPost] public void UploadImage() { foreach (string upload in Request.Files) { string path = AppDomain.CurrentDomain.BaseDirectory + "ImagesUploaded/"; string filename = Path.GetFileName(Request.Files[upload].FileName); Request.Files[upload].SaveAs(Path.Combine(path, filename)); imageModel.ImagePath = filename; imageModel.ImageName = Request.Form["ImageName"]; } } - Now we will access this saved image. To do that add a partial view into the Shared folder named as ViewSavedImage, since this partial view would be used in all of three scenarios that is why we are adding it into shared folder. It will accept an ImageModel. Write following code in this partial view:
@model ImageUploadDemo.Models.ImageModel <div id="viewSavedContentAreaDiv"> <h4>This is your recently uploaded image details:</h4> <table> <tr> <td class="pvTdFirst"> <span>Image Name</span> </td> <td class="pvTdSecond"> <span>@Model.ImageName</span> </td> </tr> <tr> <td class="pvTdFirst"><br /> <span>Uploaded Image</span> </td> <td class="pvTdSecond"><br /> <div > <img class="viewSavedImage" src="@Url.Content(String.Format("~/ImagesUploaded/{0}", Model.ImagePath))"> </div> </td> </tr> </table> </div> - Add an action method named as "ViewSavedImage" which will return this partial view.
[OutputCache(NoStore = true, Duration = 0, VaryByParam = "*")]
public ActionResult ViewSavedImage()
{
    return PartialView("ViewSavedImage", imageModel);
}
Here we are using OutputCache attribute and setting some properties: NoStore = true (No cache will be maintained); Duration = 0 (cache duration would be zero) and VaryByParam = "*" (can vary by any parameters) is used. We do not want the output of this action method to be cached at all bacause it should aways return the latest uploaded image. - Add below code in file-browsing.js file which will make ajax call to ViewSavedImage action method which will return ViewSavedImage.cshtm partial view and on success that partial view would be inserted inside div tag having id as pvContainerDiv.
$("#btnViewImage").click(function () { $.ajax({ type: "Get", url: '/Home/ViewSavedImage', dataType: "html", contentType: false, processData: false, success: function (result) { $("#pvContainerDiv").empty().append(result); } }); }); - Run the application, browse any image file, give appropriate image name and click on "Save Browsed Image" button. With the given name your image will be saved in ImagesUpload folder. Click on “View Saved Image” button. Saved image would be displayed just below on the same page as shown below screenshot.
Uploading Image by Dragging and Dropping
- Add an action method in Home Controller called GetPVDragDropand and write following code:
public ActionResult GetPVDragDrop() { return View(); } - Now add a partial view by right clicking over above method and Write following html code in GetPVDragDrop.cshtml file Most of the code would be same as GetPVforFileBrowsing.cshtml but some id's of html controls are changed to give proper name in current context. Please chnage those names as per downloaded code. Give the reference of drag-drop.js file in GetPVDragDrop.cshtml. Now we will write code in drag-drop.js which will make some are area as droppable and show dropped image on page.
$(document).ready(function () {
    $("#btnViewImage").hide();
    $("#validateImageInput ").hide();
    $("#validateDroppedImage").hide();
});
var dropArea = $("#dropAreaDiv");
var newFile;
// Providing handlers three events to the drop area
dropArea.on({
    "drop": makeDrop,
    "dragenter": ignoreDrag,
    "dragover": ignoreDrag
});
//Stop default behavior
function ignoreDrag(e) {
    e.stopPropagation();
    e.preventDefault();
}
//Handling drop event
function makeDrop(e) {
    var fileList = e.originalEvent.dataTransfer.files, fileReader;
    e.stopPropagation();
    e.preventDefault();
    if (fileList.length > 0) {
        newFile = fileList[0];
        if (newFile.type.match('image.*')) {
            $("#validateDroppedImage").hide();
            fileReader = new FileReader();
            fileReader.onloadend = handleReaderOnLoadEnd($("<img />"));
            fileReader.readAsDataURL(fileList[0]);
        }
        else {
            alert("Please select an image file only.");
        }
    }
}
//Setting the image source
function handleReaderOnLoadEnd($image) {
    return function (event) {
        $image.attr("src", this.result)
            .addClass("small")
            .appendTo("#dropAreaDiv");
    };
}
$("#txtImageName").keydown(function () {
    $("#validateImageInput").hide();
});
$("#btnDroppedSave").click(function () {
    var imageName = $("#txtImageName").val();
    if (imageName == "")
        $("#validateImageInput").show();
    var imgSource = $("#dropAreaDiv").find("img").attr("src");
    if (imgSource == undefined)
        $("#validateDroppedImage").show();
    if ((imageName != "") && (imgSource != undefined)) {
        var formData = new FormData();
        var totalFiles = 1;
        var dropedFile = newFile;
        formData.append("FileUpload", dropedFile);
        formData.append("ImageName", imageName);
        $.ajax({
            type: "POST",
            url: '/Home/UploadImage',
            data: formData,
            dataType: "html",
            contentType: false,
            processData: false,
            success: function (result) {
                $("#btnViewImage").show();
            }
        });
    }
});
$("#btnViewImage").click(function () {
    $.ajax({
        type: "Get",
        url: '/Home/ViewSavedImage',
        dataType: "html",
        contentType: false,
        processData: false,
        success: function (result) {
            $("#pvContainerDiv").empty().append(result);
        }
    });
});
In above ajax call, we are targeting to UploadImage action method which is same method which we have used in above demo for saving image by browsing image file.
- Run the application, enter image name in textbox and drop any image file inside the dotted droppable area then click on “Save Dropped Image” button. Dropped image would be saving with the same name which you have given in textbox. Click on "View Saved Image" button, hope you would be able to see just dropped and saved image as shown above in the screenshot under "Overview of Sample Demo" heading.
Uploading Image by Capturing using Webcam
In this scenario, we will capture image from systems’s webcam so your system must be having a webcam in order to run and test the application. I have used a plugin which is written in jQuery and swf file which is written in adobe flash action Script. This plugin is written by Robert Eisele please find links to his blog in the Reference section of this article. I have kept those two files in ExternalJs folder of the application.
- Add an action method in Home Controller called GetPVUsingWebCam and add a partial with the same name. The code for action method looks like:
public ActionResult GetPVUsingWebCam () { return View(); } - HTML code in GetPVUsingWebCam.cshtml file would be same as GetPVforFileBrowsing.cshtml, but some id's of HTML controls are changed, please make those same as per downloaded code. Give the reference of web-cam.js file in GetPVUsingWebCam.cshtml. Now we will write following code in web-cam.js:
$(document).ready(function () {
    $("#btnViewImage").hide();
    $("#validateImageInput").hide();
    $("#validateCameraInput").hide();
    // assigning properties and adding callback fuctions
    $("#cameraArea").webcam({
        width: 250,
        height: 160,
        mode: "save",
        swffile: "/Scripts/ExternalJs/jscam.swf",
        onTick: function () { },
        onSave: function () {
        },
        onCapture: function ()
        {
            var imageName = $("#txtImageName").val();
            var url = getContextPath() + "CameraCapture/" + imageName;
            webcam.save(url);
            $("#btnViewImage").show();
        },
        debug: function (type, message)
        {
            if (message === "Camera started") { window.webcam.started = true; }
        },
        onLoad: function () { }
    });
    // Validating and calling capture method of webcam
    $("#btnCaptureSave").click(function () {
        var imageName = $("#txtImageName").val();
        if (imageName === "")
        {
            $("#validateImageInput").show();
        }
        else
        {
            $("#validateImageInput").hide();
            if (!webcam.started) {
                $("#validateCameraInput").show();
            }
            else
            {
                $("#validateCameraInput").hide();
                $("#btnViewImage").hide();
                webcam.capture();
            }
        }
    });

    function getContextPath()
    {
        var ctx = window.location.pathname,
            path = '/' !== ctx ? ctx.substring(0, ctx.indexOf('/', 1) + 1) : ctx;
        return path + (/\/$/.test(path) ? '' : '/');
    }

    $("#txtImageName").keydown(function () {
        $("#validateImageInput").hide();
    });
    $("#btnViewImage").click(function () {
        $.ajax({
            type: "Get",
            url: '/Home/ViewSavedImage',
            dataType: "html",
            contentType: false,
            processData: false,
            success: function (result)
            {
                $("#pvContainerDiv").empty().append(result);
            }
        });
    });
});
In above ajax call, we are targeting CameraCapture action method to save the image.
- Run the application and click on "Capturing using Webcam" link from left hand side menu, you must be getting the initial screen for webcam demo as given below asking you to allow access to webcam:
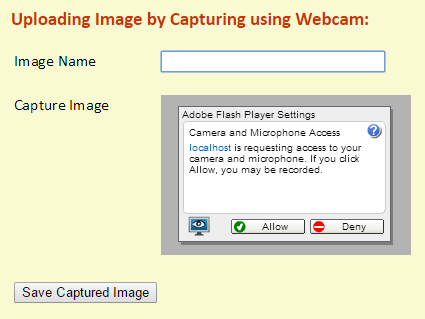
- Now start the webcam by clicking on "Allow" button, enter image name in text box, capture the snap and save image by clicking on “Save Captured Image” button. Captured image would be saved with the same name which you have given in textbox. Click on "View Saved Image" button to see the recently saved captured image as shown in below screenshot:

Conclusion
In this article we learned three ways to save the image in ASP.NET MVC application: by browsing file, by dragging and dropping and by taking snap using webcam. I tried to keep code as simple as possible so that it could be easy to understand and reusable. Your comments and suggestions are most welcome with detail to improve the article. Thanks for reading.