
Import Fixed Length File Data into Database Table with SSIS
4.33/5 (4 votes)
This article helps with step by step detailed information to import fixed length file data into SQL server’s database table.
- Download code folder - 16.4 KB
- Download source data (sample data) - 202 B
- Download script to create the destination table - 393 B
Introduction
Currently, most of legacy systems are getting converted into latest technologies. For example, Mainframe systems into .NET based systems. While doing so, it is obvious that the data must be converted as well.
Generally, these legacy systems provided their data into text files with fixed length data in it.
This article helps to import the fixed length data available in the file into SQL servers Database Table with SSIS.
SSIS (SQL Server Integration Services) is an ETL (Extract-Transform-Load) tool which comes with Microsoft SQL Server.
Using the Code
I have tried to provide step by step detailed information to import the fixed length file data into SQL server database table. I have used Microsoft SQL Server 2008 R2 and Business Intelligence Studio to write the code, however it is similar to SQL server 2005 onwards and should work with minor changes.
Import Fixed Length File with SSIS
Open SQL Server Business Intelligence Development Studio
- Select Start ->> All Programs >> Microsoft SQL Server 2008 R2 >> Business Intelligence Development Studio.

- This will display the following screen:

- Now to create the new project, select File Menu >> New >> Project. It will display window to select the project type and its name.
- Select Project Type as “Business Intelligence Projects” and Template as “Integration Services Project” as shown in below window.
- Select the project location. I have select project location as “C:\CodeProject\ImportFixedLengthFile”.
- Enter Project Name. I have provided project name as “
ImportFixedLengthFile”. Please refer to the below window:
- Click on OK.
- This will create a new project which requires reference files. And display the below screen:

- Drag Data Flow Task from toolbox and drop into Control Flow:

- Double click on the Data flow tasks which take you to data flow area.
- Drag and Drop Flat file source.
- Right click on it and select Edit. This will open window to configure source of data.

Enter Connection name. I have given connection name as SourceofData.
In General Settings, click on Browse button and select file in which data is available.
Select Format as “Fixed width”.
Select Advanced tab. Now here, we have to select properties of each column.
- For this example, I have prepared file with the below definition:
EmpID char(3) FirstName char(30) MiddleName char(30) LastName char(30) City char(30) PinCode char(6) - Sample data available in the file is shown in the below screen shot:

- Click on Add Column, Enter Column Name, Enter Input Column Width and Enter Output column width. To keep this example simple, just provide the column name and size as given above.
- After entering these all column details, Connection manager column will look like this:

- For this example, I have prepared file with the below definition:
- Click on OK.
- Now Flat File source is available with below columns configuration:

- Click on OK.
- In the same way, we have to configure the Destination connection where the data has to be imported from above connection.
- Drag ADO Net destination from Data flow destinations and Drop into Data flow task.
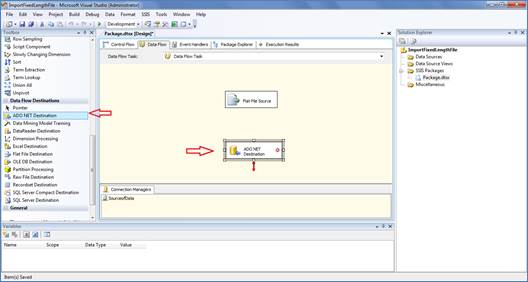
- Select the Success Precedence from Flat File Source and join it with ADO Net Destination.

- Now, double click on the ADO Net destination, the following window will open:

- Click on New.
- Click on New in Data Flow Connections.
- Select Server Name as (local).
- Select “Use Windows Authentication”. You may use SQL Server authentication if required.
- Select Database Name where destination table is available. I am selecting CodeProject as database.

- Click on OK

- Click on OK.
- Then Select Table where data has to be imported. I have existing table
"dbo"."EmpDetails"with below table definition. If you do not have it, then you may create such a table.CREATE TABLE [dbo].[EmpDetails] ( [EmpID] [nvarchar](3) NULL, [FirstName] [nvarchar](30) NULL, [MiddleName] [nvarchar](30) NULL, [LastName] [nvarchar](30) NULL, [City] [nvarchar](30) NULL, [PinCode] [nchar](6) NULL ) - Select preview to check if everything looks as expected. I get the below window with Preview.

- Click on Mappings.
- Check if each column is mapped with respective destination column.

- Click on OK.
- Finally, our screen will look like the below screen shot:

- Right Click and select “Execute Task”.
- Data flow task will be executed and the data available in source file will be imported into Destination. database table “
EmpDetails”. After execution, the screen will look like the below screen shot:
- Data flow task will be executed and the data available in source file will be imported into Destination database table “
EmpDetails” and data in the table will look like is shown in the below screen shot: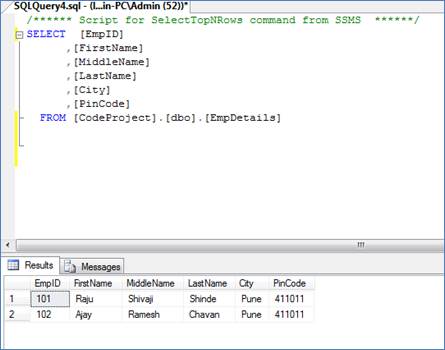
Points of Interest
You may refer to my other topic details at http://www.codeproject.com/Articles/baliram-surya#articles
History
- Initial draft