
Let's create the Screen - Android UI Layout and Controls
Learn to create the UI part for your Android Application
- Download LifeCycleTest.zip - 278.9 KB
- Download ViewAndLayoutLessons_-_Base.zip - 1.2 MB
- Download ViewAndLayoutLessons_-_Completed.zip - 1.1 MB
Index
- Introduction
- Background
- The Deals
- The Basis
- The View
- Let's Code
- Completed Project Repository
- Points of Interest
- History
Introduction
In the article you will learn about overview of UI components. Android provides basic layouts and controls that you can use to create your app's user interface. However if you are not satisfied with them or you want more components, you can make it yourself.
Background
Android Application UI is an interesting things that you must to learn. It's a little bit different from the other platforms but it has great design. To learn this lesson, you need to know about the basis of Android App such as a project structure and resources. You can learn it from Hello Android Article.
The Deals
Before learn this article, I’d like to make sure that everyone is on the same page. I have provided you the base project for using to manage our lesson materials, you can download from the link below.
To open the base project, you need to unzip it and open the Android Studio then click the file menu and select open.

Select the project folder and click OK button.

If you have opened another project, Android Studio will ask you to select the window that you want to open the project.

Now, the base project was opened.

Make the project and run it.
![]()

You will see that the main screen of this app has only a list. There are two sample items in a list, you can tap on the item to see the Sample Activity. In our lessons you will learn to create more Activity and add it to this list.
Activity Template
In this article we will use the Blank Activity template to create a new Activity.

The Blank Activity template will generate the Java code, the Layout file and auto apply an Activity to the Manifest.
For easy to access the activity, when your created the Activity you need to add it to the list in a MainActivity.
    @Override
    protected void onCreate(Bundle savedInstanceState) {
        super.onCreate(savedInstanceState);
        setContentView(R.layout.activity_main);//set the activity_main.xml as screen content

        List<ActivityData> activityDataList = new ArrayList<ActivityData>();//List of the ActivityData instance, put you ActivityData here
        activityDataList.add(new ActivityData(getString(R.string.title_activity_sample_inflate_view_from_xml),SampleInflateViewFromXmlActivity.class));//add the ActivityData to the List
        activityDataList.add(new ActivityData(getString(R.string.title_activity_sample_create_view_in_java_code),SampleCreateViewInJavaCodeActivity.class));

        ...
    }
We use the activityDataList.add() statement to add the Activity to the ListView. Youe need to create an instance of ActivityData which contains the Activity's title and it class.
This is an constructor of the ActivityData class:
ActivityData(String title,Class activityClass);
Now, try to create a new activity with name "MyFirstActivity" and add it to the list.
Here is my MainActivity.java code:
....

public class MainActivity extends Activity {

    @Override
    protected void onCreate(Bundle savedInstanceState) {
        super.onCreate(savedInstanceState);
        setContentView(R.layout.activity_main);//set the activity_main.xml as screen content

        List<ActivityData> activityDataList = new ArrayList<ActivityData>();//List of the ActivityData instance, put you ActivityData here
        activityDataList.add(new ActivityData(getString(R.string.title_activity_sample_inflate_view_from_xml),SampleInflateViewFromXmlActivity.class));//add the ActivityData to the List
        activityDataList.add(new ActivityData(getString(R.string.title_activity_sample_create_view_in_java_code),SampleCreateViewInJavaCodeActivity.class));
        activityDataList.add(new ActivityData("My Fist Activity",MyFirstActivity.class));

        ....
    }

    ....

}
When you run the application you will see a MyFirstActivity item in the list.


The basis
The Android Application UI system is consist of View and ViewGroup. View is an element that show on the screen and user can interact with, while ViewGroup is used to group and align the Views.

The picture above show that the Android Application UI is a tree of Views. You can place only one element at the root. Therefore, a ViewGroup is the first choice that you should to consider because it allow you to place many elements on the Screen.
The sizing
Android recommends developers to avoid using the pixel coordinate for positioning and sizing the View. So Android provides the ViewGourp or Layout for grouping and arranging, and special units for sizing the View.
Here is the special units and values that used for sizing and aligning the View:
- MATCH_PARENT: Set the element size (width or height) to fit its parent.
- FILL_PARENT: It same as
MATCH_PARENTbut it support Android version 2.2 and below. - WRAP_CONTENT: Set the element size (width or height) to fit its parent.
- dp(dip) unit: It is an abstract unit that calculated from the physical density of the screen. Can use to define the size of element or it margin and padding.
- sp unit: like the
dpunit but it also calculate with user prefers font size, recommend to use for sizing text.
Android Activity Lifecycle
What happened with your app when you open the app, switch to the other, and close it? The Activity of your application will transition between the states that called "Activity Lifecycle".
Android provides callback methods for every Activity's State. So you can manage how Activity works when it went to specific state. For instance, stop the music when app close, end the data streaming when user switch to the another app.

The picture above show the Android Activity Lifecycle, the state transition and callback methods.
When the Activity received an Intent it will call onCreate() method, you can construct the UI of this activity at this state.
After created, the onStart() method will invoke, at this state you can add some code that you want to operate before the UI visible.
Now, the UI is showing. Android will call onResume() method, you can add what you want to operate every time when the app resume such as refresh the data.
After Resumed, the app is full running you can interact with app's UI until it pause.
When you switch to the other app or go to home screen, the Activity will pause and onPause() and onSaveInstanceState() methods will call. You need to save the unsaved data stop the animation or UI work and reduce the resources usage.
Note: The data maybe lose after this state. You need to save it yourself.
When the Activity is no longer visible the UI will hide and Android will call the onStop() method, you can kill the service that no longer use.
If you navigate back to the Activity, onRestart() method will call and let you start an Activity.
When another activity need more resources, Android will kill the unused Activities. After killed, user still can navigate to that Activity and the Android will call onCreate() method to re-create the it. You can restore that data that you save in the pause state.
When Activity finishing or Android ask for destroy the Activity, Android will call onDestroy() method you need to free the resources such as thread, data, etc.
See with your eyes
I have created the app that is used to learn about order of lifecycle callback methods calling, you can download it here.
Just make and deploy the app to your device and then try to switch to other app go back or do something that make Activity transition into another state. You will see the callback method that called in each state from the Toast message (the text within floating balloon).
The View
View is the visual element that display on the screen, it may has some interactions with the user. Android provides many pre-defined Views that you can use in your application.
You can create Views in the Java code and XML. I recommend you to use XML because of the MVC concept that talk about Model, View, and Control should be separate.
This is the example of View usage in XML code:
<View
    android:layout_width="wrap_content"
    android:layout_height="wrap_content"
    />
Note: layout_width and layout_height attributes are mandatory to create View.
If you want to call this View in the Java code, you need to add the id attribute for using to identify this View.
Note: The value of id attribute must start with "@+id/" follow by the name or you can use the Android's pre-defined id such as "@android:id/text1"
<View
    android:id="@+id/my_view"
    android:layout_width="wrap_content"
    android:layout_height="wrap_content"
    />
Now, you can call this View in the Java code by use the method findViewById() of the parent View with the View's id as parameter.
public class MainActivity extends ActionBarActivity {

    @Override
    protected void onCreate(Bundle savedInstanceState) {
        super.onCreate(savedInstanceState);
        setContentView(R.layout.activity_main);
        View myView = findViewById(R.id.my_view);
    }
}
If you want to create a View in Java code, you can do it by instantiate the object of that View class.
public class MainActivity extends Activity {

    @Override
    protected void onCreate(Bundle savedInstanceState) {
        super.onCreate(savedInstanceState);
        setContentView(R.layout.activity_main);
        View myView findViewById(R.id.my_view);
        View newView = new View(this);
    }
}
Now, the View was created but it doesn't show on the screen until you add it to the existing layout or set it as content View.
Display View on the Screen
After you created a layout file in res/layout folder you need to put some code in the Activity to call the View that you want to display on the screen. The Activity class provides a setContentView() method to do that works, you can pass the layout's id or the View instance as parameter.
Example 1
Look at the base project, there is the file name "activity_sample_inflate_view_from_xml.xml" in the res/layout folder and I want to display it in the SampleInflateViewFromXmlActivity.
activity_sample_inflate_view_from_xml.xml

SampleInflateViewFromXmlActivity.java

I have to put a setContentView() statement in to the Activity and using the layout'd id as parameter.
package me.vable.android.viewandlayoutlessons;

import android.support.v7.app.ActionBarActivity;
import android.os.Bundle;

public class SampleInflateViewFromXmlActivity extends ActionBarActivity {
    @Override
    protected void onCreate(Bundle savedInstanceState) {
        super.onCreate(savedInstanceState);
        setContentView(R.layout.activity_sample_inflate_view_from_xml);
    }
}
Note: R class is used to access resource's ids in Java code,
Now, build and run the application.

Example 2
I have SampleCreateViewInJavaCodeActivity but I'm no longer want to use the XML layout file but I want to create the View in Java code.
Note: To display view that constructed in java code, you have to use the setConTentView() method too but use the View instance as parameter instead the layout's id.
Here is my code:
package me.vable.android.uiexample;

import android.support.v7.app.ActionBarActivity;
import android.os.Bundle;
import android.widget.Button;

public class SampleActivity extends ActionBarActivity {

    @Override
    protected void onCreate(Bundle savedInstanceState) {
        super.onCreate(savedInstanceState);
        Button helloWorldButton = new Button(this);
        helloWorldButton.setText("Hello World");
        setContentView(helloWorldButton);
    }
}
I created the Button and set it as display content. Here is the result:

Now, you can display the View on the screen.
Let's code
In this lesson I will give you a project that you need to completed it.
The project is called "UserSystem", it contains of 5 Activities there are Login Activity, Welcome Activity, Sign up Activity, Profile Activity, and User List Activity. Let's see the screen mockup.

Login Activity
Create the new activity with a name "LoginActivity". Then please consider the UI of it.
Note: Don't forget to add this Activity to the list on main page.

You will found that this Activity has 5 types of View there are Image, Text input, Check box, Text Link, Button. Now, Link them to Android basic View types.
- Image - To display the image you should to use
ImageView. - Text input - Android provides
EditTextfor this works, it allow you to set input type and you can use as password field too. - Check box - Android provides
CheckBoxwith the label in the oneView. - Text Link - No Text link for Android becuase you can add the event click to every
Views. So you can useTextViewinstead. - Button - You can use
Buttonor otherViews as you want
Note: When I describe about each View, you can create a new Activity to try it yourself e.g. TextViewExampleActivity for using to learn about how the TextView works.
TextView
You may know a TextView as a Label or a Text Block in another platforms. TextView is the simplest View that is used to display the Text on the screen.
To create the TextView, just drag the TextView from palette and drop into the preview screen.
Note: Android Studio provides many kind of TextView, there are Plain TextView, Large Text, Medium Text, and Small Text. You can select one that you like.

Open the XML view you will see the TextView element like this:
<TextView
    android:text="New Text"
    android:layout_width="wrap_content"
    android:layout_height="wrap_content"
    />
These are the interesting attributes of TextView:
- text - The text that you want to display on this
View. - textSize - Size of the text.
- textColor - Color of the text.
- textStyle - Style of the text (normal / italic / bold).
- fontFamily - Font family that is used to render the text such as serif, sans-serif, etc.
Example: I want to create a TextView that display a big red bold serif text "Hello World!"

<TextView
        android:layout_width="wrap_content"
        android:layout_height="wrap_content"
        android:text="Hello World"
        android:textSize="36dp"
        android:textColor="#FF0000"
        android:fontFamily="serif"
        />
Edit properties of View
There are many way to set properties of View in Android Studio
1. Using the XML code
From the View elements in layout file, you can add the known attributes such as id. If you don't know the attribute name you can press keys Ctrl + Space Bar (Windows/Linux) then the suggestions will be shown.

<TextView
        android:id="@+id/textview_hello_world"
        android:layout_width="wrap_content"
        android:layout_height="wrap_content"
        android:text="Hello World"
        android:textSize="36dp"
        android:textColor="#FF0000"
        android:fontFamily="serif"
        />
Don't like the XML? You can also use the GUI properties panel to edit the Views properties too.
2. Using the properties panel
Go to the design view and click on the View that you want. Look at on the right of the Android Studio screen you will see the properties panel that contains a list of View properties.
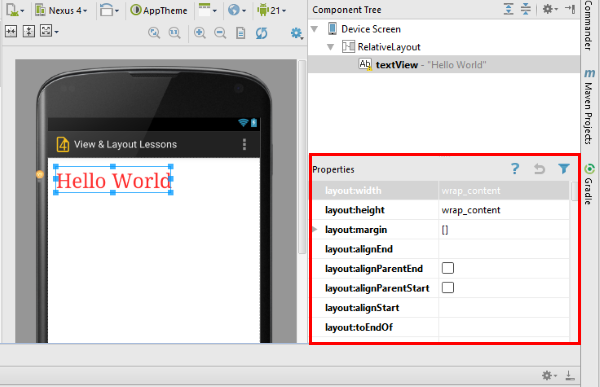
If not found properties panel, you may see a "Component Tree" menu. Click it, the properties panel will appear.

Set the properties that you want.

3. Double click on the View
When you double click on the View, the common properties of that View will show and you can edit here.

Note: In 2. and 3. you will found that there is a button [...] at the right of some property values, that button is used to browse the resource such as string, drawable, etc.
Access the TextView in the Java code
You can access every View instance from the Java code, the easiest way is using that View's id to find the specific View.
EditText
An EditText is also known as a Text Box, a Text Field or a Text Area, it allow user to enter/edit the text with keyboard. You can specific the input data type such as number, email, password, etc.
You can add the EditText to the Screen by drag the EditText (Plain Text) from the palette and drop into the preview screen.
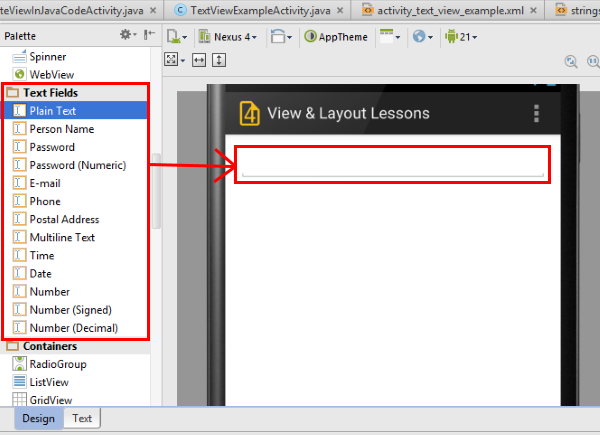

You may got a tiny TextView after drop on the preview screen because the width is set to WRAP_CONTENT, let's try to change it to MATCH_PARENT.

<EditText
    android:layout_width="match_parent"
    android:layout_height="wrap_content"
    android:id="@+id/editText"
    />
When you run the application and tap the EditText, the soft keyboard will appear.

These are the interesting attributes of EditText:
- text - The
EditText's value. - password - If you set it to true, when you type something in this
EditTextit will display every characters as "•". - textColor - Color of the text.
- hint - The text that will appear when the value is empty, it is used to guess the user about what he/she should to enter.
- textColorHint - The color of hint text, it should be lighter than the
textColor. - singleLine - By default
EditTextViewallow user to enter multiple-line text like text area, if you don't want a multiple-line, set this attribute to true. - maxLines - You can limit the line of text with this attribute.
- inputType - Limit the type of character that user can enter in this
EditText.
If you want to limit the data in EditText you can set the input type, Android provides a lot of input type such as number, textUri, textEmailAddress, etc. Input type will affect to the keyboard style if your soft keyboard supported that type.
Note: Input type only filter the keyboard input. If you set the text in java code input type will doesn't works.
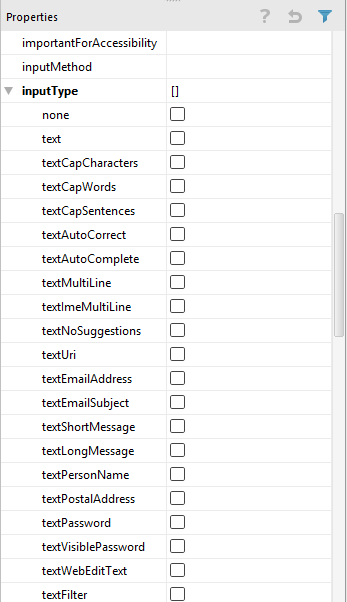
Example: When I set the input type to number, the soft keyboard style will change.

<EditText
        android:layout_width="match_parent"
        android:layout_height="wrap_content"
        android:id="@+id/edittext_test"
        android:layout_alignParentLeft="true"
        android:layout_alignParentStart="true"
        android:inputType="number" />
Access the EditText in the Java code
Now, we will access the EditText in the Java. Set the EditText's id and then you can use findViewById() method to get it instance.
....
    @Override
    protected void onCreate(Bundle savedInstanceState) {
        super.onCreate(savedInstanceState);
        setContentView(R.layout.activity_edit_text_example);
        EditText testEditText = (EditText) findViewById(R.id.edittext_test);
    }
....
You can use the setText() method to set the EditText's value.
testEditText.setText("value from Java code");

These are the methods of EditText that you should to know
- getText() - Return the value of
EditText. Normally used withtoString()method to get the value as String. - setText() - Set the value of
EditText. - setOnKeyListener() - Set the
KeyListenerthat is used to detect some key event such as enter key.
ImageView
When you want to display the image, you should to use the ImageView. You can create an ImageView by drag it from the palette and drop into the preview screen.

When you drop ImageView on the screen, it will show nothing until you set it src attribute. The src attribute value is drawable resource, you need to add an image to the drawable-xxxx folder.

Each drawable folder is used for provide the images to specific device. If you have and images in drawable-xhdpi and you run the app on the device that has a small screen or low-resolution, Android will scale the image to the proper size for that device. I will describe about the alternative resouces in another article.
Note: Drawable resource can be the image file and XML file.
Note: Create the images for each dpi if possible, because the auto scaling may reduce the performance.
To add the image to the project, you can put it in the drawable-xxxx folder directly. I recommend you to design the screen at the XHDPI or XXHDPI and use the Nexus 4(XHDPI) or 5(XXHDPI) as preview screen device.

You can double click on the ImageView to set the src attribute. Click the button [..] to browse the drawable resources.


These are the interesting attributes of ImageView
- adjustViewBounds - The
ImageViewwill maintain the aspect ratio (to same as image) when you set this attribute to true. - scaleType - How to scale the image content if it doesn't fit to the
ImageView.

You can use the setImageDrawable(), setImageResource(), or setImageBitmap() method to set the image in Java code.

Button
Button is the View that user can press or click to perform the action.

You can set the text on the button via text attribute like TextView, and you can add the image to the button via the properties drawableLeft, drawableRight, drawableTop, and drawableBottom.
The Click Event
Click or Tap is the most important action that you can interact with the UI, you can detect the Click event on every Android View by implement the OnClickListener interface.
I have a button with id "button"
<Button
        android:id="@+id/button"
        android:layout_width="wrap_content"
        android:layout_height="wrap_content"
        android:text="New Button"
        />
Then, I implement an OnClickListener and set it to the Button instance.
import android.support.v7.app.ActionBarActivity;
import android.os.Bundle;
import android.view.View;
import android.widget.Button;
import android.widget.Toast;

public class ButtonExampleActivity extends ActionBarActivity {

    @Override
    protected void onCreate(Bundle savedInstanceState) {
        super.onCreate(savedInstanceState);
        setContentView(R.layout.activity_button_example);
        Button button = (Button)findViewById(R.id.button);
        button.setOnClickListener(onClickListener);
    }

    View.OnClickListener onClickListener= new View.OnClickListener() {
        @Override
        public void onClick(View view) {
            Toast.makeText(ButtonExampleActivity.this,"Button was clicked",Toast.LENGTH_SHORT).show();
        }
    };
}
When I click (tap) this button the Toast message will show.

Also you can detect the Click event without implements OnClikListener by using the onClick attribute in the XML code.
Note: If the View is not a Button, you need to set the clickable attribute to true.
Note: onClick will call the method of Activity only, don't use it in Fragment.
<Button
        android:drawableLeft="@drawable/ic_launcher"
        android:layout_width="wrap_content"
        android:layout_height="wrap_content"
        android:text="drawableLeft"
        android:onClick="buttonClick"
        />

<TextView
        android:layout_width="wrap_content"
        android:layout_height="wrap_content"
        android:text="Clickable TextView"
        android:clickable="true"
        android:onClick="buttonClick"
        />
You need to create the buttonClick(View) method in the Activity
public void buttonClick(View view)
{
        Toast.makeText(ButtonExampleActivity.this,"Invoke buttonClick() method",Toast.LENGTH_SHORT).show();
}

The familiar Views: ImageButton, every Views with onClikListener Implements.
CheckBox
CheckBox is the two-state button that can be either checked or unchecked. In our project, we will use the check box as a Remember Me option that user can choose for keeping the login state.

<CheckBox
        android:id="@+id/checkbox_remember_me"
        android:layout_width="wrap_content"
        android:layout_height="wrap_content"
        android:text="remember me"
        />
You can check it as default by using the checked attribute.
<CheckBox
        android:id="@+id/checkbox_remember_me"
        android:layout_width="wrap_content"
        android:layout_height="wrap_content"
        android:text="remember me"
        android:checked="true"
        />

Now, try to play with CheckBox in the Java code. You can use the isChecked() method to get checked status.
CheckBox rememberMeCheckBox = (CheckBox) findViewById(R.id.checkbox_remember_me);

boolean rememberMe = rememberMeCheckBox.isChecked();
If you want to detect the checked change, you can implement the CompoundButton.OnCheckedChangeListener interface.
    CompoundButton.OnCheckedChangeListener onRememberMeCheckBoxCheckedChange = new CompoundButton.OnCheckedChangeListener() {
        @Override
        public void onCheckedChanged(CompoundButton compoundButton, boolean checked) {
            if(checked)
            {
                Toast.makeText(CheckBoxExampleActivity.this, "rememberMeCheckBox was checked", Toast.LENGTH_SHORT).show();
            }
            else
            {
                Toast.makeText(CheckBoxExampleActivity.this, "rememberMeCheckBox was unchecked", Toast.LENGTH_SHORT).show();
            }
        }
    };
And set it to the CheckBox.
rememberMeCheckBox.setOnCheckedChangeListener(onRememberMeCheckBoxCheckedChange);


The familiar Views: Switch, ToggleButton.
Create the LoginActivity
Now, you have learned 5 types of basic View. That's enough to create our project's Activity, please try to create it now!! (Only UI part)
Note: Please name each View same the picture below.

Is the result beautiful? :(
Now, you will learn more about the View's properties and the Layout for using to build the more beautiful UI.
The common properties of the View
When every Views extends from the same base class, them will have the common properties/attributes. I will describe only the important properties.
- alpha - Make the
Viewtransparent, semi-transparent or opaque. The possible value is between 0.0 and 1.0. - background - Set the background of the
View. - clickable - Defines that this
Viewreact to the Click event. - contentDescription - Description of the
View. - gravity - Set the
View's content position. The possible value is the one of these valuesleft,top,right,bottom,center,center_horizontal,center_verticalor combine some of them. - id - Id of The View.
- minHeight - The minimun Height of the
View. - minWidth - The minimum Width of the
View. - onClick - Name of the method that is used to react the Clik Event.
- padding - Set the padding of all four edges.
- paddingBottom - Set the padding of the bottom edge.
- paddingEnd - Set the padding of the end edge.
- paddingLeft - Set the padding of the left edge.
- paddingRight - Set the padding of the right edge.
- paddingStart - Set the padding of the start edge.
- paddingTop - Set the padding of the top edge.
- saveEnabled - Set if you want to save the state when UI freeze.
- tag - Set the tag of this View.
- visibility - Set the view visibility.
And when the Views was placed under the Layout they will receive some properties for using to fulfill the Layout behavior such as the layout_margin, layout_gravity.

When you set the width/height to WRAP_CONTENT, Android will set the width/height of View as small as possible. But if you add the minWidth/minHeight to the View, Android will compare the width/height and minWidth/minHeight and then choose the largest one.

When the padding is the gap between the content and View's border, the margin is the opposite, it is a gap between this View and the others.

The gravity attribute is defines where to place the content in the View but the layout_gravity is defines where to place the View in the Parent (Layout).
The Layout
What is Layout? Layout is a kind of ViewGroup that is used to define the structure for app's UI, Android provides many kind of Layout such as LinearLayout, FrameLayout, etc. In this section you will learn about the behaviors of each Layout and how to using them.
Linear Layout
LinearLayout is the simplest Layout that will arranges it children in a single column or row.

It is easy to use but it's powerful.

With LinearLayout you can weigh the View width or height.
Example: You have an ImageView and Content in the LinearLayout and you want to scale the image to 40% of LinearLayout's height and use all remaining area for a content.
This is current XML code:
<LinearLayout xmlns:android="http://schemas.android.com/apk/res/android"
    android:layout_width="match_parent"
    android:layout_height="match_parent"
    android:orientation="vertical">

    <ImageView
        android:id="@+id/image_view_logo"
        android:layout_width="match_parent"
        android:layout_height="wrap_content"
        android:background="#FF99FF" />

    <LinearLayout
        android:layout_width="match_parent"
        android:layout_height="wrap_content"
        android:orientation="vertical"
        android:background="#999999">
    </LinearLayout>
</LinearLayout>
And this is what you want:

You need to set the weightSum attribute to the LinearLayout.
I set the LinearLayout's weightSum to 10.
Note: weightSum value can be an Integer or decimal
<LinearLayout xmlns:android="http://schemas.android.com/apk/res/android"
    android:layout_width="match_parent"
    android:layout_height="match_parent"
    android:orientation="vertical"
    android:weightSum="10">
    ....
And, then 40% of 10 is 4, you need to set the weight of ImageView to 4.
    <ImageView
        android:id="@+id/image_view_logo"
        android:layout_width="match_parent"
        android:layout_height="wrap_content"
        android:background="#FF99FF"
        android:layout_weight="4"/>
The remaining of height is 60%, you have to set the weight of content (Inner LinearLayout) to 6.
    <LinearLayout
        android:layout_width="match_parent"
        android:layout_height="wrap_content"
        android:orientation="vertical"
        android:background="#999999"
        android:layout_weight="6">
    </LinearLayout>
Now, you got the UI that you want.

Note: For the better performance when you use the weight behavior, please set the height of the layout's children to 0dp if you use a Vertical LinearLayout or set the width of layout's children to 0dp if you use a Horizontal LinearLayout.
<LinearLayout xmlns:android="http://schemas.android.com/apk/res/android"
    android:layout_width="match_parent"
    android:layout_height="match_parent"
    android:orientation="vertical"
    android:weightSum="10">

    <ImageView
        android:id="@+id/image_view_logo"
        android:layout_width="match_parent"
        android:layout_height="0dp"
        android:background="#FF99FF"
        android:layout_weight="4"/>

    <LinearLayout
        android:layout_width="match_parent"
        android:layout_height="0dp"
        android:orientation="vertical"
        android:background="#999999"
        android:layout_weight="6">
    </LinearLayout>

</LinearLayout>
Relative Layout
RelativeLayout is a very flexible layout, it will arranges it children to relative position. Each children can be specific position by relative to sibling elements such as above another View, left to another View. RelativeLayout allow you to make Views overlapping or floating View, and it has a better performance than nested LinearLayout.

You can see the RelativeLayout in many application such as Facebook and Google+.

These are interesting property of the RelativeLayout's child Views
- layout_alignParentTop - Place the
Viewat the top ofRelativeLayout. - layout_alignParentBottom - Place the
Viewat the bottom ofRelativeLayout. - layout_alignParentLeft - Place the
Viewat the left ofRelativeLayout. - layout_alignParentRight - Place the
Viewat the right ofRelativeLayout. - layout_centerInParent - Place the
Viewat the center ofRelativeLayout. - layout_centerHorizontal - Place the
Viewto center in horizontal ofRelativeLayout. - layout_centerVertical - Place the
Viewto center in vertical ofRelativeLayout. - layout_toLeftOf - Place the
Viewto the left of otherView. - layout_toRightOf - Place the
Viewto the right of otherView. - layout_above - Place the
Viewto the above of otherView. - layout_below - Place the
Viewto the below of otherView.
Seem hard? you can drag and drop the Views on RelativeLayout in the design view to positioning them.
Note: You need to set the id attribute to every RelativeLayout's child Views, for using to reference in relative position.
Example: You want to create a forum application, on the thread list page you want to create the list item like this:
You decide to use the Relative for the Thread item UI, let's try it now!!
The picture below show about relation of each Views

Here is my code:
<RelativeLayout xmlns:android="http://schemas.android.com/apk/res/android"
    xmlns:tools="http://schemas.android.com/tools"
    android:layout_width="match_parent"
    android:layout_height="70dp"
    android:background="#252525"
    android:padding="8dp"
    android:layout_margin="8dp">

    <ImageView
        android:id="@+id/imageview_icon"
        android:layout_width="wrap_content"
        android:layout_height="wrap_content"
        android:layout_alignParentBottom="true"
        android:layout_alignParentLeft="true"
        android:layout_alignParentTop="true"
        android:src="@drawable/ic_launcher" />

    <TextView
        android:id="@+id/textview_title"
        android:layout_width="0dp"
        android:layout_height="wrap_content"
        android:layout_above="@+id/textview_content"
        android:layout_alignParentRight="true"
        android:layout_alignParentTop="true"
        android:layout_toRightOf="@+id/imageview_icon"

        android:text="Title"
        android:textColor="@android:color/white"
        android:textSize="24sp" />

    <TextView
        android:id="@+id/textview_content"
        android:layout_width="0dp"
        android:layout_height="wrap_content"
        android:layout_alignParentBottom="true"
        android:layout_alignParentRight="true"
        android:layout_toRightOf="@+id/imageview_icon"
        android:text="Content"
        android:textColor="@android:color/secondary_text_dark"
        android:textSize="18sp" />
</RelativeLayout>
And this is a result!!

Frame Layout
FrameLayout is designed to display only one child, to position it on the border on center of the layout. However, you can add more than one child to the FrameLayout but the Views may overlapping the others and you can't control it.

When the Views in FrameLayout can be overlapping, you can create the overlay elements like Google+'s write button.

Note: To position the View in FrameLayout, you can using a layout_gravity and layout_margin attributes on the child Views.
FramLayout example code:

<FrameLayout xmlns:android="http://schemas.android.com/apk/res/android"
    xmlns:tools="http://schemas.android.com/tools"
    android:layout_width="match_parent"
    android:layout_height="match_parent"
    tools:context="me.vable.android.viewandlayoutlessons.FrameLayoutExampleActivity">

    <TextView
        android:text="top|left"
        android:textSize="20sp"
        android:gravity="center"
        android:layout_width="100dp"
        android:layout_height="100dp"
        android:background="#FF99FF"
        android:layout_gravity="top"
        />

    <TextView
        android:text="right|bottom"
        android:textSize="20sp"
        android:gravity="center"
        android:layout_width="100dp"
        android:layout_height="100dp"
        android:background="#FF99FF"
        android:layout_gravity="right|bottom" />

    <TextView
        android:text="bottom|center"
        android:textSize="20sp"
        android:gravity="center"
        android:layout_width="100dp"
        android:layout_height="100dp"
        android:background="#FF99FF"
        android:layout_gravity="center_horizontal|bottom" />

    <TextView
        android:text="left|bottom"
        android:textSize="20sp"
        android:gravity="center"
        android:layout_width="100dp"
        android:layout_height="100dp"
        android:background="#FF99FF"
        android:layout_gravity="left|bottom" />

    <TextView
        android:text="right|center"
        android:textSize="20sp"
        android:gravity="center"
        android:layout_width="100dp"
        android:layout_height="100dp"
        android:background="#FF99FF"
        android:layout_gravity="right|center_vertical" />

    <TextView
        android:text="center"
        android:textSize="20sp"
        android:gravity="center"
        android:layout_width="100dp"
        android:layout_height="100dp"
        android:background="#FF99FF"
        android:layout_gravity="center" />

    <TextView
        android:text="left|center"
        android:textSize="20sp"
        android:gravity="center"
        android:layout_width="100dp"
        android:layout_height="100dp"
        android:background="#FF99FF"
        android:layout_gravity="left|center_vertical" />

    <TextView
        android:text="top|right"
        android:textSize="20sp"
        android:gravity="center"
        android:layout_width="100dp"
        android:layout_height="100dp"
        android:background="#FF99FF"
        android:layout_gravity="right|top" />

    <TextView
        android:text="top|center"
        android:textSize="20sp"
        android:gravity="center"
        android:layout_width="100dp"
        android:layout_height="100dp"
        android:background="#FF99FF"
        android:layout_gravity="center_horizontal|top" />
    <ImageView
        android:layout_width="50dp"
        android:layout_height="50dp"
        android:id="@+id/imageView"
        android:layout_gravity="right|bottom"
        android:src="@drawable/ic_error"
        android:layout_margin="80dp"/>

</FrameLayout>
Create the LoginActivity (Cont'd.)
Now, I think that you can create a better UI for LoginActivity by using everything that you learned, let's go!!
I will show you my layout below (Try it yourself, don't copy)

<RelativeLayout xmlns:android="http://schemas.android.com/apk/res/android"
    xmlns:tools="http://schemas.android.com/tools"
    android:layout_width="match_parent"
    android:layout_height="match_parent"
    tools:context="me.vable.android.viewandlayoutlessons.LoginActivity"
    >

    <ImageView
        android:layout_width="match_parent"
        android:layout_height="200dp"
        android:id="@+id/imageview_app_logo"
        android:layout_alignParentTop="true"
        android:layout_centerHorizontal="true"
        android:src="@drawable/ic_launcher"
        android:adjustViewBounds="true"
        android:padding="32dp"
        android:background="#2DABFF"
        android:layout_marginBottom="16dp"
        />

    <EditText
        android:id="@+id/edittext_username"
        android:layout_centerHorizontal="true"
        android:hint="Username"
        android:layout_width="250dp"
        android:layout_height="wrap_content"
        android:layout_below="@+id/imageview_app_logo"
        android:singleLine="true"
        android:maxLines="1"/>

    <EditText
        android:id="@+id/edittext_password"
        android:layout_below="@+id/edittext_username"
        android:layout_alignRight="@+id/edittext_username"
        android:layout_alignLeft="@+id/edittext_username"
        android:hint="Password"
        android:layout_width="0dp"
        android:layout_height="wrap_content"
        android:inputType="textPassword"
        android:ems="10"
        android:singleLine="true"
        android:maxLines="1"/>

    <CheckBox
        android:id="@+id/checkbox_remember_me"
        android:layout_width="wrap_content"
        android:layout_height="wrap_content"
        android:text="remember me"
        android:layout_below="@+id/edittext_password"
        android:layout_alignLeft="@+id/edittext_password"
        android:layout_marginLeft="8dp"
        android:layout_marginTop="16dp"/>

    <TextView
        android:id="@+id/textview_forgot_password"
        android:layout_width="wrap_content"
        android:layout_height="wrap_content"
        android:textAppearance="?android:attr/textAppearanceSmall"
        android:text="forgot password?"
        android:layout_below="@+id/checkbox_remember_me"
        android:layout_centerHorizontal="true"
        android:layout_marginTop="16dp"
        android:textColor="#FF4040"/>

    <LinearLayout
        android:orientation="horizontal"
        android:layout_width="fill_parent"
        android:layout_height="wrap_content"
        android:layout_alignParentBottom="true"
        android:layout_alignParentLeft="true"
        android:layout_alignParentStart="true"
        android:weightSum="2">

        <Button
            android:id="@+id/button_sign_up"
            android:layout_width="wrap_content"
            android:layout_height="wrap_content"
            android:text="Sign up"
            android:layout_weight="1" />

        <Button
            android:id="@+id/button_login"
            android:layout_width="wrap_content"
            android:layout_height="wrap_content"
            android:text="Login"
            android:layout_weight="1" />

    </LinearLayout>
</RelativeLayout>
Welcome Activity

After user logged in he/she will see the welcome page, this page show only the profile image and the greetings text. There is only an options menu that you haven't learned, we will learn about it in this section.
Options Menu
Android provides a standard menu component. For the consistent, you should use the standard menu instead build your own one. On the legacy Android version, there is a menu hardware button that is used to open the options menu but on Android 3.0 and above the options menu is a part of Action Bar. Google provide the AppCompat library that is used to create the Action Bar for the legacy Android version to bring the same experiences to all device.

On Android 3.0+ the options menu is separate into 2 type there are Action Menu (show as icon on the Action Bar) and the Popup Menu (submenu, the menu that collapse until you tap the  menu)
menu)
To create the options menu, you need to create a menu resource in res/menu (When you using the Blank Activity template, the menu resource will generate automatically).
Now, I have created OptionsMenuExampleActivity with the menu resource name options_menu_example.xml.

And here is a XML code:
<menu xmlns:android="http://schemas.android.com/apk/res/android"
    xmlns:app="http://schemas.android.com/apk/res-auto"
    xmlns:tools="http://schemas.android.com/tools"
    tools:context="me.vable.android.viewandlayoutlessons.OptionsMenuExampleActivity" >
    <item android:id="@+id/action_settings"
        android:title="@string/action_settings"
        android:orderInCategory="100"
        app:showAsAction="never" />
</menu>
The Blank Activity template will generate the menu resource with settings menu by default.


These are the important attributes of options menu
- android:id - The id of this menu, without the id you will can access the menu in Java code.
- android:title - The text that you want to show on this menu.
- android:orderInCategory - The order of this menu in its
category. - android:icon - The icon of this menu, will show when the menu is an
Action Menuand always show on the old stylemenu(legacy Android). - app:showAsAction / android:showAsAction - Is this menu an
Action Menu, you can set it to always show as Action Menu, or depends on theAction Barspace, or never show as Action Menu.
Note: If your Activity was extended from the ActionBarActivitiy in AppCompat library you need to import an app namespace xmlns:app="http://schemas.android.com/apk/res-auto" and use the showAsAction proper from app namespace. Or you can add both app:showAsAction and android:showAsAction for make sure that the Action Menu will show.
I suggest you to name the id of menu as action_<name> if it's an Action Menu or menu_<name> if it's a normal Menu.
I will create an about menu as a popup menu.
<item android:id="@+id/menu_about"
        android:title="About"
        android:orderInCategory="101"
        app:showAsAction="never"
        />
I want to show the about menu under the settings menu then I set the order of it to 101 (greater it lower).

Next, I will create the refresh menu as a Action Menu.
<item android:id="@+id/action_refresh"
        android:title="Refresh"
        android:orderInCategory="1"
        app:showAsAction="always"
        />
Here is a result:
![]()
When you create an Action Menu you should to add the menu icon. Android suggest to use the monochrome image as the menu icon, you must to create the image that simple and has a clear meaning and well known.
I decide to use this icon  for the refresh menu. Android Studio provides the Image Asset import wizard that help the developer to convert the image into the proper size and color. To use the wizard, right click on the
 res folder then select New > Image Asset.

You will see the wizard window

There are 3 drawable asset types that you can use this wizard to import, there are Launcher Icons, Action Bar and Tabs Icons, and Notification Icon.

We will use the Action Bar and Tab Icons option for importing the menu icon.

These are description of the options.
- Asset Type - Type of
assetthat you want to create - Foreground - You can use your own image, or using the clipart, or text.
- Image File - If you use your own image, the wizard will let you select the image.
- Clipart - If you set foreground to clipart, the wizard will let you choose the clipart.
- Text - If you set foreground to text, you can enter you text here.
- Font - Set the font of text.
- Trim surrounding blank space - trim the space around the foreground element.
- Additional padding - add the space around the foreground element.
- Theme - You app's theme, if you choose a custom options it will let you choose that color of icon.
- Resource name - Set the name of this asset.
Note: Resource name should be name as ic_action_<name>
After selected the options, click the next button and you will see the outputs preview.

I can't see my image because it color is white :( Select the Target Module to you app, and select the res directory of you app.
Now, I have a drawable resource name ic_action_refresh. Add it to the menu!!
<item android:id="@+id/action_refresh"
        android:title="Refresh"
        android:orderInCategory="1"
        app:showAsAction="always"
        android:icon="@drawable/ic_action_refresh"
        />
Here is a result:
Next, we will access the options menu in Java code and write the code to react the options menu click event.
Open the Activity file you will see the onCreateOptionsMenu() and onOptionsItemSelected() method (create it if not exist)
    @Override
    public boolean onCreateOptionsMenu(Menu menu) {
        // Inflate the menu; this adds items to the action bar if it is present.
        getMenuInflater().inflate(R.menu.options_menu_example, menu);
        return true;
    }

    @Override
    public boolean onOptionsItemSelected(MenuItem item) {
        // Handle action bar item clicks here. The action bar will
        // automatically handle clicks on the Home/Up button, so long
        // as you specify a parent activity in AndroidManifest.xml.
        int id = item.getItemId();
        if (id == R.id.action_settings) {
            return true;
        }
        return super.onOptionsItemSelected(item);
    }
onCreateOptionsMenu() method is used to inflate the options menu to show on the View.
onOptionsItemSelected() method is used to detect the Click event on the menu.
Now, we focus on the onOptionsItemSelected() method and I will show the Toast message for each menu.
    @Override
    public boolean onOptionsItemSelected(MenuItem item) {
        int id = item.getItemId();
        if (id == R.id.action_settings) {
            //do something
            Toast.makeText(this,"Settings menu was clicked",Toast.LENGTH_SHORT).show();
            return true;
        }
        else if (id == R.id.menu_about) {
            //do something
            Toast.makeText(this,"About menu was clicked",Toast.LENGTH_SHORT).show();
            return true;
        }
        else if (id == R.id.action_refresh) {
            //do something
            Toast.makeText(this,"Refresh menu was clicked",Toast.LENGTH_SHORT).show();
            return true;
        }
        return super.onOptionsItemSelected(item);
    }
And run the app!!


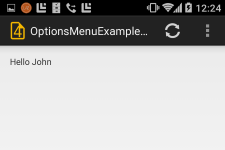
Create the WelcomeActivity
Now, you have learned everything that is used to create our project's WelcomeActivity. Create it now and set the Views's id and Menu's id as the picture below.

Here is my code:

welcome.xml (menu):
<RelativeLayout xmlns:android="http://schemas.android.com/apk/res/android"
    xmlns:tools="http://schemas.android.com/tools"
    android:layout_width="match_parent"
    android:layout_height="match_parent"
    android:paddingLeft="@dimen/activity_horizontal_margin"
    android:paddingRight="@dimen/activity_horizontal_margin"
    android:paddingTop="@dimen/activity_vertical_margin"
    android:paddingBottom="@dimen/activity_vertical_margin"
    tools:context="me.vable.android.viewandlayoutlessons.WelcomeActivity">

    <ImageView
        android:layout_width="100dp"
        android:layout_height="100dp"
        android:adjustViewBounds="true"
        android:id="@+id/imageview_profile"
        android:layout_alignParentTop="true"
        android:layout_centerHorizontal="true"
        android:layout_marginTop="32dp"
        android:src="@drawable/ic_man" />

    <TextView
        android:layout_width="wrap_content"
        android:layout_height="wrap_content"
        android:textAppearance="?android:attr/textAppearanceMedium"
        android:text="Hello, John"
        android:id="@+id/textview_greeting"
        android:layout_below="@+id/imageview_profile"
        android:layout_centerHorizontal="true"
        android:layout_marginTop="16dp" />
</RelativeLayout>
activity_welcome.xml (layout):
<menu xmlns:android="http://schemas.android.com/apk/res/android"
    xmlns:app="http://schemas.android.com/apk/res-auto"
    xmlns:tools="http://schemas.android.com/tools"
    tools:context="me.vable.android.viewandlayoutlessons.WelcomeActivity" >
    <item android:id="@+id/menu_user_list"
        android:title="User List"
        android:orderInCategory="1"
        app:showAsAction="never" />
    <item android:id="@+id/menu_profile"
        android:title="My Profile"
        android:orderInCategory="2"
        app:showAsAction="never" />
    <item android:id="@+id/menu_logout"
        android:title="Log Out"
        android:orderInCategory="3"
        app:showAsAction="never" />
</menu>
Sign up Activity

When users open the app they will found the LoginActivity if they don't have the account they need to register a new one. There are a RadioButton, RadioGroup, and Switch that we haven't learned. Now, we will learn to create a SignUpActivity.
RadioButton / RadioGroup
RadioButton and RadioGroup is used together to create a series of items but you can select only one item at a time.

RadioGroup is the ViewGroup that is used to control the RadioButton, RadioGroup will allow user to select only one item.
Note: There is orientation attribute in RadioGroup like LinearLayout.
Almost properties of RadioButton are like the CheckBox proiperties. I think you can try it yourself.
Example: I want to create the single choice question like the image above. Here is my code:
<LinearLayout xmlns:android="http://schemas.android.com/apk/res/android"
    xmlns:tools="http://schemas.android.com/tools"
    android:layout_width="match_parent"
    android:layout_height="match_parent"
    android:paddingLeft="@dimen/activity_horizontal_margin"
    android:paddingRight="@dimen/activity_horizontal_margin"
    android:paddingTop="@dimen/activity_vertical_margin"
    android:paddingBottom="@dimen/activity_vertical_margin"
    tools:context="me.vable.android.viewandlayoutlessons.RadioButtonExampleActivity"
    android:orientation="vertical">

    <TextView
        android:layout_width="wrap_content"
        android:layout_height="wrap_content"
        android:textAppearance="?android:attr/textAppearanceMedium"
        android:text="what are you feeling right now?"
        android:id="@+id/textView" />

    <RadioGroup
        android:id="@+id/radiogroup_feeling"
        android:layout_width="fill_parent"
        android:layout_height="wrap_content">

        <RadioButton
            android:id="@+id/radiobutton_felling_happy"
            android:layout_width="wrap_content"
            android:layout_height="wrap_content"
            android:text="Happy"/>

        <RadioButton
            android:id="@+id/radiobutton_felling_sad"
            android:layout_width="wrap_content"
            android:layout_height="wrap_content"
            android:text="Sad"/>

        <RadioButton
            android:id="@+id/radiobutton_felling_bored"
            android:layout_width="wrap_content"
            android:layout_height="wrap_content"
            android:text="Bored" />
    </RadioGroup>

</LinearLayout>
Now, I want to detect that what the button is selected, Implements the OnCheckedChangeListener of RadioGroup to detect when selection change. You will see onCheckedChanged() method, it will call when the selected item changed, it provides the RadioGroup and id of RadioButton as parameter.
package me.vable.android.viewandlayoutlessons;

import android.support.v7.app.ActionBarActivity;
import android.os.Bundle;
import android.view.Menu;
import android.view.MenuItem;
import android.widget.RadioGroup;
import android.widget.Toast;

public class RadioButtonExampleActivity extends ActionBarActivity {

    @Override
    protected void onCreate(Bundle savedInstanceState) {
        super.onCreate(savedInstanceState);
        setContentView(R.layout.activity_radio_button_example);
        RadioGroup feelingRadioGroup = (RadioGroup) findViewById(R.id.radiogroup_feeling);
        feelingRadioGroup.setOnCheckedChangeListener(onCheckedChangeListener);

    }

    RadioGroup.OnCheckedChangeListener onCheckedChangeListener= new RadioGroup.OnCheckedChangeListener() {
        @Override
        public void onCheckedChanged(RadioGroup radioGroup, int i) {
            if(i == R.id.radiobutton_felling_happy)
            {
                Toast.makeText(RadioButtonExampleActivity.this,"You're happy!!",Toast.LENGTH_SHORT).show();
            }
            else if(i == R.id.radiobutton_felling_sad)
            {
                Toast.makeText(RadioButtonExampleActivity.this,"You're sad",Toast.LENGTH_SHORT).show();
            }
            else if(i == R.id.radiobutton_felling_bored)
            {
                Toast.makeText(RadioButtonExampleActivity.this,"You're bored",Toast.LENGTH_SHORT).show();
            }
        }
    };
}


Switch
The Switch is working like the CheckBox but it look like the real world switch. And you can set the on/off label on it. Switch is required Android 4.0 or above, if your device run the Android version less than 4.0 please use the check box instead.

Here is an example:
    <Switch
        android:id="@+id/switch_subscription"
        android:layout_width="wrap_content"
        android:layout_height="wrap_content"
        android:text="Email subscriptions"
        android:textOn=""
        />
You can also set the on/off text by using textOn and textOff attributes
     <Switch
        android:id="@+id/switch_subscription"
        android:layout_width="wrap_content"
        android:layout_height="wrap_content"
        android:text="Email subscriptions"
        android:textOn="Yes"
        android:textOff="No"
        />


The familiar Views: CheckBox, ToggleButton.
Create the SignUpActivity
Let create the SignUpActivity now!!
Note: please using the id that I provide in a picture below.

Here is my code:
activity_sign_up.xml
<RelativeLayout xmlns:android="http://schemas.android.com/apk/res/android"
    xmlns:tools="http://schemas.android.com/tools"
    android:layout_width="match_parent"
    android:layout_height="match_parent"
    android:paddingLeft="@dimen/activity_horizontal_margin"
    android:paddingRight="@dimen/activity_horizontal_margin"
    android:paddingTop="@dimen/activity_vertical_margin"
    android:paddingBottom="@dimen/activity_vertical_margin"
    tools:context="me.vable.android.viewandlayoutlessons.SignupActivity">

    <ImageView
        android:layout_width="100dp"
        android:layout_height="100dp"
        android:adjustViewBounds="true"
        android:id="@+id/imageview_profile"
        android:layout_alignParentTop="true"
        android:layout_centerHorizontal="true"
        android:layout_marginTop="32dp"
        android:src="@drawable/ic_man" />

    <EditText
        android:id="@+id/edittext_username"
        android:layout_width="250dp"
        android:layout_height="wrap_content"
        android:textAppearance="?android:attr/textAppearanceMedium"
        android:hint="Username"
        android:layout_below="@+id/imageview_profile"
        android:layout_centerHorizontal="true"
        android:layout_marginTop="16dp" />

    <EditText
        android:id="@+id/edittext_password"
        android:layout_width="250dp"
        android:layout_height="wrap_content"
        android:textAppearance="?android:attr/textAppearanceMedium"
        android:hint="Password"
        android:password="true"
        android:layout_below="@+id/edittext_username"
        android:layout_centerHorizontal="true"
        />

    <EditText
        android:id="@+id/edittext_email"
        android:inputType="textEmailAddress"
        android:layout_width="250dp"
        android:layout_height="wrap_content"
        android:textAppearance="?android:attr/textAppearanceMedium"
        android:hint="Username"
        android:layout_below="@+id/edittext_password"
        android:layout_centerHorizontal="true"
        />
    <RadioGroup
        android:id="@+id/radiogroup_gender"
        android:layout_width="250dp"
        android:layout_height="wrap_content"
        android:orientation="horizontal"
        android:layout_below="@+id/edittext_email"
        android:layout_centerHorizontal="true"
        >
        <RadioButton
            android:id="@+id/radiobutton_male"
            android:text="male"
            android:layout_width="wrap_content"
            android:layout_height="wrap_content" />
        <RadioButton
            android:text="female"
            android:id="@+id/radiobutton_female"
            android:layout_width="wrap_content"
            android:layout_height="wrap_content" />
    </RadioGroup>

    <Switch
        android:id="@+id/switch_subscription"
        android:layout_width="300dp"
        android:layout_height="wrap_content"
        android:text="Email subscriptions"
        android:layout_centerHorizontal="true"
        android:layout_marginTop="16dp"
        android:layout_below="@+id/radiogroup_gender"
        />

    <Switch
        android:id="@+id/switch_allow_email"
        android:layout_width="300dp"
        android:layout_height="wrap_content"
        android:text="Allow email from other"
        android:layout_centerHorizontal="true"
        android:layout_marginTop="16dp"
        android:layout_below="@+id/switch_subscription"
        />

</RelativeLayout>
sign_up.xml (Options menu)
<menu xmlns:android="http://schemas.android.com/apk/res/android"
    xmlns:app="http://schemas.android.com/apk/res-auto"
    xmlns:tools="http://schemas.android.com/tools"
    tools:context="me.vable.android.viewandlayoutlessons.SignUpActivity">
    <item
        android:id="@+id/action_submit"
        android:icon="@drawable/ic_action_check"
        android:title="Submit"
        app:showAsAction="always"/>
</menu>
And then, run the app on the device!!

Profile Activity

The ProfileActivity will show about the user information without their password. Please create it yourself!!

When you finish, we will add the logic to every Activity before create the next Activity.
Add the logic
Before create the last Activity, we will add the logic code the every activity to make our application work. I have provides the logic code in the base project, you only need to implement it will your Activities.
User class
User is the class that is used to store the user information.
These are properties of User class:
- private String username;
- private String password;
- private String email;
- private String profileImage;
- private Gender gender;
- private boolean newsletterSubscribed;
- private boolean allowedOtherEmail;
Use can set or get it via the accessor methods (get/set).
And this is the structure of Gender enum:
public enum Gender implements Serializable {
    MALE,FEMALE
}
UserService class
UserService is used to manage the User accounts, there are the function to create a new User, Login, Log Out, etc. you will use this class to interact with the screens.
These are the methods of this class:
- getInstance() - Get current instance of this class.
- getCurrentUser() - Get current logged in
User. - login() - Authenticate the user with username and password, you need to pass the
LoginListenerfor using to receive the result. - logout() - Log out from the system.
- register() - Create a new user account, you need to pass the
RegisterListenerforusing to receive the result. - getProfileImage() - Return the
Bitmapobject of the user profile image. - getUserList() - Get the list of user accounts, you need to pass the
GetUserListListenerfor using to receive the result.
And, there the interface that you need to implement when using some method.
    public interface LoginListener
    {
        public void onResponce(boolean loggedin,String message, User user);
    }

    public interface RegisterListener
    {
        public void onResponce(boolean registered, String message, User user);
    }

    public interface GetUserListListener
    {
        public void onResponce(boolean success, String message, List<User> users);
    }
Every interface will return the result in first parameter and the message in second, the third parameter is the User object or User List object.
LoginActivity
Now, get started with the LoginActivity.
First of all, you need to get all instance of View.
    private EditText usernameEditText;
    private EditText passwordEduitText;
    private CheckBox rememberMeCheckBox;
    private TextView forgotPasswordTextView;
    private Button loginButton;
    private Button signUpButton;

    @Override
    protected void onCreate(Bundle savedInstanceState) {
        super.onCreate(savedInstanceState);
        setContentView(R.layout.activity_login);

        usernameEditText = (EditText) findViewById(R.id.edittext_username);
        passwordEduitText = (EditText) findViewById(R.id.edittext_password);
        rememberMeCheckBox = (CheckBox) findViewById(R.id.checkbox_remember_me);
        forgotPasswordTextView =  (TextView) findViewById(R.id.textview_forgot_password);
        loginButton =  (Button) findViewById(R.id.button_login);
        signUpButton =  (Button) findViewById(R.id.button_sign_up);
    }
Next, we will create the login() method.
    private void login(String username,String password)
    {
        progressDialog.show();
        UserService.getInstance(LoginActivity.this).login(username, password, loginListener);
    }
The login() method will call the login method of UserService class.
Note: You need to use UserService.getInstance(Context) to get the instance on UserService class, Don't create it yourself.
Create the ProgressDialog to show when doing a long operation method()
private ProgressDialog progressDialog;

    @Override
    protected void onCreate(Bundle savedInstanceState) {
        ...
        progressDialog = new ProgressDialog(LoginActivity.this);
        progressDialog.setIndeterminate(true);
        ...
    }
Then we need to Implement the LoginListener for receiving the result callback.
    UserService.LoginListener loginListener = new UserService.LoginListener() {
        @Override
        public void onResponce(boolean loggedin, String message, User user) {
            progressDialog.dismiss();
            Toast.makeText(LoginActivity.this,message,Toast.LENGTH_SHORT).show();
            if(loggedin)
            {
                SharedPreferences sharedPreferences = getSharedPreferences("user_data",MODE_PRIVATE);
                SharedPreferences.Editor editor = sharedPreferences.edit();
                if(rememberMeCheckBox.isChecked())
                {
                    editor.putBoolean("remembered", true);
                    editor.putString("username", user.getUsername());
                    editor.putString("password", user.getPassword());
                }
                else
                {
                    editor.putBoolean("remembered",false);
                    editor.remove("username");
                    editor.remove("password");
                }
                editor.commit();
                goToWelcomeActivity();
            }
        }
    };
If login successful, we need to check for a Remember Me button state. If user want to remember, we need to save the account data into the SharePreferences.
Android provides the SharedPreferences to use to store the app data such as settings. You can get the SharePreferences instance from the getSharedPreferences() method of Context class. And you can save or manage the data by using the SharedPreferences.Editor class.
Note: Every time that use add, remove, or edit the SharedPreferences data you need to commit by using Editor.commit() method.
When user is logged in you need to bring the use to WelcomeActivity. So I created the goToWelcomeActivity() method to do that works.
    private void goToWelcomeActivity()
    {
        Intent intent = new Intent(this,WelcomeActivity.class);
        startActivity(intent);
        finish();
    }
The intent object is like the message that you send to Android, and when Android receive the intent it will find the responsibility man of that intent. When you ned to switch to another Activity, you need to create an Intent and pass the Context and another Activity class then call the startActivity() method. The finish() method is used to end the Activity, after user is logged in we finish the Activity because we don't need it anymore.
Next, we will detect the Click event of Login Button.
    @Override
    protected void onCreate(Bundle savedInstanceState) {
        ...
        loginButton.setOnClickListener(onClickLoginButtonListener);
        ...
    }

    View.OnClickListener onClickLoginButtonListener = new View.OnClickListener() {
        @Override
        public void onClick(View view) {
            String username = usernameEditText.getText().toString();
            String password = passwordEduitText.getText().toString();
            login(username, password);
        }
    };
We need to get the value of usernameEditText and passwordEditText and pass them into the login() method.
After that, we have to implements the click event of Sign up Button.
    @Override
    protected void onCreate(Bundle savedInstanceState) {
        ...
        signUpButton.setOnClickListener(onClickSignUpButtonListener);
        ...
    }

    View.OnClickListener onClickSignUpButtonListener = new View.OnClickListener() {
        @Override
        public void onClick(View view) {
            goToSignupActivity();
        }
    };

    private void goToSignupActivity()
    {
        Intent intent = new Intent(this,SignUpActivity.class);
        startActivity(intent);
    }
When user click the Sign up Button, the app will navigate to the SignUpActivity.
Almost finish, now there is the Forgot Password TextView that will used to renew a password, but we don't have that function right now. We need to tell the user that this function is not implemented.
    @Override
    protected void onCreate(Bundle savedInstanceState) {
        ...
        forgotPasswordTextView.setOnClickListener(onClickForgotPasswordTextViewListener);
    }
    ...
    View.OnClickListener onClickForgotPasswordTextViewListener = new View.OnClickListener() {
        @Override
        public void onClick(View view) {
            AlertDialog.Builder builder = new AlertDialog.Builder(LoginActivity.this);
            builder.setTitle("Waraing");
            builder.setIcon(R.drawable.ic_error);
            builder.setMessage("Not implement");
            builder.setPositiveButton("OK",null);
            builder.show();
        }
    };
I have created the AlertDialog to show the user that this function is not implemented.
Next, we need to check the login state of user when he/she enter this activity, if he/she is logged in, the application should navigate to the WelcomeActivity immediately.
    @Override
    protected void onCreate(Bundle savedInstanceState) {
        ...
        if(UserService.getInstance(this).getCurrentUser()!=null)
        {
            goToWelcomeActivity();
            return;
        }
    }
To check the log in statuc you can use the medthod getCurrentUser() of UserService, if the current user is not null, you need to switch to the WelcomeActivity.
Finally, if we have stored the user data from the Remember Me function, we need to login that user immediately.
    @Override
    protected void onCreate(Bundle savedInstanceState) {
        ...
        SharedPreferences sharedPreferences = getSharedPreferences("user_data",MODE_PRIVATE);
        boolean remembered = sharedPreferences.getBoolean("remembered",false);
        if(remembered)
        {
            rememberMeCheckBox.setChecked(true);
            String username = sharedPreferences.getString("username", null);
            String password = sharedPreferences.getString("password", null);
            login(username,password);
        }
    }
Here is a full source code:
package me.vable.android.viewandlayoutlessons;

import android.app.AlertDialog;
import android.app.ProgressDialog;
import android.content.Intent;
import android.content.SharedPreferences;
import android.support.v7.app.ActionBarActivity;
import android.os.Bundle;
import android.view.Menu;
import android.view.MenuItem;
import android.view.View;
import android.widget.Button;
import android.widget.CheckBox;
import android.widget.EditText;
import android.widget.ImageView;
import android.widget.TextView;
import android.widget.Toast;
import me.vable.android.viewandlayoutlessons.data.User;
import me.vable.android.viewandlayoutlessons.data.service.UserService;

public class LoginActivity extends ActionBarActivity {

    private EditText usernameEditText;
    private EditText passwordEduitText;
    private CheckBox rememberMeCheckBox;
    private TextView forgotPasswordTextView;
    private Button loginButton;
    private Button signUpButton;
    private ProgressDialog progressDialog;

    @Override
    protected void onCreate(Bundle savedInstanceState) {
        super.onCreate(savedInstanceState);
        setContentView(R.layout.activity_login);

        if(UserService.getInstance(this).getCurrentUser()!=null)
        {
            goToWelcomeActivity();
            return;
        }

        progressDialog = new ProgressDialog(LoginActivity.this);
        progressDialog.setIndeterminate(true);

        usernameEditText = (EditText) findViewById(R.id.edittext_username);
        passwordEduitText = (EditText) findViewById(R.id.edittext_password);
        rememberMeCheckBox = (CheckBox) findViewById(R.id.checkbox_remember_me);
        forgotPasswordTextView =  (TextView) findViewById(R.id.textview_forgot_password);
        loginButton =  (Button) findViewById(R.id.button_login);
        signUpButton =  (Button) findViewById(R.id.button_sign_up);

        loginButton.setOnClickListener(onClickLoginButtonListener);
        signUpButton.setOnClickListener(onClickSignUpButtonListener);
        forgotPasswordTextView.setOnClickListener(onClickForgotPasswordTextViewListener);

        SharedPreferences sharedPreferences = getSharedPreferences("user_data",MODE_PRIVATE);
        boolean remembered = sharedPreferences.getBoolean("remembered",false);
        if(remembered)
        {
            rememberMeCheckBox.setChecked(true);
            String username = sharedPreferences.getString("username", null);
            String password = sharedPreferences.getString("password", null);
            login(username,password);
        }
    }

    private void login(String username,String password)
    {
        progressDialog.show();
        UserService.getInstance(LoginActivity.this).login(username, password, loginListener);
    }

    private void goToSignupActivity()
    {
        Intent intent = new Intent(this,SignUpActivity.class);
        startActivity(intent);
    }

    private void goToWelcomeActivity()
    {
        Intent intent = new Intent(this,WelcomeActivity.class);
        startActivity(intent);
        finish();
    }

    View.OnClickListener onClickLoginButtonListener = new View.OnClickListener() {
        @Override
        public void onClick(View view) {
            String username = usernameEditText.getText().toString();
            String password = passwordEduitText.getText().toString();

            login(username, password);
        }
    };

    View.OnClickListener onClickSignUpButtonListener = new View.OnClickListener() {
        @Override
        public void onClick(View view) {
            goToSignupActivity();
        }
    };

    View.OnClickListener onClickForgotPasswordTextViewListener = new View.OnClickListener() {
        @Override
        public void onClick(View view) {
            AlertDialog.Builder builder = new AlertDialog.Builder(LoginActivity.this);
            builder.setTitle("Waraing");
            builder.setIcon(R.drawable.ic_error);
            builder.setMessage("Not implement");
            builder.setPositiveButton("OK",null);
            builder.show();
        }
    };

    UserService.LoginListener loginListener = new UserService.LoginListener() {
        @Override
        public void onResponce(boolean loggedin, String message, User user) {
            progressDialog.dismiss();
            Toast.makeText(LoginActivity.this,message,Toast.LENGTH_SHORT).show();
            if(loggedin)
            {
                SharedPreferences sharedPreferences = getSharedPreferences("user_data",MODE_PRIVATE);
                SharedPreferences.Editor editor = sharedPreferences.edit();
                if(rememberMeCheckBox.isChecked())
                {
                    editor.putBoolean("remembered", true);
                    editor.putString("username", user.getUsername());
                    editor.putString("password", user.getPassword());
                }
                else
                {
                    editor.putBoolean("remembered",false);
                    editor.remove("username");
                    editor.remove("password");
                }
                editor.commit();
                goToWelcomeActivity();
            }
        }
    };
}
SignUpActivity
To add the logic to SignupActivity, you need to get all Views instance first.
    private ImageView profileImageView;
    private EditText usernameEditText;
    private EditText passwordEditText;
    private EditText emailEditText;
    private RadioGroup genderRadioGroup;
    private RadioButton maleRadioButton;
    private RadioButton femaleRadioButton;
    private CompoundButton newsletterSubscriptionCompoundButton;
    private CompoundButton allowOtherEmailCompoundButton;
    private ProgressDialog progressDialog;

    @Override
    protected void onCreate(Bundle savedInstanceState) {
        super.onCreate(savedInstanceState);
        setContentView(R.layout.activity_sign_up);

        progressDialog = new ProgressDialog(this);
        progressDialog.setIndeterminate(true);

        profileImageView = (ImageView) findViewById(R.id.imageview_profile);
        usernameEditText = (EditText) findViewById(R.id.edittext_username);
        passwordEditText = (EditText) findViewById(R.id.edittext_password);
        emailEditText = (EditText) findViewById(R.id.edittext_email);
        genderRadioGroup = (RadioGroup) findViewById(R.id.radiogroup_gender);
        maleRadioButton = (RadioButton) findViewById(R.id.radiobutton_male);
        femaleRadioButton = (RadioButton) findViewById(R.id.radiobutton_female);
        newsletterSubscriptionCompoundButton = (CompoundButton) findViewById(R.id.switch_subscription);
        if(newsletterSubscriptionCompoundButton == null)
        {
            newsletterSubscriptionCompoundButton = (CompoundButton) findViewById(R.id.checkbox_subscription);
        }
        allowOtherEmailCompoundButton = (CompoundButton) findViewById(R.id.switch_allow_email);
        if(allowOtherEmailCompoundButton == null) {
            allowOtherEmailCompoundButton = (CompoundButton) findViewById(R.id.checkbox_allow_email);
        }
    }
I use the CompoundButton instead the Switch or CheckBox because I need to support both of them.
To make sure that one of the Gender RadioButton was checked, by making one of them checked as default
    @Override
    protected void onCreate(Bundle savedInstanceState) {
        ...
        maleRadioButton.setChecked(true);
    }
When user click the profile imageView I want to allow them to choose the picture on his/her device.
    private static final int SELECT_PICTURE = 1;
    @Override
    protected void onCreate(Bundle savedInstanceState) {
        ...
        profileImageView.setOnClickListener(onClickProfileImageViewListener);
    }

    View.OnClickListener onClickProfileImageViewListener = new View.OnClickListener() {
        @Override
        public void onClick(View view) {
            chooseImage();
        }
    };

    private void chooseImage()
    {
        Intent intent = new Intent(Intent.ACTION_PICK,android.provider.MediaStore.Images.Media.EXTERNAL_CONTENT_URI);
        startActivityForResult(intent, SELECT_PICTURE);
    }
I used the Intent to open the other app that provides the image.
When the image was receive, we will resize and set show it on the profile ImageView.
    private Bitmap bitmap;
    @Override
    protected void onActivityResult(int requestCode, int resultCode, Intent data) {
        if (requestCode == SELECT_PICTURE && resultCode == Activity.RESULT_OK)
            try {
                // We need to recyle unused bitmaps
                if (bitmap != null) {
                    bitmap.recycle();
                }
                InputStream stream = getContentResolver().openInputStream(data.getData());
                BitmapFactory.Options options = new BitmapFactory.Options();
                options.inSampleSize=2;
                bitmap = BitmapFactory.decodeStream(stream, null, options);
                int width = bitmap.getWidth();
                int height = bitmap.getHeight();
                double scale = 100.0/height;
                height = (int)(height*scale);
                width = (int)(width*scale);
                bitmap = Bitmap.createScaledBitmap(bitmap, width,height, false);
                stream.close();
                profileImageView.setImageBitmap(bitmap);
            } catch (FileNotFoundException e) {
                e.printStackTrace();
            } catch (IOException e) {
                e.printStackTrace();
            }
        super.onActivityResult(requestCode, resultCode, data);
    }
Next, When the user click the Submit Action Menu, the data will send to the UserService for creating an account.
    @Override
    public boolean onCreateOptionsMenu(Menu menu) {
        getMenuInflater().inflate(R.menu.sign_up, menu);
        return true;
    }

    @Override
    public boolean onOptionsItemSelected(MenuItem item) {
        int id = item.getItemId();
        if (id == R.id.action_submit) {
            String username = usernameEditText.getText().toString();
            String password = passwordEditText.getText().toString();
            String email = emailEditText.getText().toString();
            User.Gender gender;
            if(genderRadioGroup.getCheckedRadioButtonId() == R.id.radiobutton_male)
            {
                gender = User.Gender.MALE;
            }
            else
            {
                gender = User.Gender.FEMALE;
            }
            boolean newsletterSubscribed = newsletterSubscriptionCompoundButton.isChecked();
            boolean allowedOtherEmail = allowOtherEmailCompoundButton.isChecked();

            register(username,password,email,gender,newsletterSubscribed,allowedOtherEmail);

            return true;
        }
        return super.onOptionsItemSelected(item);
    }

    private void register(String username,String password, String email, User.Gender gender, boolean newsletterSubscribed, boolean allowedOtherEmail)
    {
        progressDialog.show();
        UserService.getInstance(SignUpActivity.this).register(username,password,email,gender,newsletterSubscribed,allowedOtherEmail,registerListener,bitmap);
    }
Implement the RegisterListener for receiving the register result.
    UserService.RegisterListener registerListener = new UserService.RegisterListener() {
        @Override
        public void onResponce(boolean registered, String message, User user) {
            progressDialog.dismiss();
            Toast.makeText(SignUpActivity.this, message, Toast.LENGTH_SHORT).show();
            if(registered)
            {
                goToWelcomeActivity();
            }
        }
    };

    private void goToWelcomeActivity()
    {
        Intent intent = new Intent(this,WelcomeActivity.class);
        startActivity(intent);
        finish();
    }
After that, you should to check the login state of user when he/she enter this Activity.
     protected void onCreate(Bundle savedInstanceState) {
        ....
        if(UserService.getInstance(this).getCurrentUser()!=null)
        {
            goToWelcomeActivity();
        }
        ....
    }
Here is a full source code:
package me.vable.android.viewandlayoutlessons;

import android.app.Activity;
import android.app.ProgressDialog;
import android.content.Intent;
import android.graphics.Bitmap;
import android.graphics.BitmapFactory;
import android.os.Bundle;
import android.support.v7.app.ActionBarActivity;
import android.view.Menu;
import android.view.MenuItem;
import android.view.View;
import android.widget.CompoundButton;
import android.widget.EditText;
import android.widget.ImageView;
import android.widget.RadioButton;
import android.widget.RadioGroup;
import android.widget.Toast;
import java.io.FileNotFoundException;
import java.io.IOException;
import java.io.InputStream;
import me.vable.android.viewandlayoutlessons.data.User;
import me.vable.android.viewandlayoutlessons.data.service.UserService;

public class SignUpActivity extends ActionBarActivity {

    private ImageView profileImageView;
    private EditText usernameEditText;
    private EditText passwordEditText;
    private EditText emailEditText;
    private RadioGroup genderRadioGroup;
    private RadioButton maleRadioButton;
    private RadioButton femaleRadioButton;
    private CompoundButton newsletterSubscriptionCompoundButton;
    private CompoundButton allowOtherEmailCompoundButton;
    private ProgressDialog progressDialog;
    private Bitmap bitmap;

    private static final int SELECT_PICTURE = 1;

    @Override
    protected void onCreate(Bundle savedInstanceState) {
        super.onCreate(savedInstanceState);
        setContentView(R.layout.activity_sign_up);

        if(UserService.getInstance(this).getCurrentUser()!=null)
        {
            goToWelcomeActivity();
        }

        progressDialog = new ProgressDialog(this);
        progressDialog.setIndeterminate(true);

        profileImageView = (ImageView) findViewById(R.id.imageview_profile);
        usernameEditText = (EditText) findViewById(R.id.edittext_username);
        passwordEditText = (EditText) findViewById(R.id.edittext_password);
        emailEditText = (EditText) findViewById(R.id.edittext_email);
        genderRadioGroup = (RadioGroup) findViewById(R.id.radiogroup_gender);
        maleRadioButton = (RadioButton) findViewById(R.id.radiobutton_male);
        femaleRadioButton = (RadioButton) findViewById(R.id.radiobutton_female);
        newsletterSubscriptionCompoundButton = (CompoundButton) findViewById(R.id.switch_subscription);
        if(newsletterSubscriptionCompoundButton == null)
        {
            newsletterSubscriptionCompoundButton = (CompoundButton) findViewById(R.id.checkbox_subscription);
        }
        allowOtherEmailCompoundButton = (CompoundButton) findViewById(R.id.switch_allow_email);
        if(allowOtherEmailCompoundButton == null) {
            allowOtherEmailCompoundButton = (CompoundButton) findViewById(R.id.checkbox_allow_email);
        }
        maleRadioButton.setChecked(true);

        profileImageView.setOnClickListener(onClickProfileImageViewListener);

    }

    View.OnClickListener onClickProfileImageViewListener = new View.OnClickListener() {
        @Override
        public void onClick(View view) {
            chooseImage();
        }
    };

    private void chooseImage()
    {
        Intent intent = new Intent(Intent.ACTION_PICK,android.provider.MediaStore.Images.Media.EXTERNAL_CONTENT_URI);
        startActivityForResult(intent, SELECT_PICTURE);
    }

    @Override
    protected void onActivityResult(int requestCode, int resultCode, Intent data) {
        if (requestCode == SELECT_PICTURE && resultCode == Activity.RESULT_OK)
            try {
                // We need to recyle unused bitmaps
                if (bitmap != null) {
                    bitmap.recycle();
                }
                InputStream stream = getContentResolver().openInputStream(data.getData());
                BitmapFactory.Options options = new BitmapFactory.Options();
                options.inSampleSize=2;
                bitmap = BitmapFactory.decodeStream(stream, null, options);
                int width = bitmap.getWidth();
                int height = bitmap.getHeight();
                double scale = 100.0/height;
                height = (int)(height*scale);
                width = (int)(width*scale);
                bitmap = Bitmap.createScaledBitmap(bitmap, width,height, false);
                stream.close();
                profileImageView.setImageBitmap(bitmap);
            } catch (FileNotFoundException e) {
                e.printStackTrace();
            } catch (IOException e) {
                e.printStackTrace();
            }
        super.onActivityResult(requestCode, resultCode, data);
    }

    @Override
    public boolean onCreateOptionsMenu(Menu menu) {
        getMenuInflater().inflate(R.menu.sign_up, menu);
        return true;
    }

    @Override
    public boolean onOptionsItemSelected(MenuItem item) {
        int id = item.getItemId();
        if (id == R.id.action_submit) {
            String username = usernameEditText.getText().toString();
            String password = passwordEditText.getText().toString();
            String email = emailEditText.getText().toString();
            User.Gender gender;
            if(genderRadioGroup.getCheckedRadioButtonId() == R.id.radiobutton_male)
            {
                gender = User.Gender.MALE;
            }
            else
            {
                gender = User.Gender.FEMALE;
            }
            boolean newsletterSubscribed = newsletterSubscriptionCompoundButton.isChecked();
            boolean allowedOtherEmail = allowOtherEmailCompoundButton.isChecked();

            register(username,password,email,gender,newsletterSubscribed,allowedOtherEmail);

            return true;
        }
        return super.onOptionsItemSelected(item);
    }

    private void register(String username,String password, String email, User.Gender gender, boolean newsletterSubscribed, boolean allowedOtherEmail)
    {
        progressDialog.show();
        UserService.getInstance(SignUpActivity.this).register(username,password,email,gender,newsletterSubscribed,allowedOtherEmail,registerListener,bitmap);
    }

    UserService.RegisterListener registerListener = new UserService.RegisterListener() {
        @Override
        public void onResponce(boolean registered, String message, User user) {
            progressDialog.dismiss();
            Toast.makeText(SignUpActivity.this, message, Toast.LENGTH_SHORT).show();
            if(registered)
            {
                goToWelcomeActivity();
            }
        }
    };

    private void goToWelcomeActivity()
    {
        Intent intent = new Intent(this,WelcomeActivity.class);
        startActivity(intent);
        finish();
    }
}
Welcome Activity
This Activity will show only the use profile image and the greeting message.
You need to get the instace on Views and set they value.
    private ImageView profileImageView;
    private TextView greetingTextView;

    @Override
    protected void onCreate(Bundle savedInstanceState) {
        super.onCreate(savedInstanceState);
        setContentView(R.layout.activity_welcome);

        profileImageView = (ImageView) findViewById(R.id.imageview_profile);
        greetingTextView = (TextView) findViewById(R.id.textview_greeting);

        greetingTextView.setText(String.format("Hello, %s", user.getUsername()));
        profileImageView.setImageBitmap(UserService.getInstance(this).getProfileImage(user));
    }
Check for the User instance. If it not exist, you should to close this activity immediately.
        User user = UserService.getInstance(this).getCurrentUser();

        if(user==null) {
            finish();
            return;
        }
Then, detect the options menu item click event by using the onOptionsItemSelected() method and create the action for each event.
    @Override
    public boolean onCreateOptionsMenu(Menu menu) {
        // Inflate the menu; this adds items to the action bar if it is present.
        getMenuInflater().inflate(R.menu.welcome, menu);
        return true;
    }

    @Override
    public boolean onOptionsItemSelected(MenuItem item) {
        int id = item.getItemId();
        if (id == R.id.menu_user_list) {
            return true;
        }else if (id == R.id.menu_profile) {
            goToMenuProfilePage();
            return true;
        }else if (id == R.id.menu_logout) {
            logout();
            return true;
        }
        return super.onOptionsItemSelected(item);
    }

    private void goToMenuProfilePage()
    {
        Intent intent = new Intent(this,ProfileActivity.class);
        startActivity(intent);
    }

    private void logout()
    {
        UserService.getInstance(this).logout();
        SharedPreferences sharedPreferences = getSharedPreferences("user_data",MODE_PRIVATE);
        SharedPreferences.Editor editor = sharedPreferences.edit();
        editor.putBoolean("remembered",false);
        editor.remove("username");
        editor.remove("password");
        editor.commit();
        finish();
    }
}
In the goToMenuProfilePage(), I haved created the Intent and put the extra data into it becuase I want to pass the User object into the ProfileActivity.
Here is a full source code:
package me.vable.android.viewandlayoutlessons;

import android.content.Intent;
import android.content.SharedPreferences;
import android.support.v7.app.ActionBarActivity;
import android.os.Bundle;
import android.view.Menu;
import android.view.MenuItem;
import android.widget.ImageView;
import android.widget.TextView;
import me.vable.android.viewandlayoutlessons.data.User;
import me.vable.android.viewandlayoutlessons.data.service.UserService;

public class WelcomeActivity extends ActionBarActivity {

    private ImageView profileImageView;
    private TextView greetingTextView;

    @Override
    protected void onCreate(Bundle savedInstanceState) {
        super.onCreate(savedInstanceState);
        setContentView(R.layout.activity_welcome);

        profileImageView = (ImageView) findViewById(R.id.imageview_profile);
        greetingTextView = (TextView) findViewById(R.id.textview_greeting);

        User user = UserService.getInstance(this).getCurrentUser();

        if(user==null) {
            finish();
            return;
        }

        greetingTextView.setText(String.format("Hello, %s", user.getUsername()));
        profileImageView.setImageBitmap(UserService.getInstance(this).getProfileImage(user));
    }

    @Override
    public boolean onCreateOptionsMenu(Menu menu) {
        // Inflate the menu; this adds items to the action bar if it is present.
        getMenuInflater().inflate(R.menu.welcome, menu);
        return true;
    }

    @Override
    public boolean onOptionsItemSelected(MenuItem item) {
        int id = item.getItemId();
        if (id == R.id.menu_user_list) {
            return true;
        }else if (id == R.id.menu_profile) {
            goToMenuProfilePage();
            return true;
        }else if (id == R.id.menu_logout) {
            logout();
            return true;
        }
        return super.onOptionsItemSelected(item);
    }

    private void goToMenuProfilePage()
    {
        Intent intent = new Intent(this,ProfileActivity.class);
        startActivity(intent);
    }

    private void logout()
    {
        UserService.getInstance(this).logout();
        SharedPreferences sharedPreferences = getSharedPreferences("user_data",MODE_PRIVATE);
        SharedPreferences.Editor editor = sharedPreferences.edit();
        editor.putBoolean("remembered",false);
        editor.remove("username");
        editor.remove("password");
        editor.commit();
        finish();
    }
}
Profile Activity
The ProfileActivity will receive the User object from the intent and show the User information on the screen. First of all, we need to receive the User object from intent and get all View instances.
    private ImageView profileImageView;
    private TextView usernameTextView;
    private TextView emailTextVIew;
    private TextView genderTextView;
    private CompoundButton newsletterSubscriptionCompoundButton;
    private CompoundButton allowOtherEmailCompoundButton;

    @Override
    protected void onCreate(Bundle savedInstanceState) {
        super.onCreate(savedInstanceState);
        setContentView(R.layout.activity_profile);

        User user = (User) getIntent().getExtras().getSerializable("user");

        if(user==null) {
            finish();
            return;
        }

        profileImageView = (ImageView) findViewById(R.id.imageview_profile);
        usernameTextView = (TextView) findViewById(R.id.textview_username);
        emailTextVIew = (TextView) findViewById(R.id.textview_email);
        genderTextView = (TextView) findViewById(R.id.textview_gender);
        newsletterSubscriptionCompoundButton = (Switch) findViewById(R.id.switch_subscription);
        if(newsletterSubscriptionCompoundButton==null)
        {
            newsletterSubscriptionCompoundButton = (CheckBox) findViewById(R.id.checkbox_subscription);
        }
        allowOtherEmailCompoundButton = (Switch) findViewById(R.id.switch_allow_email);
        if(allowOtherEmailCompoundButton==null)
        {
            allowOtherEmailCompoundButton = (CheckBox) findViewById(R.id.checkbox_allow_email);
        }
    }
Next, set the value to the Views
        profileImageView.setImageBitmap(UserService.getInstance(this).getProfileImage(user));
        usernameTextView.setText(String.format("Username: %s",user.getUsername()));
        emailTextVIew.setText(String.format("Email: %s",user.getEmail()));
        genderTextView.setText(String.format("Gender: %s",user.getGender()== User.Gender.MALE?"Male":"Female"));
        newsletterSubscriptionCompoundButton.setChecked(user.isNewsletterSubscribed());
        allowOtherEmailCompoundButton.setChecked(user.isAllowedOtherEmail());
Finally, we need to hide the Email if the allowOtherEmailCompoundButton is not checked.
        if(!allowOtherEmailCompoundButton.isChecked())
        {
            emailTextVIew.setVisibility(View.GONE);
        }
Here is a full source code:
package me.vable.android.viewandlayoutlessons;

import android.app.Activity;
import android.os.Bundle;
import android.support.v7.app.ActionBarActivity;
import android.view.Menu;
import android.view.MenuItem;
import android.view.View;
import android.widget.CheckBox;
import android.widget.CompoundButton;
import android.widget.ImageView;
import android.widget.Switch;
import android.widget.TextView;

import org.w3c.dom.Text;

import me.vable.android.viewandlayoutlessons.data.User;
import me.vable.android.viewandlayoutlessons.data.service.UserService;

public class ProfileActivity extends ActionBarActivity {

    private ImageView profileImageView;
    private TextView usernameTextView;
    private TextView emailTextVIew;
    private TextView genderTextView;
    private CompoundButton newsletterSubscriptionCompoundButton;
    private CompoundButton allowOtherEmailCompoundButton;

    @Override
    protected void onCreate(Bundle savedInstanceState) {
        super.onCreate(savedInstanceState);
        setContentView(R.layout.activity_profile);

        User user = (User) getIntent().getExtras().getSerializable("user");

        if(user==null) {
            finish();
            return;
        }

        profileImageView = (ImageView) findViewById(R.id.imageview_profile);
        usernameTextView = (TextView) findViewById(R.id.textview_username);
        emailTextVIew = (TextView) findViewById(R.id.textview_email);
        genderTextView = (TextView) findViewById(R.id.textview_gender);
        newsletterSubscriptionCompoundButton = (Switch) findViewById(R.id.switch_subscription);
        if(newsletterSubscriptionCompoundButton==null)
        {
            newsletterSubscriptionCompoundButton = (CheckBox) findViewById(R.id.checkbox_subscription);
        }
        allowOtherEmailCompoundButton = (Switch) findViewById(R.id.switch_allow_email);
        if(allowOtherEmailCompoundButton==null)
        {
            allowOtherEmailCompoundButton = (CheckBox) findViewById(R.id.checkbox_allow_email);
        }

        profileImageView.setImageBitmap(UserService.getInstance(this).getProfileImage(user));
        usernameTextView.setText(String.format("Username: %s",user.getUsername()));
        emailTextVIew.setText(String.format("Email: %s",user.getEmail()));
        genderTextView.setText(String.format("Gender: %s",user.getGender()== User.Gender.MALE?"Male":"Female"));
        newsletterSubscriptionCompoundButton.setChecked(user.isNewsletterSubscribed());
        allowOtherEmailCompoundButton.setChecked(user.isAllowedOtherEmail());

        if(!allowOtherEmailCompoundButton.isChecked())
        {
            emailTextVIew.setVisibility(View.GONE);
        }
    }
}
User List Activity, The last Activity of the app

This is an article about the Views and ViewGroups but without coding you will can't understand the ViewGroup in this activity. That is a reason that I close the article with this Activity, the ViewGroup that I said is the ListView, The common view in every Application.
ListView


Most of Application in the Play Store has a ListView, The basic idea of ListView is to manage the series of data, when the data is created dynamically by the user, you will never know its size. ListView is the best answer for that works, you only create the template View for a single data and the Adapter will apply every data items to the View and arranges to the list automatically.
ListView is a View container (ViewGroup) that is not a Layout and you can't place the item on the ListView directly but you need to create the Adapter that work like a middle ware to provide the View item to the ListView.

The picture above show how ListView working, the Adapter will consume the data and create the View (List Item) then serve it to the ListView.
The Mechanism
When you add the Adapter to the ListView, the ListView will ask for a number of data items in data source then the ListView will ask for the View of data item at specific position that need to display on the screen. Every time after the data source changed this procees will re-run.
Note: The ListView will store only n+1 items at a time where n is a maximum number of item that ListView can show in a single screen without scrolling.
The base project's MainActivity is the good example, look at the MainActivity's layout you will see only a ListView.
<ListView xmlns:android="http://schemas.android.com/apk/res/android"
    xmlns:tools="http://schemas.android.com/tools"
    android:id="@android:id/list"
    android:layout_width="match_parent"
    android:layout_height="match_parent"
    tools:context=".MainActivity">

</ListView>
Then look at the MainActivity Java code you will see the collection of the ActivityData instance.
        List<ActivityData> activityDataList = new ArrayList<ActivityData>();//List of the ActivityData instance, put you ActivityData here
        activityDataList.add(new ActivityData("Login",LoginActivity.class));
        activityDataList.add(new ActivityData("Welcome",WelcomeActivity.class));
        activityDataList.add(new ActivityData("Sign up Activity",SignUpActivity.class));
        activityDataList.add(new ActivityData("Profile Activity",ProfileActivity.class));
        activityDataList.add(new ActivityData(getString(R.string.title_activity_sample_inflate_view_from_xml),SampleInflateViewFromXmlActivity.class));//add the ActivityData to the List
        activityDataList.add(new ActivityData(getString(R.string.title_activity_sample_create_view_in_java_code),SampleCreateViewInJavaCodeActivity.class));
        activityDataList.add(new ActivityData("My Fist Activity",MyFirstActivity.class));
        activityDataList.add(new ActivityData("TextView Example",TextViewExampleActivity.class));
        activityDataList.add(new ActivityData("EditText Example",EditTextExampleActivity.class));
        activityDataList.add(new ActivityData("ImageView Example",ImageViewExampleActivity.class));
        activityDataList.add(new ActivityData("Button Example",ButtonExampleActivity.class));
        activityDataList.add(new ActivityData("CheckBox Example",CheckBoxExampleActivity.class));
        activityDataList.add(new ActivityData("LinearLayout  Example",LinearLayoutExampleActivity.class));
        activityDataList.add(new ActivityData("RelativeLayout  Example",RelativeLayoutExampleActivity.class));
        activityDataList.add(new ActivityData("Options Menu  Example",OptionsMenuExampleActivity.class));
        activityDataList.add(new ActivityData("Radio Button  Example",RadioButtonExampleActivity.class));
        activityDataList.add(new ActivityData("Switch  Example",SwitchExampleActivity.class));
ActivityData's members:
- Title - The title that will show on the
ListView. - ActivityClass - The activity class that is used to open the
Activity.
I want to show this collection on the ListView, the Adapter is a thing that I need. To create the Adapter you need to create the class extends BaseAdapter.
Theses are the Adapter method that you need to override:
- getCount() - The number of item in the data source (or
Collection). - getItem() - Return the data item at specific position.
- getItemId() - Return the id of data item at specific position.
- getView() - Return the
Viewinstance of data item at specific position.
In the ActivityDataListAdapter I have create the constructure with the Context and the Collection of ActivityData as the parameter.
public class ActivityDataListAdapter extends BaseAdapter {

    private Context mContext;
    private List<ActivityData> mItems;

    public ActivityDataListAdapter(Context context,List<ActivityData> items)
    {
        mContext = context;
        mItems = items;
    }

    ...

}
Then I have created the methods that use to manage the Collection.
    public void add(ActivityData activityData)
    {
        mItems.add(activityData);
        notifyDataSetChanged();
    }

    public void addAll(List<ActivityData> items)
    {
        mItems.addAll(items);
        notifyDataSetChanged();
    }

    public void remove(int index)
    {
        mItems.remove(index);
        notifyDataSetChanged();
    }

    public void remove(ActivityData activityData)
    {
        mItems.remove(activityData);
        notifyDataSetChanged();
    }
Note: notifyDataSetChanged() method is used to ask the ListView for refeshing. You need to call it after add, remove, edit the item in data source.
The getCount() method will return the data source size.
    @Override
    public int getCount() {
        return mItems.size();
    }
The getItem() method will return the data item at specific position
    @Override
    public ActivityData getItem(int i) {
        return mItems.get(i);
    }
Our data don't have an id property, in the getItemId() methid just return a zero.
   @Override
    public long getItemId(int i) {
        return 0;
    }
Then I need to create the Views for using in getView() method. I have created a View that contains 2 TextView, the first one for the Title and another one for the Activity Class name.

listitem_activity_data.xml:
<?xml version="1.0" encoding="utf-8"?>

<LinearLayout xmlns:android="http://schemas.android.com/apk/res/android"
    android:layout_width="match_parent"
    android:layout_height="match_parent"
    android:orientation="vertical"
    android:padding="8dp">

    <TextView
        android:layout_width="wrap_content"
        android:layout_height="wrap_content"
        android:textAppearance="?android:attr/textAppearanceLarge"
        android:text="@string/listitem_textview_default_activity_title"
        android:id="@+id/textview_title"
        android:padding="8dp"/>

    <TextView
        android:layout_width="wrap_content"
        android:layout_height="wrap_content"
        android:textAppearance="?android:attr/textAppearanceSmall"
        android:text="@string/listitem_textview_activity_class_name"
        android:id="@+id/textview_class"
        android:padding="8dp"/>
</LinearLayout>
Note: The name of list item layout should be start with the word "listitem".
Then, override the getView() method
    @Override
    public View getView(int i, View view, ViewGroup viewGroup) {

        if(view == null)
        {
            view = LayoutInflater.from(mContext).inflate(R.layout.listitem_activity_data,null);
        }

        ActivityData activityData = getItem(i);

        String title = activityData.getTitle();
        Class clazz = activityData.getActivityClass();

        TextView titleTextView = (TextView)view.findViewById(R.id.textview_title);
        TextView classTextView = (TextView)view.findViewById(R.id.textview_class);

        if(title==null)
            titleTextView.setText(mContext.getString(R.string.listitem_textview_default_activity_title));
        else
            titleTextView.setText(title);

        if(clazz==null)
            classTextView.setText(mContext.getString(R.string.listitem_textview_activity_class_name));
        else
            classTextView.setText(clazz.getSimpleName());

        return view;
    }
In the the getView() method there are Integer, View, and ViewGroup parameters the first parameter is the current position the second is the View for current item and the third is ListView Instance. First of all, I check for an instance of View if it not exist inflate a new one, then get the item at the specific position, get the Views instance and set the data.
Back to the MainActivity Java cocde and create the instance of the ActivityDataListAdapter and set it to the ListView.
ActivityDataListAdapter activityDataListAdapter = new ActivityDataListAdapter(this,activityDataList);
ListView listView = (ListView)findViewById(android.R.id.list);
listView.setAdapter(activityDataListAdapter);
When you run the app you will see the List of ActivityData like this.
Now, add the action when user click on the list item by implement the OnItemClickListener.
    AdapterView.OnItemClickListener onItemClickListener = new AdapterView.OnItemClickListener() {
        @Override
        public void onItemClick(AdapterView<?> adapterView, View view, int i, long l) {
            ActivityData activityData = (ActivityData)adapterView.getAdapter().getItem(i);//get the selected item from the Adapter
            if(activityData.getActivityClass()!=null)
            {
                try{
                    Intent intent = new Intent(MainActivity.this, activityData.getActivityClass());//create the intent for start the new Activity
                    startActivity(intent);//start the new Activity
                }
                catch(ActivityNotFoundException e)//Activity not found or the class that you provide is not an Activity
                {
                    AlertDialog.Builder builder = new AlertDialog.Builder(MainActivity.this);//Create alert dialog builder
                    builder.setIcon(R.drawable.ic_error);//set dialog icon to drawable resource
                    builder.setTitle(R.string.error_dialog_title);//set dialog title
                    builder.setMessage(
                            String.format(
                                    getString(R.string.error_dialog_activity_not_found_message),
                                    activityData.getActivityClass().getSimpleName()
                            )
                    );//set dialog message
                    builder.setPositiveButton(android.R.string.ok,null);//set positive button title and action
                    builder.show();//show the dialog
                }
            }
        }
    };
This OnItemClickListener instance will bring the user to the Activity that he/she selected, or if no Activity found the error will show.
And then set the ListView to call this Listener when the item was clicked.
    @Override
    protected void onCreate(Bundle savedInstanceState) {
        ...
        listView.setOnItemClickListener(onItemClickListener);
    }

Finish!!
The familiar Views: GridView, Spinner.
Create the UserListActivity
Now, you have learned about ListView and the Adapter. You are prompt to create the UserListActivity, let's start now!!

First, you need to create the Activity and layout. Then add the ListView into the layout file.
<ListView xmlns:android="http://schemas.android.com/apk/res/android"
    xmlns:tools="http://schemas.android.com/tools"
    android:layout_width="match_parent"
    android:layout_height="match_parent"
    tools:context="me.vable.android.viewandlayoutlessons.UserListActivity"
    android:id="@android:id/list">

</ListView>
Second, create the View for User item.

<?xml version="1.0" encoding="utf-8"?>

<LinearLayout xmlns:android="http://schemas.android.com/apk/res/android"
    android:orientation="horizontal"
    android:layout_width="match_parent"
    android:layout_height="66dp"
    >

    <ImageView
        android:id="@+id/imageview_profile"
        android:src="@drawable/ic_man"
        android:layout_width="50dp"
        android:layout_height="50dp"
        android:adjustViewBounds="true"
        android:layout_margin="8dp"
        />

    <TextView
        android:id="@+id/textview_username"
        android:layout_gravity="center_vertical"
        android:text="Username"
        android:textSize="18sp"
        android:layout_width="wrap_content"
        android:layout_height="wrap_content"
        android:layout_margin="8dp"/>

</LinearLayout>
Third, create the Adapter name UserListAdapter that consume the data from the List of User.
package me.vable.android.viewandlayoutlessons.data.adapter;

import android.content.Context;
import android.media.Image;
import android.view.LayoutInflater;
import android.view.View;
import android.view.ViewGroup;
import android.widget.BaseAdapter;
import android.widget.ImageView;
import android.widget.TextView;

import java.util.List;

import me.vable.android.viewandlayoutlessons.R;
import me.vable.android.viewandlayoutlessons.data.User;
import me.vable.android.viewandlayoutlessons.data.service.UserService;

/**
 * Created by Varavut on 8/23/2014.
 */
public class UserListAdapter extends BaseAdapter {

    Context mContext;
    List<User> mItems;
    public UserListAdapter(Context context,List<User> users)
    {
        mContext = context;
        mItems = users;
    }

    @Override
    public int getCount() {
        return mItems.size();
    }

    @Override
    public User getItem(int i) {
        return mItems.get(i);
    }

    @Override
    public long getItemId(int i) {
        return 0;
    }

    @Override
    public View getView(int i, View view, ViewGroup viewGroup) {
        if(view == null)
        {
            view = LayoutInflater.from(mContext).inflate(R.layout.listitem_user,null);
        }
        User user = getItem(i);
        ImageView profileImageView = (ImageView)view.findViewById(R.id.imageview_profile);
        TextView usernameTextView = (TextView)view.findViewById(R.id.textview_username);

        profileImageView.setImageBitmap(UserService.getInstance(mContext).getProfileImage(user));
        usernameTextView.setText(user.getUsername());
        return view;
    }
}
Next, get the User List from the UserService, create the instance of UseListAdapter in the UserListActivity java code and set it to the ListView.
Here is my code:
package me.vable.android.viewandlayoutlessons;

import android.app.Activity;
import android.os.Bundle;
import android.support.v7.app.ActionBarActivity;
import android.view.Menu;
import android.view.MenuItem;
import android.widget.ListView;

import java.util.ArrayList;
import java.util.List;

import me.vable.android.viewandlayoutlessons.data.User;
import me.vable.android.viewandlayoutlessons.data.adapter.UserListAdapter;
import me.vable.android.viewandlayoutlessons.data.service.UserService;

public class UserListActivity extends ActionBarActivity {

    List<User> users = new ArrayList<User>();
    UserListAdapter adapter;

    @Override
    protected void onCreate(Bundle savedInstanceState) {
        super.onCreate(savedInstanceState);
        setContentView(R.layout.activity_user_list);

        adapter = new UserListAdapter(this, users);

        UserService.getInstance(this).getUserList(getUserListListener);

        ListView userListView = (ListView) findViewById(android.R.id.list);
        userListView.setAdapter(adapter);
    }

    UserService.GetUserListListener getUserListListener = new UserService.GetUserListListener() {
        @Override
        public void onResponce(boolean success, String message, List<User> userList) {
            if(success)
            {
                users.clear();
                adapter.notifyDataSetChanged();
                users.addAll(userList);
                adapter.notifyDataSetChanged();
            }
        }
    };
}
Add the action when user click on the list item, the app will navigate to UserProfileActivity.
    @Override
    protected void onCreate(Bundle savedInstanceState) {
        ...
        userListView.setOnItemClickListener(onItemClickListener);
    }

    AdapterView.OnItemClickListener onItemClickListener = new AdapterView.OnItemClickListener() {
        @Override
        public void onItemClick(AdapterView<?> adapterView, View view, int i, long l) {
            Intent intent = new Intent(UserListActivity.this,ProfileActivity.class);
            intent.putExtra("user",adapter.getItem(i));
            startActivity(intent);
        }
    };
Finally, back to the WelcomeActivity there is a User List menu that has no action. Add the action that is used to open the UserListActivity.
    @Override
    public boolean onOptionsItemSelected(MenuItem item) {
        int id = item.getItemId();
        if (id == R.id.menu_user_list) {
            goToUserListPage();
            return true;
        }else if (id == R.id.menu_profile) {
            goToMenuProfilePage();
            return true;
        }else if (id == R.id.menu_logout) {
            logout();
            return true;
        }
        return super.onOptionsItemSelected(item);
    }

    private void goToUserListPage()
    {
        Intent intent = new Intent(this,UserListActivity.class);
        startActivity(intent);
    }
Runthe application and try to use every function!!

The Complete Project Repository
Points of Interest
Android provides many basic Views and ViewGroup component, moreover you can create your own custom View and Compound View. This article is only a little part of Android View system, there are much more Views that you should you learn. Hop you enjou you Android Application Developer Life!!
History
24/08/2014 initial submit.
24/08/2014 add familiar Views information.
24/08/2014 correct misspelled words
25/08/2014 correct the information about device