
ASP.NET GridView Client Side Validation
5.00/5 (4 votes)
We will explore the technique in jQuery to validate the ASP.NET GridView.
Email Validation Failed Alert
We will explore the technique in jQuery to validate the ASP.NET GridView.
Setting up the GridView First
On aspx Page
We will show following fields in GridView.
- Name –
TextBox - Age –
TextBox - Email –
TextBox - Date of Birth –
TextBox(with jQueryDatePicker) - Gender –
RadioButtonList
For each field, we will have one TemplateField with
ItemTemplate(shows when Grid is loaded) – Inside this, a Label to show the value.EditItemTemplate(shows when Grid is in Edit Mode) – Inside this, actualTextBoxorRadioButtonList.
<asp:GridView ID="gvTestValidations" runat="server" AutoGenerateColumns="false" OnRowEditing="gvTestValidations_RowEditing"
	OnRowUpdating="gvTestValidations_RowUpdating" OnRowCancelingEdit="gvTestValidations_RowCancelingEdit">
	<Columns>
		<asp:TemplateField HeaderText="Name">
			<ItemTemplate>
				<asp:Label ID="lblName" runat="server" Text='<%#Bind("Name") %>'></asp:Label>
			</ItemTemplate>
			<EditItemTemplate>
				<asp:TextBox ID="txtName" runat="server" Text='<%#Bind("Name") %>' />
			</EditItemTemplate>
		</asp:TemplateField>
		<asp:TemplateField HeaderText="Age">
			<ItemTemplate>
				<asp:Label ID="lblAge" runat="server" Text='<%#Bind("Age") %>'></asp:Label>
			</ItemTemplate>
			<EditItemTemplate>
				<asp:TextBox ID="txtAge" runat="server" Text='<%#Bind("Age") %>' />
			</EditItemTemplate>
		</asp:TemplateField>
		<asp:TemplateField HeaderText="Email">
			<ItemTemplate>
				<asp:Label ID="lblEmail" runat="server" Text='<%#Bind("Email") %>'></asp:Label>
			</ItemTemplate>
			<EditItemTemplate>
				<asp:TextBox ID="txtEmail" runat="server" Text='<%#Bind("Email") %>' />
			</EditItemTemplate>
		</asp:TemplateField>
		<asp:TemplateField HeaderText="Date Of Birth">
			<ItemTemplate>
				<asp:Label ID="lblDOB" runat="server" Text='<%#Bind("DOB") %>'></asp:Label>
			</ItemTemplate>
			<EditItemTemplate>
				<asp:TextBox ID="txtDOB" runat="server" Text='<%#Bind("DOB") %>' />
			</EditItemTemplate>
		</asp:TemplateField>
		<asp:TemplateField HeaderText="Gender">
			<ItemTemplate>
				<asp:Label ID="lblGender" runat="server" Text='<%#Bind("Gender") %>'></asp:Label>
			</ItemTemplate>
			<EditItemTemplate>
				<asp:RadioButtonList ID="rblGender" runat="server" SelectedValue='<%#Bind("Gender") %>'>
					<asp:ListItem Value="Male">Male</asp:ListItem>
					<asp:ListItem Value="Female">Female</asp:ListItem>
				</asp:RadioButtonList>
			</EditItemTemplate>
		</asp:TemplateField>
		<asp:CommandField ShowEditButton="true" HeaderText="Edit" />
	</Columns>
</asp:GridView>
On aspx.cs Page
As I am not using Database, so to bind the GridView, we can have one DataTable property stored in ViewState. We will edit, update to the ViewState Table and bind that to the GridView. Inside the Page Load, we will declare hard-coded rows and add them to DataTable. Then bind that to the Grid.
// This ViewState DataTable Property holds the GridView Data.
DataTable dtGridData
{
    get
    {
        return (DataTable)ViewState["dtGridData"];
    }
    set
    {
        ViewState["dtGridData"] = value;
    }
}

protected void Page_Load(object sender, EventArgs e)
{
	if (!IsPostBack)
	{
		// Add Column for the DataTable.
		DataTable dt = new DataTable();
		dt.Columns.Add(new DataColumn("Name"));
		dt.Columns.Add(new DataColumn("Age"));
		dt.Columns.Add(new DataColumn("Email"));
		dt.Columns.Add(new DataColumn("DOB"));
		dt.Columns.Add(new DataColumn("Gender"));

		// Add Rows to DataTable.
		DataRow dr = dt.NewRow();
		dr["Name"] = "Deepak Mahapatra";
		dr["Age"] = 24;
		dr["Email"] = "abc@anything.com";
		dr["DOB"] = "09/28/1990";
		dr["Gender"] = "Male";

		dt.Rows.Add(dr);

		dr = dt.NewRow();
		dr["Name"] = "Dillip Das";
		dr["Age"] = 24;
		dr["Email"] = "def@anything.com";
		dr["DOB"] = "10/02/1990";
		dr["Gender"] = "Male";

		dt.Rows.Add(dr);

		dr = dt.NewRow();
		dr["Name"] = "Tadit Dash";
		dr["Age"] = 24;
		dr["Email"] = "ghi@anything.com";
		dr["DOB"] = "07/05/1990";
		dr["Gender"] = "Male";

		dt.Rows.Add(dr);

		// Assign the DataTable to dtGridData, so that it is stored in ViewState.
		// After that, bind the GridView.
		dtGridData = dt;
		BindGrid();
	}
}

private void BindGrid()
{
	gvTestValidations.DataSource = ViewState["dtGridData"];
	gvTestValidations.DataBind();
}
What’s on Browser?
Initial Load
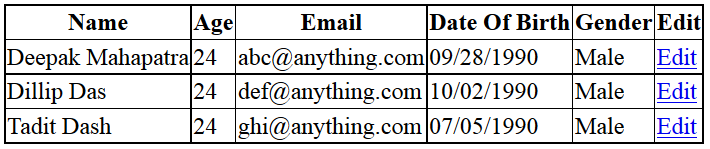
GridView on Browser
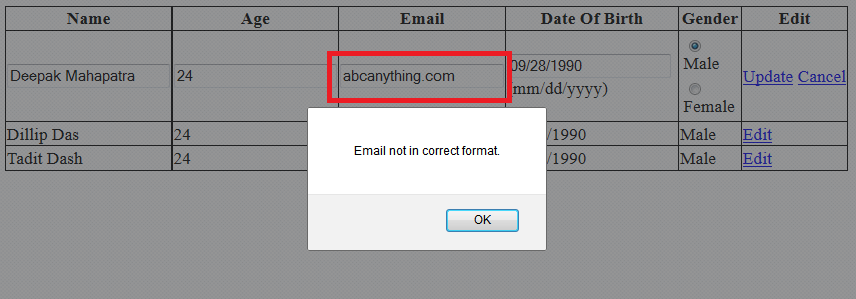
On Row Edit Button Click

First Row in Edit Mode
Now, the Actual Show Begins !!!
We will do following validation…
- For Age Field – Only Allow Numbers
- For Email Field – Email Validation
You can do more validations, you just need to learn how to do it.
So, How to?
Logic is that, inside the document Ready Event, we will try to find all the Age TextBoxes and Email TextBoxes inside the GridView and handle the keydown and change events respectively.
For Age TextBox
The highlighted code lines are important.
$("#gvTestValidations tr input[id*='txtAge']").each(function () {
	$(this).keydown(function (event) {
        // Just to find all non-decimal characters and replace them with blank.
		$(this).val($(this).val().replace(/[^\d].+/, ""));

		var charCode = (event.which) ? event.which : event.keyCode;
		if (charCode > 31 && (charCode < 48 || charCode > 57)) {
			event.preventDefault();

			isValidated = false;
		}
		else { isValidated = true; }
	});
});
The first important line is…
$("#gvTestValidations tr input[id*='txtAge']")
This is actually searching for all the TextBoxes inside the Grid with the help of Attribute Contains Selector [name*="value"].
Then the following code attaches the keydown Event with all those matched Age TextBoxes.
$(this).keydown(function (event) {
    // Validation code here...
});
For Email TextBox
The same logic is used for Email TextBox. The only difference is that we are handling the change Event here instead of keydown Event.
$("#gvTestValidations tr input[id*='txtEmail']").each(function () {
	$(this).change(function (event) {
		if (!validateEmail($(this).val())) {
			alert("Email not in correct format.");
			$(this).addClass('errorClass');
			event.preventDefault();

			isValidated = false;
		}
		else {
			$(this).removeClass('errorClass');

			isValidated = true;
		}
	});
});
NOTE: The CSS class “errorClass” is used to make Email TextBox Border Red-Coloured, when validation fails.
One more interesting thing…
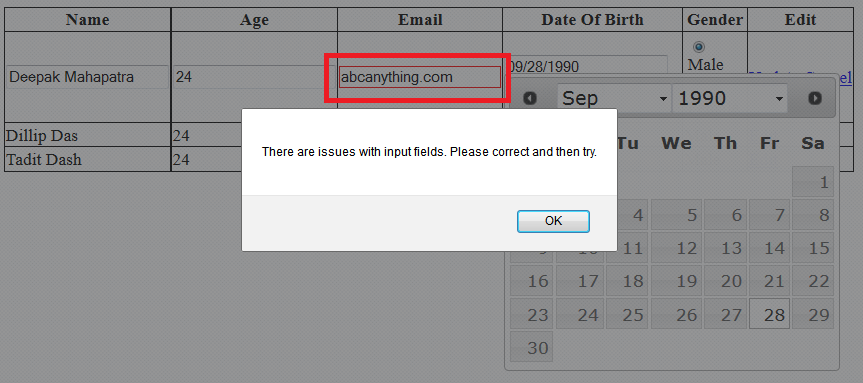
We are also restricting User to Update one record, if the row is not validated. Suppose, User has typed one wrong Email Id and then directly hits the Update Button, so it won’t allow the User to Update and show one message. For that, we are using the variable isValidated, which you have already seen inside the code.
We are just checking the isValidated value inside the Update Button click and taking action according to that. Again the same logic, which is searching all the links and finds the Button, which is having Text as “Update” and fires its click Event.
$("#gvTestValidations a").each(function () {
	if ($(this).text() == "Update") {
		$(this).click(function (event) {
			if (!isValidated) {
				alert("There are issues with input fields. Please correct and then try.");
				return false;
			}
			else { return true; }
		});
	}
});
Update Button not working if Validation Fails
Thanks !!!
For taking time and reading the Blog. Download the Project and play with it. If you find it useful, then share within your circle, by pressing the Social Icons.

![]()