
Deploying Web Applications using Team Foundation Build Server – Part 2 (Database Deployment)
Learn how to deploy database schema using Team Foundation Server
Roadmap
- Deploying Web Applications using TFS
- Deploying Databases using TFS
- Web Config Transformation
Introduction
In the previous article we learnt how to install and configure Team Foundation Application Server, Build Service, how to create a Team Project, add source code to source control, how to create Build Definition using appropriate Build Arguments for our needs and finally how to build and deploy web application automatically.
In this article we’ll continue with database deployment. Again, we will deploy our database to the same machine where TFS is installed.
Products used: Windows Server 2008 R2, SQL Server 2008 R2, Team Foundation Server 2010, Visual Studio 2012.
Background
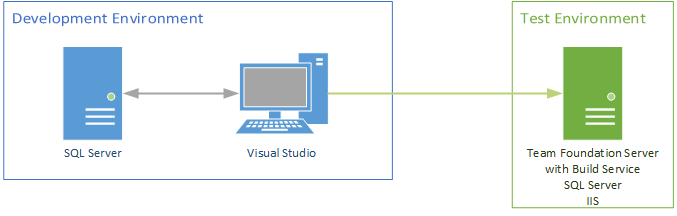
Let’s imagine we have a development machine with Visual Studio where we are working on our web application. Also, we have a development server with SQL Server installed where a database resides which is used as data storage by our web application. The web application connects to the SQL Server and selects, inserts and updates data in a particular DB according to user interaction.
Our goal is to automatically deploy this database along with our web application to e.g. test environment – in our case it is the server where TFS and SQL Server are installed.
Content
-
Database Project Build/Deployment prerequisities installation
-
Update Build Definition to Build and Deploy Database Project
Sample Database
For our demo, I created a simple database named DBTEST with:
2 tables:
Country table

City table

1 view: CountryCity

Both tables have identity column named ID which is also primary key (clustered index). Table City has also foreign key column named COUNTRY_ID which references ID column (primary key) in table Country.
Note: I’m not going to explain how to create database and it’s objects (it‘s beyond the scope of this tutorial), but for those who want to follow exactly this demo I prepared scripts to create DB objects mentioned above and to insert some sample data.
Database Project Build/Deployment prerequisities installation
In order to be able to build and publish SQL Server Data Tools Projects (*.sqlproj) with Team Build Service, you have to have SQL Server Data Tools (SSDT) installed on the machine where Build Service is installed. As in the previous article when we installed prerequisities for web application deployment, we have two options again:
-
Install Visual Studio with SQL Server Data Tools
OR
- Download and install SSDT: http://go.microsoft.com/fwlink/?LinkID=393520
To get more information go to: http://msdn.microsoft.com/en-us/jj650015
Create a New Database Project
I will create a database project inside the solution (TFSTest) we created in previous article, so we have both project (web application and database schema) in one place – in one solution.
-
In the Solution Explorer tab right click the name of your solution, select Add and click New Project...

-
Add New Project dialog opens – expand Other Languages, click SQL Server, click SQL Server Database Project, write a name for this project and click OK

Note: If you use Visual Studio 2010, you find database project here: Database – SQL Server – SQL Server 2008 Database Project.
The database project DBTest has just been created. As we are connected to TFS source control, the database project is automatically added to source control and the solution is marked as modified.

Import Database Schema
Now we are going to import database schema (from development SQL Server) to our created database project:
-
Right click the database project name (in Solution Explorer tab), select Import and click Database...

-
Import Database Wizard opens – If your database is not listed in Source database connection’s drop-down list, click New Connection...

-
Connection Properties dialog opens – in the Server name write the name (or IP address) of your development SQL Server, choose the authentification type, select the database you want to connect to and click OK

Just created connection is set as Source Database Connection – it’s format is <sql_server_name>.<database_name> (<user>). -
In the Import Settings part select settings that best fits your needs and click Start
Import referenced logins – imports all user logins mapped to selected database
Import permissions – imports permissions granted for users
- When the import is finished, click Finish – the database schema was added to our database project and it was added to TFS source control as well

Create Publish Profile
In order to tell the Build Service how and where to deploy the database, we have to create Publish Profile which will contain these informations.
-
In the Solution Explorer tab right click the name of your database project (in our case DBTest) and click Publish...

-
The Publish Database dialog opens – click Edit... next to Target Database Connection to create a connection to target database server (in our case it is the same server where TFS is installed – TFSSERVER)
-
Connection Properties dialog opens – in the Server name write the name (or IP address) of your test SQL Server, choose the authentification type, write the database name (or leave it as is – will be the name of deployed database) and click OK

Note: If we use Windows Authentication, the account the Build Service runs under (in our case NT AUTHORITY/System) will try to connect to SQL Server and to create our database. So it has to have appropriate permissions in SQL Server. Probably, you do not have to do anything, because the permissions were set for this account while configuring Build Service.
Just created connection is set as Target Database Connection in the Publish Database dialog. -
When you click Advanced... (in Publish Database dialog) you can see a lot of options you can configure – these options may be different depending on the targeted environment. You can create separate Publish Profile with different settings for each environment you will deploy to. Accepting the default settings is ok for us.
-
Click Create Profile in the Publish Database dialog

The Publish Profile was created, added to database project (DBTest) as xml file and added to TFS source control.

-
Click Cancel in the Publish Database dialog
- Check-in the solution – right click the name of your solution, click Check In..., write a check-in comment, click Check In button and confirm Check-In Confirmation dialog by clicking Yes
Note: To be able to check-in the solution you have to be connected to Team Foundation Server of course. If you don’t know how to do it, check the first article of this serie here.
Update Build Definition to Build and Deploy Database Project
Now, we have to modify MSBuild Arguments (in our Build Definition) to tell the Build Service to build and deploy our database project.
-
In the Team Explorer tab click Builds, right click Build Definition name (in our case from previous article it is TFSTest) and select Edit Build Definition...
- In the Build Definition select Process and expand Advanced, so you can modify MSBuild Arguments
Note: How to create/modify Build Definition you can also find in the first article of this serie here.
For the deployment of the database project we need to add just 3 new arguments:/p:SqlPublishProfilePath=DBTest.publish.xml /t:Build /t:Publish
SqlPublishProfilePath – tells which publish profile to use while deploying the database project
Build, Publish – are self-explanatory
- Add these 3 arguments above to MSBuild Arguments – then it looks like this:
/p:DeployOnBuild=True /p:DeployTarget=MSDeployPublish /p:CreatePackageOnPublish=True
/p:MSDeployPublishMethod=InProc /p:MsDeployServiceUrl=localhost
/p:DeployIisAppPath="Default Web Site/TFSTest" /p:VisualStudioVersion=11.0
/p:UserName= /p:SqlPublishProfilePath=DBTest.publish.xml /t:Build /t:Publish
Note: As we want to deploy the database project along with the web application project, we need all these arguments specified in MSBuild Arguments. If you want to deploy only the database project, the 3 arguments mentioned above are enough for you.
- Save the modified Build Definition
Deploy Database Project along with Web Application
- Right click build definition name and select Queue New Build...
- The Queue Build dialog opens – accept the defaults and click Queue
- In the Team Explorer you can see a new build was queued – by double clicking it, you open a dialog to see the progress and the result of the build
- As we can see in the build progress dialog, the build succeeded
Check Deployed Database Schema
-
Connect to SQL Server where you’ve just deployed database e.g. with Microsoft SQL Server Management Studio (in our case it is the same machine where TFS is installed)
- Expand Databases, DBTest database and then Tables and Views, so we can see if all existing objects in our development DB (2 tables, 1 view) were created in the test environment (as we called it at the beginning of this article)

- If you had checked Import referenced logins and Import permissions (in Import settings) when we imported database schema to Visual Studio Database project, all users mapped to the DBTEST database were also imported with their logins and permissions – first expand Database server Security (not DBTEST Security) and Logins to view logins transfered from development to test env.

Note: While importing logins to database project a new password was created for all logins as you can see in Visual Studio – Solution Explorer – DBTest project – Security – open <login_name>_1.sql

and you see script to create a login

So now, if you want to connect with this login to SQL Server, just copy the new generated password or login as system administrator (or security admin) and change password for the login.
- Now, if you expand Security – Users under database DBTEST, you can see the user was created as well (login mapped to this database)

- You can find database project package generated by Build Service in the drop folder we specified while creating build definition (see in previous article here):
Open Windows Explorer on the server where the specified shared drop folder is located (in our case it is still the same machine) and find Drops folder – inside it you can find SQL script (.sql) used for deploying the database schema.

Deploy Modified DB Schema of Already Published Database
First, we are going to insert some data into the database in our test environment to simulate web application testing and to see that data will remain untouched after deploying modified database schema – this of course depends on settings you made while creating Publish Profile. Then we will change the database schema in development environment e.g. by adding a column to one of the tables.
-
Go to the test environment and insert some data to tables (Country, City) in DBTEST (you can use prepared script that you can download on the top of this article)
-
Go to the development environment and add a column to Country table – you can use this script:
ALTER TABLE COUNTRY ADD TESTCOL INT -
Compare the schemas – modified DB schema in dev env with schema imported to Visual Studio Database project
-
Go to Visual Studio, right click the name of database project DBTest and select Schema Compare...

-
Schema Compare window opens – on the left side is the source schema and on the right is target schema – our database project schema is by default set on the left side what is not good as we want update our project schema, so we need to set it as target – click switch button in the middle to do it

-
Select source (left side) – eighter select a connection (to dev env) you made before from a dropdown list or create a new one by selecting Select source... from the same dropdown list

-
When the connection to dev environment is selected or created, click Compare

-
In the SqlSchemaCompare window you can see the differencies between the two schemas

-
Click Update and then Yes (to confirm the action) to update our database project schema

-
The SQL script for creation Country table was automatically checked-out from source control and modified by adding the new column TESTCOL

-
Check-in the solution – right click the name of your solution, click Check In..., write a check-in comment, click Check In button and confirm Check-In Confirmation dialog by clicking Yes
-
Trigger the manual build – in the Team Explorer tab click Builds, right click build definition name and select Queue New Build... The Queue Build dialog opens – accept the defaults and click Queue
-
In the Team Explorer you can see a new build was queued – by double clicking it, you open a dialog to see the progress and the result of the build
-
As we can see in the build progress dialog, the build succeeded
Check Deployed Updated Database Schema
-
Connect to SQL Server where you’ve just deployed updated database schema
-
Expand Databases, DBTest database, Tables, Country table, Columns – so we can see if there is the new column TESTCOL

-
Check the Drops folder for SQL script (.sql) used for deploying updated database schema – as you can see (when you open it) the Build Service compared the schemas and created the script only with differences – in our case add column TESTCOL to table Country.

Note: When you are deploying database schema along with web application, the important to know is that if web application build (with Build Service) ends up with an error, nothing is deployed – neither web application nor database schema.
Conclusion
Database deployment using Team Foundation Server is pretty simple and straightforward unlike web application deployment. Redeploying modified database schema is easy as well, thanks to the tools in Visual Studio. If you have any questions or find any important information missing, please feel free to write back.
In the next part, we’ll discuss web config transformation.
History
30th July 2014 - Initial Version