
Embedded Application Identity Part 2: Role-Based Authorization in ASP.NET MVC 5
4.83/5 (3 votes)
Add feature authorization to your MVC application with Roles
In this article we will implement the identity management requirements (defined in the previous article) that pertain to roles. Below is a recap of these requirements.
-
There will be 4 roles: Admin, Demographics Editor, Financial Manager, Online Access Manager.
-
Admin users can view all of the users in the system and create new users.
-
All users in any one of the predefined roles can at a minimum view account holder data.
-
Users in the Demographics Editor role can modify account holder’s demographic (address, phone, email address) data.
-
Users in the Financial Manager role can modify account information of the account holder.
-
Users in the Online Access Manager role can modify the account holder’s online access.
-
Each user may be a member of zero or more roles.
Role-based authorization is the function of specifying access rights to resources based on roles. Resources in this case are the various functions in an application. Roles simplify the management of authorization by giving application administrators and developers the ability to manage authorization for multiple users at the same time. Application administrators assign users to a role and developers limit certain functionality in an application to only those users in a role who are authorized to access that particular functionality.
The illustrations below demonstrate the value that role-based authorization plays in application security. In the first illustration all application users have access to all of the modules that make up the application because there are no restrictions based on the user's role. Thus there are u * m potential access points that need to be managed from a security standpoint where u is the number of users and m is the number of application modules.

In the second illustration, each user is added to one or more roles and access to application modules are restricted by role which is much more manageable. From a security standpoint it is much easier to manage role-based authorization because multiple users can be added to a single role and the application only has to be coded to restrict access by role rather then individual user and there are far less roles than users. Also if a user's role in the organization changes overtime, the application code does not have to be modified. Instead the user would be assigned to a different role.

As in the previous article it would be helpful to have the ASP.NET source code for the sample application in front of you for reference as we will be making modifications to the source code to incorporate role-based authorization. As with the previous article, the source code is located on github in https://github.com/pcarrasco23/FootlooseFinancialServices. The commit called “Changes for Role-base Authorization” has the revisions to the Visual Studio project that pertain to this article.
Also we will be analyzing a potential threat using Fiddler so if you want to run the demonstration yourself you should download Fiddler.
Defining the Roles
The first step will be to define the four application roles. For simplicity we will insert the roles into the ASP.NET Identity database using the SQL script below. The script also seeds the database with the admin user in the Admin role so that that user has the capability from the application to create new users. For more advanced user/role management systems such as Active Directory there would be a user interface for this step.
INSERT INTO AspNetRoles
(Id, Name)
VALUES
('Admin', 'Admin'),
('Demographics', 'Demographics'),
('Financial', 'Financial'),
('OnlineAccess', 'OnlineAccess')
DECLARE @UserId nvarchar(128)
SELECT @UserId = Id FROM AspNetUsers WHERE UserName = 'admin'
INSERT INTO AspNetUserRoles
(UserId, RoleId)
VALUES (@UserId, 'Admin')
In the Visual Studio project this script is stored in the AspNetRoles_Populate.sql file in the App_Data folder.
Restricting Functions By Role
Now we will make changes to the application to restrict certain functionality by role. This is, in order to access the functionality, the user must be a member of a role that is permitted to access the function.
Restriction by Role in the User Interface
First we want to remove the ability for a user to register him/herself. Although this is the default functionality in the ASP.NET MVC 5 template, typically you would not want your users to create their own profiles in the system (even though you had to do this for the admin user).
Open the file Login.shtml and remove the following line:
<p>
 @Html.ActionLink("Register", "Register") if you don't have an account.
 </p>
You should also remove the Register methods from the AccountController. Although removing the user control will prevent most users from being able to create their own profile, a tech savy user can access the functionality in ASP.NET MVC controllers without a user interface as we will soon see how that can be done.
Per the requirements, users in the Admin role should be able to view all users and create new users. The AdminController.cs was created to store the code for the functionality for Admin users. Note that the Register methods from AccountController were moved to AdminController. The Index method returns a list of all users in the ASP.NET Identity database as well as the roles of which they are a member.
Next the following code is added to _LoginPartial.cshtml. When a user in the Admin role logs into the application, this code will create browser links that refer to the AdminController methods above.
@if (User.IsInRole("Admin"))
 {
     <li>
         @Html.ActionLink("Register New User", "Register", "Admin")
     </li>
     <li>
         @Html.ActionLink("View Users", "Index", "Admin")
     </li>
 }
The User object is an object of type System.Security.Principal.IPrincipal. The IPrincipal object represents the security context under which the code is running. The security context in the case of this application is the authenticated user. The IPrincipal interface has only one method – IsInRole(role) – which returns true or false to indicate if the security context is a member of the role provided. When a user in the Admin role runs this code, he/she will be given links to view all users in the system and create new users.
Now let’s run the application and login as the admin user. Since the admin user is a member of the Admin role you should see the Register New User and View Users links. Click on the Register New User link and create a new user. In my example I created a user with the ID “jsmith”.

Next we will add this user to the Demographics and Financial roles. For simplicity, I will perform this step using SQL against the ASP.NET Identity database (although the UI can easily be modified to assign the user to one or more roles).
DECLARE @UserId nvarchar(128)
SELECT @UserId = Id FROM AspNetUsers WHERE UserName = 'jsmith'
INSERT INTO AspNetUserRoles
(UserId, RoleId)
VALUES (@UserId, 'Demographics')
INSERT INTO AspNetUserRoles
(UserId, RoleId)
VALUES (@UserId, 'Financial')
Restriction by Role in the Server-Side public API
Going back to AdminController.cs, you will note that the public methods are qualified with the Authorize filter.
[Authorize(Roles = "Admin")]
This attribute will only allow execution of the method if the authenticated user is a member of the Admin role. As noted earlier, although the UI has code that limits the admin functionality to users in the Admin role, an MVC controller can be executed using any HTTP client such as Fiddler. Therefore it is good security practice to implement security in the UI layer as well as in the server-side public code that is exposed via HTTP.
To demonstrate how public code can be accessed by unauthorized users, let’s remove the Authorize method attribute from the Index method of AdminController, rebuild, and run the project. Open Fiddler and log in as a user who is not a member of the Admin role (such as the user you just created).
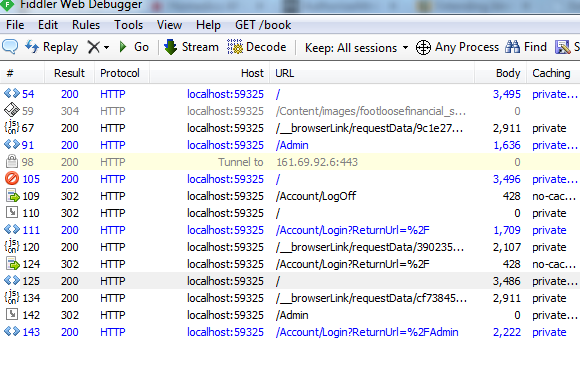
Now go to Fiddler and search for the login request. It will be the one with the empty url “/”. I am running my Visual Studio project using IIS Express and the host address of the application is localhost:5925. Go to the Inspector tab and copy the the “Raw” contents minus the first line with the GET method and the URL.

Then go to the Composer tab and paste the Raw contents in the “Request Headers” field like below. Enter the URL for the Admin controller and make sure the method specified is “GET”. Click the Execute button on the far right.

The Execute button will cause the Admin controller to execute with the credentials of the non-admin user because you copied the authorization token cookie that was created when you logged in. You will see this in the “/Admin” request. Click on this request to view the information associated with this request. You will see that the server returned the HTML content of the Index method of AdminController (which in this example returns a list of users in the system – something non-Admin users generally should not see!!) even though the authorized user is not a member of the Admin role. That is because there was nothing to tell the server to limit this functionality to Admin users.

Now go back to the code and add the Authorize attribute back to the Index method of AdminController, rebuild, run the application, and login again as the non-Admin user. Go to the Compose tab and click the Execute button again. This time the server will not return anything because the authorized user is not a member of the Admin role (Note that this time the body of the /Admin request returned 0 bytes).
As you can see it is critical that security is a fundamental part part not only of the UI design but of the server-side public API as well.
Let’s finish up by completing the other requirements for the Demographic, Financial, and Online Access roles. In the Person/Edit.cshtml file add the following if statements around the tab markup. Only members in the Demographic role can access the Person tab to edit an account holder’s demographic information. Only members in the Financial role can access the Account tab is modify the account holder’s account information. Lastly only members in the Online Access role can give an account holder online access. A user in the Admin role should be able to perform all of these functions.
<ul>
 @if (User.IsInRole("Demographics") || User.IsInRole("Admin"))
 {
     <li><a href="#person" data-toggle="tab">Person</a></li>
 }
@if (User.IsInRole("Financial") || User.IsInRole("Admin"))
 {
     <li><a href="#account" data-toggle="tab">Account</a></li>
 }
@if (User.IsInRole("OnlineAccess") || User.IsInRole("Admin"))
 {
     <li><a href="#login" data-toggle="tab">Login</a></li>
 }
</ul>
<div>
 @if (User.IsInRole("Demographics") || User.IsInRole("Admin"))
 {
     <div id="person" style="margin:5px;">
     @Html.Partial("PersonEdit", Model)
     </div>
 }

 @if (User.IsInRole("Financial") || User.IsInRole("Admin"))
 {
     <div id="account" style="margin:5px;">
     @Html.Partial("AccountsEdit", Model.Accounts)
     </div>
 }

 @if (User.IsInRole("OnlineAccess") || User.IsInRole("Admin"))
 {
     <div id="login" style="margin:5px;">
     @Html.Partial("LoginEdit", Model.Login)
     </div>
 }
</div>
Login as the non-Admin user (jsmith), search for account holders, and select an account holder. Note that only the Person and Account tabs are visible.

Next go into the PersonController.cs file. You will see the appropriate Authorize attributes for the New, Edit, and Save methods. Using the Authorize attributes here will prevent unauthorized access to these public methods by means outside of the application’s user interface (such as through Fiddler).
In the next article we discuss how the ASP.NET Identity database can be replaced with Active Directory for identification management in our Footloose Financial Services application.