
Reflection and ASP.NET Web Controls
4.83/5 (9 votes)
In this article, we share a utility that can be used to dynamically change ASP.NET attributes of a WebControl.
Introduction
Sometimes it is not easy for young developers to completely understand the power of the Reflection API and how it can be used in their ASP.NET applications. The approach is difficult and the documentation is very technical, so people prefer to write a lot of code to solve problems instead of implementing reusable features that could be used in several applications. In this article I share a utility that can be used to dynamically change ASP.NET WebControl attributes using Reflection and also show how this can be used by a simple website.
Scenario
Why dynamically change attributes of a control? The reasons could be endless.
-
Some small applications may not implement security by role. Suppose, for enterprise issues, you need to protect some features of your application if the user's role isn't correct for the organization. A quick solution could be to disable the controls (button, links, etc.) that perform the function that you want to protect. Reflection a simple way to reach this goal.
-
Sometimes you need to change the attributes to the user control (like label text or colors) according to the user's choice. Reflection can help you.
-
A textbox of your UserControl can't be used in some pages but can be in other pages. Use Reflection to make the textbox disappear without hundreds of "if" conditions.
These are just a few examples. Now let's go inside the code.
Using the Code
The example attached is entirely managed by the utility ReflectionComponent. I will explain the most complete case. Looking at the code it will be easy to see the other features of the utility. Download the code and run it with "Default2.aspx" as the Start page. Click "How to use the sample" for help.
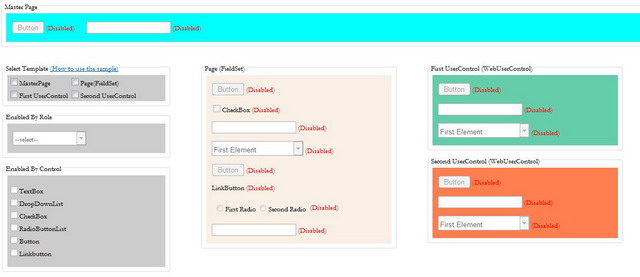
This application changes the "enabled" attribute of webcontrols with several rules.
In the page you will see four areas (MasterPage, FieldSet, FirstUserControl, SecondUserControl) representing the container controls. Selecting one or more in "Select Template" will enable the fieldsets "enable by Role" and "enable by control". These represent a set of rules you can apply to enable WebControls in areas you have chosen. You can:
-
Enable By Control: If you select, for example, the "Button" checkbox in the container controls you have chosen, you'll see the "Button" will be enabled and the Label (on the right)
TextandForeColorwill be changed. -
Enable By Role: If you select "Operator" from dropdownlist you'll see that only some controls in the container controls you have chosen will be enabled. This depends on the value of the custom attribute inserted inside the controls.
You can get this goal using ReflectionComponent in the App_Code folder by managing the parameter object that you pass when the static method ManagedControls.ChangeControlsAttributeValues is called. Let's see how:
After you have selected areas, in "Enable by role", select "Operator". Note that each webcontrol in the controls container includes a custom attribute named Security. In this example, in the control, when the value of "Security" contains "Operator" the attribute "Enable" will be set to "true".
<asp:Button ID="btnOne" runat="server" Security="Administrator;Operator;Other" Text="Button" Enabled="False"
         OnClientClick="javascript:return false;"/>
<asp:Label ID="lblBtnOne" runat="server" Text="(Disabled)" ForeColor="Red"></asp:Label><br /><br />

<asp:CheckBox ID="chkOne" runat="server" Security="Administrator;Operator" Text="CheckBox" Enabled="False"/>
<asp:Label ID="lblChkOne" runat="server" Text="(Disabled)" ForeColor="red"></asp:Label><br /><br />

<asp:TextBox ID="txtOne" runat="server" Security="Administrator" Enabled="False" ></asp:TextBox>
<asp:Label ID="lblTxtOne" runat="server" Text="(Disabled)" ForeColor="red"></asp:Label><br/><br/>
To get this goal you need to call the static method ManagedControls.ChangeControlsAttributeValues
of the utility with the correct parameters.
Look at the code in the ddlUserRoles_SelectedIndexChanged method.
_managedControlParameter = new ManagedControlParameter();

//Set container control
if (chklTemplate.Items[0].Selected)
    _managedControlParameter.MainControls.Add(Master);
if (chklTemplate.Items[1].Selected)
    _managedControlParameter.MainControls.Add(rightFieldset);
if (chklTemplate.Items[2].Selected)
    _managedControlParameter.MainControls.Add(firstUserControl);
if (chklTemplate.Items[3].Selected)
    _managedControlParameter.MainControls.Add(secondUserControl);

//Set type of control you want change property
_managedControlParameter.ManagedControls.Add(ManagedControlType.All);

//Set property you want change if custom attribute (Security) is setting to correct value
_managedControlParameter.Attributes.Add(new ManagedControlTypeAttributesValue
                                            {
                                                Attribute = "Enabled",
                                                AttributeNewValue = "true",
                                                CustomAttribute = "Security",
                                                CustomAttributeValue = ddlUserRoles.SelectedValue
                                            });
//Call
ManagedControls.ChangeControlsAttributesValues(_managedControlParameter);
ManagedControlParameter represents a set of parameters that the Reflection utility receive to do what you want. Examine it:
-
MainControls property represents the list of controls in the container you want to manage. However, you can only add a webcontrol if you need to manage a single item. (See code in
Page_Prerenderfor a singleasp:label.) -
ManagedControls property are the webcontrols where you want to apply the new attributes. These are defined in the
ManagedControlTypeenum. The enum items must be the samenameof the webcontrols(GetType().Name). In this example, you need to apply the changes of all controls. -
Attributes property includes a collection of
ManagedControlTypeAttributesValuein this object you define (CustomAttributeandCustomAttributeValuewill be omitted if you won't check it.)Attribute: You want to changeAttributeNewValue: New value (be carefull about the type)CustomAttribute: Attribute you want checkCustomeAttributeValue: Value you want to test
Next, call the ManagedControls.ChangeControlsAttributeValues method.
"ReflectionComponent" Utility
The ChangeControlsAttributeValues method checks object parameters and reorganizes inputs in order to provide easy usability (CheckParameters). After that, it retrieves the list of controls where changes will be applied (GetManagedWebControls). See comments to
understand the rules to get the control list.
The ApplyChange method starts to process the controls list. Next, for each control, try to apply the new attribute values you want to set. Using the Reflection method get a reference of the attribute that you need to modify and check if it is possible.
....

//Get attributes control to change
var controlAttribute = control.GetType().GetProperty(attribute.Attribute);

....
If you set CustomAttribute, the method searches the attribute in the webcontrol (using GetControlCustomAttributes) and checks its value. If OK, controlProperty.SetValue will be used to set the new value. Be careful about the new value. The cast must be possible.
....

//(Be carfull about contains when you define your custom attribute value)
if (GetControlCustomAttributes(control)[attribute.CustomAttribute] != null &&
     (GetControlCustomAttributes(control)[attribute.CustomAttribute]).Contains(
                                        attribute.CustomAttributeValue))
    //Change with CAST
    controlAttribute.SetValue(control,
                                 Convert.ChangeType(attribute.AttributeNewValue,
                                                      controlAttribute.PropertyType),
                                                             null);
....
Conclusion
Reflection is a really powerful feature. This article is only a little sample to demonstrate how you can improve the flexibility of your applications and solve some problems quickly. Please send me feedback about that and sorry for my English.
Article Update Log
- 19 March 2013: Alignment of article code samples to utility code.
- 15 March 2013: Initial release.