
Running Automation Tests At Scale Using Playwright
0/5 (0 vote)
In this article, we learn about Playwright, how it works, and why it is a good choice for web automation with Java.
In the world of web development, choosing the right framework for automation testing can be a difficult task. In a rapidly evolving tech landscape, informed decisions are crucial when choosing test automation frameworks to compete with Selenium.
Playwright, a Node.js framework, is one such framework that has recently gained popularity. Its popularity can be attributed to the popularity of Node, which has helped Playwright attract a large user base. Playwright is a powerful open-source framework developed by Microsoft for automating web applications. It has a unique set of features and capabilities that make it a valuable framework for developers and testers.
In this article, we will explore the world of Playwright with Java. We will start by learning about Playwright and how it can be used to execute test cases at scale. For the same, we will learn about cloud test execution on the LambdaTest platform, which can help in accelerated execution and a quicker feedback cycle.
So, let's get started.
- What is Playwright?
- Why choose Playwright with Java?
- Framework Setup for Playwright and Java
- Writing the First Test Case Using Playwright Java
- Running Parallel Tests Using Playwright on LambdaTest
- Conclusion
What is Playwright?
Playwright is an open-source automation framework created by Microsoft to test and automate web applications. This framework is compatible with Windows, macOS, and Linux and supports cross-browser automation testing on Chromium (Google Chrome, Microsoft Edge), Mozilla Firefox, and WebKit (Apple Safari).
It is widely used because it is compatible with Java, Python, C# .NET, and Node.js. This means that it can be used by developers with a variety of programming languages, which makes it a versatile framework. Playwright is a more effective cross browser testing and web scraping than other counterparts (e.g., Selenium, Cypress, etc.) because it provides a unified, high-level API for automating web applications across multiple browsers. Testers can use these APIs to navigate to URLs, and interact with elements, perform actions like filling forms and scraping data.
Playwright, which was first released in January 2020, has quickly gained popularity due to its stability, open-source nature, and support for multiple languages such as C#, Java, and Python. This support makes it easy for users to migrate from existing frameworks to Playwright. Its growing popularity is evident in the current numbers of Microsoft Playwright on GitHub.
With more than 36,000 active users, over 3,000 forks, and 450+ active contributors, its popularity will continue growing.
Advantages of Playwright
Playwright's latest version, 1.38, includes all of the versatile features that the framework has to offer. It supports multi-tab, multi-user, and iframe test cases, as well as built-in and custom waits for any locator action.
In addition, a few of the top advantages of using Playwright for web test automation over other frameworks are.
Playwright also supports all major programming languages, such as C#, Python, .NET, and JavaScript/TypeScript, which makes it simple to automate tests and add assertions for a variety of applications. These test cases might include web navigation flows, form filling, etc.
Scalability
Scalability becomes crucial with complex applications having larger test suites and the need for parallel testing. Playwright offers high scalability as it supports Parallel test execution on multiple browsers and platforms on both local and cloud-based platforms.
It allows you to scale your test infrastructure using containerization horizontally and distributed execution of test cases, providing effective resource management. It also enables test data scalability by integrating with databases and other sources for parameterized test cases for data-driven testing.
Wide Integrations Support
Playwright offers integration support for several tools and technologies. It can be integrated with
- CI/CD tools like Jenkins, Gitlab, etc.
- Reporting tools and testing frameworks like Allure, Extent Reports, or custom reporting and JUnit, TestNG, Cucumber, etc.
- Performance testing tools and API testing frameworks.
- Cloud-based testing platforms like LambdaTest.
Smart built-in auto-wait
Playwright has an in-built auto-wait feature that is not available in other frameworks. This feature waits until all elements are ready for interaction before performing actions or checks on them.
This in-house approach can be used to implement wait times and conditions, such as element visibility, element availability for interaction, page navigation, and network calls to complete.
Parallel testing with full test isolation
Playwright creates a browser context for each test, which is like a new individual browser profile. This helps to execute multiple test cases in parallel and reduces the execution time.
Since each test has a separate browser profile, just like a different thread in Selenium, all tests run in complete isolation without interfering with each other. This helps in reduced interferences within test cases, improved test reliability, easier debugging by isolated logs and test data, reduced flakiness, and cleaner test environments.
Why Choose Playwright with Java?
Playwright Java combination complements each other's capabilities and hence allows the writing of more stable and scalable automation test cases.
It supports various languages, but Java is popular due to its wide adoption and robust ecosystem. Java is still among the top 3 languages and ranks in the top 5 in the latest TIOBE index of programming languages, so it's familiar to many programmers and easy to use with Playwright. JDK 21 is the latest long-term support release of the Java SE platform.
A few other advantages that make this combination a powerful one are:
Seamless Configuration
The ease of setting up a Playwright with Java automation framework makes it a top choice for web automation tasks. Playwright comes bundled as a set of Maven module dependencies that can be easily integrated with a Java project.
All the available versions are readily available on the Maven website and can be added like below in your project.

Cross-Platform Compatibility
Java is a platform-independent language that allows you to create Playwright scripts that run on Linux, Windows, or macOS. This is useful when working with web automation, and test cases need to be executed on browsers on all platforms.
By using Java, the same cases can be used, and there is no need to rewrite them in a new language for each platform.
Modern Language Bindings
Playwright's Java API is intended to be user-friendly and idiomatic for Java testers. It provides well-structured APIs that make it simpler to write and maintain automation scripts without having to learn a new language.
Comprehensive Documentation and Support
Playwright has extensive documentation on working with Java. This coupled with a large active community of Java developers, makes it very easy to find resources and get help in case of any issues.
Framework Setup for Playwright and Java
Configuring a Playwright Java project is quite seamless. As mentioned already, Playwright comes as a set of Maven modules. This makes it very easy to configure it by adding one dependency to the Maven project’s pom.xml.
At a high level, the setup can be divided into three parts:
- Installing Java 11
- Creating a Maven Project
- Adding Playwright Maven dependency
Let’s look at each of these one by one before writing our first test case.
Installing Java 11
Follow the following steps to install Java if it is not already installed on your machine.
Step 1. Visit the official Java website and download the latest compatible version as per your OS. Instead, you can also opt for OpenJDK. It is open-source and identical to Oracle Java in terms of build and results.
Step 2. Run the downloaded installation file and follow the steps to install Java on your system.
Creating a Maven Project
In this tutorial for demonstration purposes, Eclipse IDE has been used. However, you can use any IDE of your choice and create a new Maven project in that and then continue with the next steps.
Step 1. Launch Eclipse IDE → Select New → Project.

Step 2. Choose Maven → Maven Project and then click on Next.

Step 3. Fill in the required project details and name it as PlaywrightJava. A new project like the one below would be created.

Adding Playwright Maven dependency
Playwright for Java is available as a Maven dependency. To be able to use it in your project,
Step 1. Visit the Maven website and search for Playwright.

Step 2. Select the first option and then select the latest stable version available.
Step 3. Copy the dependency details and add them to the pom.xml file of your project. We have used v1.38.0, which was the latest version at the time of writing this article.
<dependency>
         <groupId>com.microsoft.playwright</groupId>
         <artifactId>playwright</artifactId>
         <version>1.38.0</version>
</dependency>
With this, we have completed the basic project setup and installation to be able to start writing the first Playwright Java web automation test case.
Writing the First Test Case using Playwright Java
Now, we will move to writing our first Playwright Java test case. For the same, consider the following test scenario to navigate to a webpage, perform actions on it, and assert results.
We will be executing our playwright cases on a cloud grid. Executing automation on the cloud provides improved speed and scalability, making automation testing faster and more reliable. It also allows us to execute multiple cases across various browsers and operating systems.
In this article, the LambdaTest cloud grid is used to achieve this. LambdaTest is an AI-powered test execution platform that enables users to perform Playwright automation for web applications on a wide range of over 3000+ real browsers and operating system combinations. We will see how the same cloud platform can be utilized for single test execution followed by parallel execution on different browsers.
Test Scenario
- Navigate to the LambdaTest Playground.
- Click on Input Form Submit.
- Assert that the Input Form page is loaded.
- Fill out the form on the landing page.
- Click on the Submit button.
- Assert the confirmation message.
To execute the test case, TestNG has been used. Add the TestNG dependency along with a gson dependency to the pom.xml.
Gson, as described on the Maven website, is a Java library that can convert Java Objects into their JSON representation. We will use it to create a JsonObject to add cloud properties for the LambdaTest platform and to connect to the cloud grid. These properties help to select the browser and platform for execution and to identify the execution details on the LambdaTest Web Automation dashboard for better results analysis and debugging.
Final pom.xml after adding all the dependencies should look like one below
<project xmlns="http://maven.apache.org/POM/4.0.0"
xmlns:xsi="http://www.w3.org/2001/XMLSchema-instance"
xsi:schemaLocation="http://maven.apache.org/POM/4.0.0 https://maven.apache.org/xsd/maven-4.0.0.xsd">
         <modelVersion>4.0.0</modelVersion>
         <groupId>PlaywrightJava</groupId>
         <artifactId>PlaywrightJava</artifactId>
         <version>0.0.1-SNAPSHOT</version>
         <build>
                  <sourceDirectory>src</sourceDirectory>
                  <plugins>
                           <plugin>
                                    <artifactId>maven-compiler-plugin</artifactId>
                                    <version>3.8.1</version>
                                    <configuration>
                                             <release>19</release>
                                    </configuration>
                           </plugin>
                  </plugins>
         </build>
         <dependencies>
                  <dependency>
                           <groupId>com.microsoft.playwright</groupId>
                           <artifactId>playwright</artifactId>
                           <version>1.38.0</version>
                  </dependency>
                  <dependency>
                           <groupId>org.testng</groupId>
                           <artifactId>testng</artifactId>
                           <version>7.8.0</version>
                           <scope>test</scope>
                  </dependency>
                  <dependency>
                           <groupId>com.google.code.gson</groupId>
                           <artifactId>gson</artifactId>
                           <version>2.10.1</version>
                  </dependency>
         </dependencies>
</project>
Having completed the project setup and created the pom file with updated dependencies to be used, we now move to writing our first Playwright Java test case with cloud execution.
The test case that we are going to write would essentially be divided into two parts:
- Java class file, which will have the actual test flow, including navigation, performing actions on the webpage, filling the data, and asserting the result.
- Test case file, which will have the code for connection to LambdaTest cloud grid and a call to test flow execution defined in the first file.
Let’s get started now.
Add a package as a base inside the src package. In this, add a new file and name it SampleTestFlow.java. This file will have the test scenario execution as mentioned previously and look like the below.
package base;
import static com.microsoft.playwright.assertions.PlaywrightAssertions.assertThat;
import com.microsoft.playwright.Locator;
import com.microsoft.playwright.Page;
public class SampleTestFlow {
/*
* This function is to execute the test flow.
* Navigate to the webpage, fill and submit data, and assert confirmation messages.
*/
public static void playwrightTestFlow(Page page) {
try {
// Navigate to the Lambdatest Selenium Playground
page.navigate("https://www.lambdatest.com/selenium-playground/");
// Locate the Input Form Submit a link and click on it.
Locator inputForm = page.locator("text=Input Form Submit");
inputForm.click();
// Assert Input Form Submit page is loaded
assertThat(page.getByText("Input form validations")).isVisible();
// fill data in the form
fillInputFormData(page);
// Click Submit button to submit the form
page.getByText("Submit").click();
// Fetch the success message, print it on console, and assert same.
String successMessage = page.locator("xpath=//p[@class='success-msg hidden']")
.textContent();
System.out.println(successMessage);
assertThat(page.locator("xpath=//p[@class='success-msg hidden']"))
.hasText("Thanks for contacting us, we will get back to you shortly.");
} catch (Exception err) {
err.printStackTrace();
}
}
/*
* This function is to fill all the required input form fields on the webpage
*/
private static void fillInputFormData(Page page)
{
page.locator("id=name").fill("Playwright");
page.locator("id=inputEmail4").fill("Playwright@example.com");
page.locator("id=inputPassword4").fill("Playwright@123");
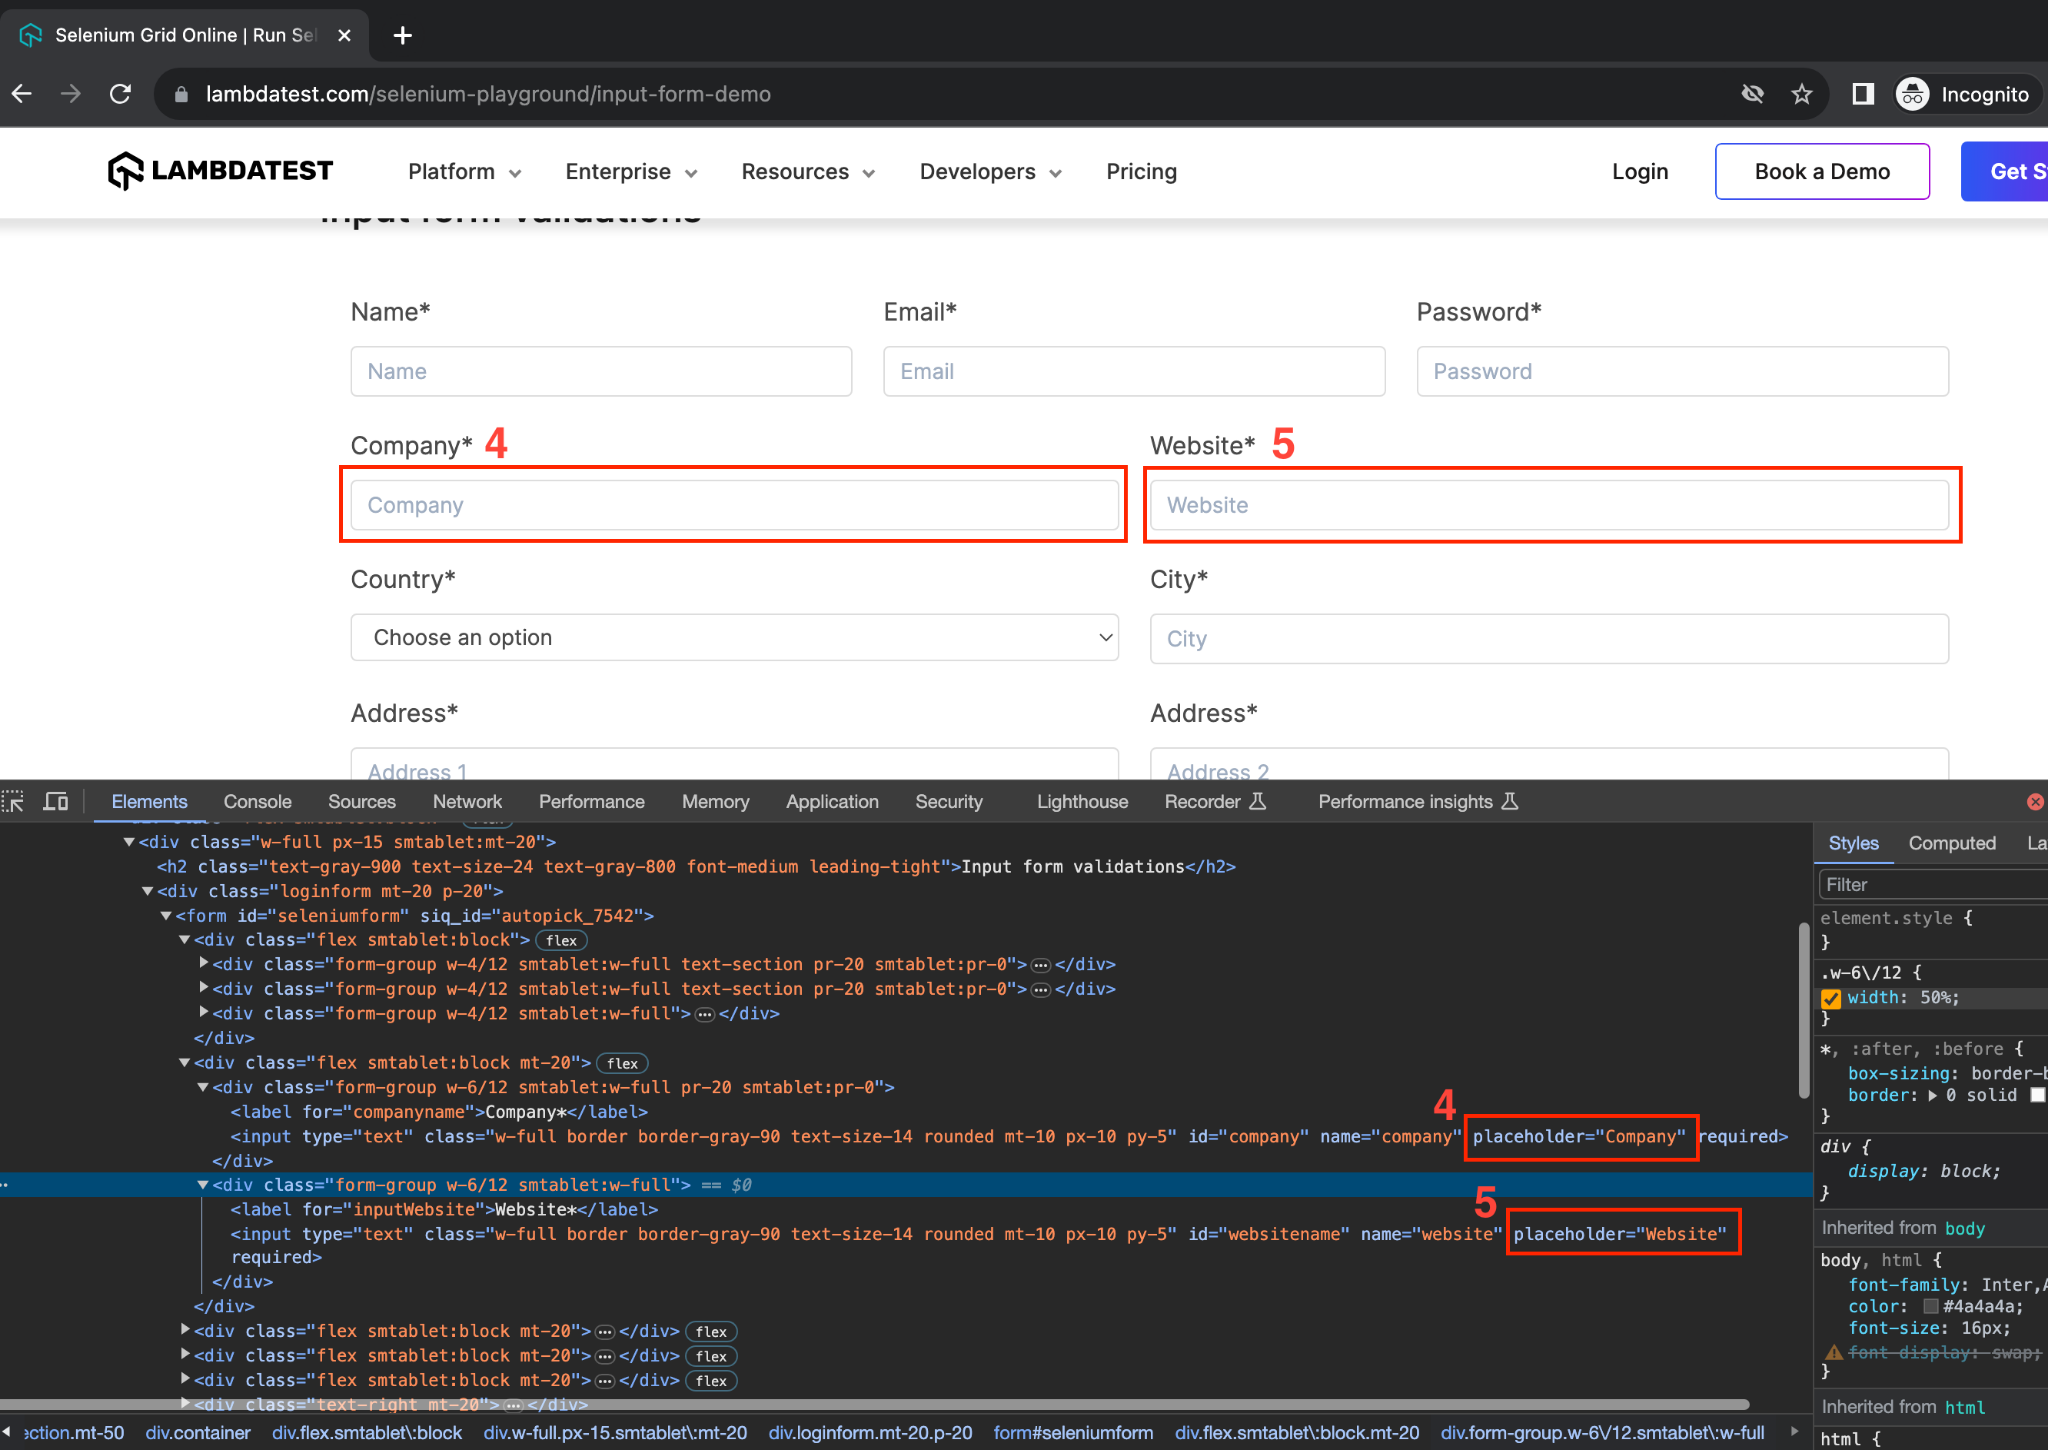
page.getByPlaceholder("Company").fill("Lambdatest");
page.getByPlaceholder("Website").fill("www.playwright.dev");
page.locator("xpath=//select[@name='country']").selectOption("IN");
page.locator("xpath=//input[@name='city']").fill("Gurgaon");
page.locator("xpath=//*[@name='address_line1']").fill("House 1");
page.locator("css=input#inputAddress2").fill("Sector 1");
page.locator("css=#inputState").fill("Haryana");
page.locator("id=inputState").fill("Haryana");
page.locator("css=input[name='zip']").fill("123456");
}
}
Code Walkthrough: SampleTestFlow.java
Step 1. Import Locator and Page interfaces of the playwright package. The Locator interface is used to find a web element on the webpage at any time, while the Page interface interacts with the webpage throughout the test flow using its methods.

In addition, you should import the assertThat method from the PlaywrightAssertions interface statically to verify the success message in the test flow.

Step 2. Add the first function inside this class as playwrightTestFlow(). This function will have one parameter - page, which will be used for interactions on the webpage.

The public access, along with static type on this function, would allow calling it in the test class files directly using the class name without creating an object.
Step 3. Navigate to the LambdaTest Selenium Playground.

Step 4. Locate the Input Form Submit link on the loaded webpage and click on it.

Playwright provides several different inbuilt locator methods that can be used to locate a web element on the web page using page instances.
In addition to these methods, a generic locator() method is also available in which we can use the commonly used approach for locating web elements like XPath, id, name, text, CSS, etc., by passing it as a key-value pair in the function argument.
In this step, the locator() method is used. We use the text type to locate the web element and store it in a variable of Locator type.

This variable is then used to click on it.

Step 5. Assert that the Input Form Demo page has been loaded by verifying the visibility of this text on the webpage.

For assertion, we are using the assertThat() method, which we imported initially. Playwright's isVisible() inbuilt method is used here to check if the given web element is visible on the page or not.

This time, we use the getByText() element locator to fetch the web element reference.
Step 6. Fill the data in the form by calling the fillInputFormData() function using the page instance as a parameter.

We will do a walk-through of this function after the current one is finished.
Step 7. Click the Submit button to submit the filled data form.

To locate the Submit button, the getByText() locator is used again.

Step 8. Fetch the success message locator after submitting the form using its XPath.

The actual content of the same is fetched using the textContent() method of Playwright API.

Log this message on the console and assert it to be an exact match with the given message using the hasText() method with the assertThat function.

Step 9. Add the next function as fillInputFormData(), which will be used to fill all the data in the input form.

This function will take an instance of a page as a parameter to interact with the page and locate web elements to fill data.
Step 10. Use the page.locator() or other locator methods for fields on the web page to locate and fill in all the data in the form. Different identifiers are used for different fields to showcase usage.
To enter data in all the textbox fields on the form fill() method is used, which takes the data to be entered as a String argument.
10.1) To fill in the name, email, and password, we use the locator() method with an id identifier.


10.2) For company and website, getByPlaceholder() locator method is used.

10.3) Since the Country option is a drop-down, to select the value from the dropdown selectOption() method is used along with XPath to locate the element.


In addition to this, you can also use the label or index of the dropdown value to select it.
10.4) For city and address line 1, usage of page.locator() with XPath is demonstrated.


10.5) Lastly, for all the remaining fields, a CSS identifier is used inside the locator() method to locate elements and fill data.


With this, we have completed writing and understanding the code for test case flow using Playwright Java. Let us move on to the test class file, which will hold the code for Cloud test execution on the LambdaTest Platform.
Start by adding a new package inside the src and name it test.cloud_execution. Inside it, add a Java test file, PlaywrightTestSingle.java.
package test.cloud_execution;

import java.net.URLEncoder;
import org.testng.annotations.Test;
import com.google.gson.JsonObject;
import com.microsoft.playwright.*;

import base.SampleTestFlow;

public class PlaywrightTestSingle {
       @Test
       public void playwrightTestSingle()
       {
              String username = System.getenv("LT_USERNAME") == null ? "<lambdatest_username>" :
              System.getenv("LT_USERNAME");
              String accessKey = System.getenv("LT_ACCESS_KEY") == null ? "<lambdatest_accesskey>" :
              System.getenv("LT_ACCESS");

              try (Playwright playwright = Playwright.create()) {
                     JsonObject capabilities = new JsonObject();
                     JsonObject ltOptions = new JsonObject();

                     capabilities.addProperty("browsername", "Chrome");
                     capabilities.addProperty("browserVersion", "latest");
                     ltOptions.addProperty("platform", "Windows 10");
                     ltOptions.addProperty("name", "Playwright Single Cloud Test");
                     ltOptions.addProperty("build", "Playwright Java");
                     ltOptions.addProperty("user", username);
                     ltOptions.addProperty("accessKey", accessKey);
                     capabilities.add("LT:Options", ltOptions);

                     String cdpUrl = "wss://cdp.lambdatest.com/playwright?capabilities=" +
                                                                                    URLEncoder.encode(capabilities.toString(), "utf-8");

                     Browser browser = playwright.chromium().connect(cdpUrl);

                     // Create BrowserContext object and use it to create a Page object to execute cases in isolation
                     BrowserContext browserContext = browser.newContext();
                     Page page = browserContext.newPage();

                     SampleTestFlow.playwrightTestFlow(page);

                     page.close();
                     browserContext.close();
                     browser.close();
                     playwright.close();
              }
               catch (Exception err) {
                     err.printStackTrace();
              }
       }
}
Code Walkthrough: PlaywrightTestSingle.java
Step 1. Add the following imports to the test class to access methods inside these packages.

TestNG annotations to be able to use @Test annotation, gson library to create JsonObject, playwright package to use its interfaces, and SampleTestFlow class to call the test flow method.
Step 2. Add the test case method as playwrightTestSingle() and annotate it with @Test annotation to be able to execute the test case.

Step 3. As previously discussed, we will be executing the cases on the LambdaTest Cloud grid to take advantage of the cloud grid and be able to write more robust and scalable automation cases. To do this, you must create an account on the LambdaTest platform.
After creating the account, fetch your username and access key from the Password & Security section from your LambdaTest Profile.

Alternatively, you can also configure these as environment variables and directly fetch them in code.
For macOS and Linux:
export LT_USERNAME=LT_USERNAME
export LT_ACCESS_KEY=LT_ACCESS_KEY
For Windows:
set LT_USERNAME=LT_USERNAME
set LT_ACCESS_KEY=LT_ACCESS_KEY
Step 4. Initialize a new instance of Playwright to access the Playwright API.

Step 5. Create 2 JsonObject variables, and name them as capabilities and ltOptions.
5.1) We use these variables to define the properties of the LambdaTest cloud grid for Playwright. These include defining the browser and its version and platform.

The name and build details for the case can be used to filter the execution logs on the LambdaTest platform.

And, mention the username and password for the LambdaTest account using which the connection is to be created.

Step 6. Pass the capabilities object to the URL to be used to connect to the LambdaTest cloud grid for Playwright test execution.

Step 7. Using the Playwright object created initially, connect to the LambdaTest cloud grid with the Chromium browser type. Assign this to an object of the Browser interface.

We are using browser type Chromium here as we will execute the cases on Chrome browser, which we mentioned in the browserName property in Step 5.1.
Step 8. Create a new browserContext instance to create a separate thread for each test run so that each test case can be run in isolation. BrowserContext can operate multiple independent browser sessions and is typically used in parallel execution.

This is equivalent to ThreadLocal while working with Selenium for web automation to create a separate thread for each test run.
Step 9. Inside the browserContext, create a page. All the corresponding actions in the test case flow are performed using this page instance.

Each BrowserContext can have multiple pages. A Page is a single browser window or tab that is opened in a browser context. It provides a number of methods for interacting with the webpage. These methods include creating a new page, navigating to URLs, locating web elements on the webpage, and interacting with page elements to perform actions.
Step 10. Make a call to the playwrightTestFlow() function inside the SampleTestFlow class using the page instance. This will execute the test scenario and perform the web element interactions and assertions.

Step 11. After the test execution, close Playwright, BrowserContext, Browser, and Page instances to clean up resources using the close() method.

Code Execution
Execute the above Playwright test case by running it as a TestNG Test.
For this, right-click and select Run As → TestNG Test. Executing the same would give an output like the one below on local.

You can also see the execution results on the LambdaTest dashboard by navigating to the Automation → Web Automation section.

Running Parallel Tests using Playwright on LambdaTest
With the previous execution, we have understood the Playwright Java project setup steps, how to write the first automation test case using the combination, and how to execute it on the cloud.
So, let’s see what additional changes need to be made to execute the same test scenario as parallel in 2 browsers.
For the same, we will use the parallel = true attribute of the @DataProvider annotation of TestNG.
Inside the existing test.cloud_execution package, add 2 more Java class files:
- PlaywrightTestParallel.java for the test case with parallel execution
- LambdaTestCapabilities.java to pass the capabilities for 2 different browser configurations for execution using the
DataProvider.
Updated LambdaTestCapabilities.java file with 2 browser capabilities for parallel execution on the cloud would look like below.
package test.cloud_execution;
import org.testng.annotations.DataProvider;
import com.google.gson.JsonObject;
public class LambdaTestCapabilities
{
@DataProvider(name = "BrowserCapabilities", parallel = true)
public static Object[] getDefaultTestCapability()
{
String username = System.getenv("LT_USERNAME") == null ? "<lambdatest_username>" :
System.getenv("LT_USERNAME");
String accessKey = System.getenv("LT_ACCESS_KEY") == null ? "<lambdatest_accesskey>"
: System.getenv("LT_ACCESS");
//capabilities for first browser - Chrome
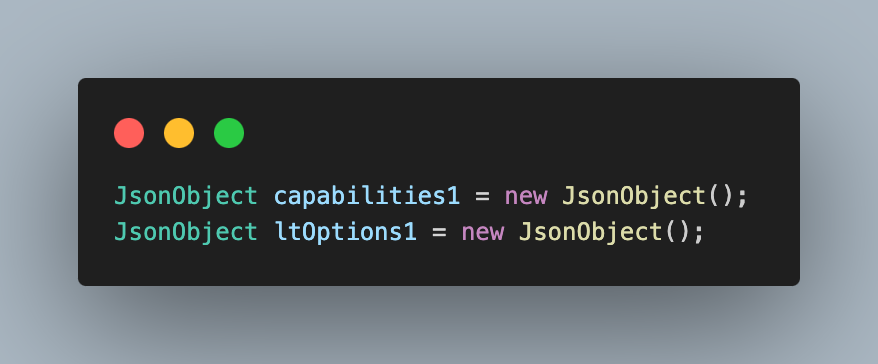
JsonObject capabilities1 = new JsonObject();
JsonObject ltOptions1 = new JsonObject();
capabilities1.addProperty("browserName", "Chrome");
capabilities1.addProperty("browserVersion", "latest");
ltOptions1.addProperty("platform", "Windows 10");
ltOptions1.addProperty("name", "Playwright Parallel Test - Chrome");
ltOptions1.addProperty("build", "Playwright Java Parallel Cloud");
ltOptions1.addProperty("user", username);
ltOptions1.addProperty("accessKey", accessKey);
capabilities1.add("LT:Options", ltOptions1);
//capabilities for second browser - Edge
JsonObject capabilities2 = new JsonObject();
JsonObject ltOptions2 = new JsonObject();
capabilities2.addProperty("browserName", "MicrosoftEdge");
capabilities2.addProperty("browserVersion", "latest");
ltOptions2.addProperty("platform", "Windows 10");
ltOptions2.addProperty("name", "Playwright Parallel Test - Edge");
ltOptions2.addProperty("build", "Playwright Java Parallel Cloud");
ltOptions2.addProperty("user", username);
ltOptions2.addProperty("accessKey", accessKey);
capabilities2.add("LT:Options", ltOptions2);
return new Object[] { capabilities1, capabilities2 };
}
}
Code Walkthrough: LambdaTestCapabilities.java
Step 1. Inside the class, add a new method as getDefaultTestCapability(). Annotate this method with @DataProvider annotation of TestNG.
This method will be used to pass test data, which is browser capabilities in this case, for execution on Lambdatest Playwright cloud for 2 browsers - Chrome and Edge. Test cases would get executed in parallel on both these browsers.

You can notice that the name attribute with the value BrowserCapabilities is used with @DataProvider annotation. This is the name we use in our test case to define which data provider is to be used for execution.
The most important thing to note here is the parallel = true attribute with annotation. This is what tells TestNG that all the data is to be passed to the test case and then used for parallel execution on the cloud.
Step 2. Since we are executing our Playwright Java cases on the LambdaTest cloud grid, fetch your username and access key from the Password & Security section once you have created your account on the LambdaTest platform.
Alternatively, you can also configure these in environment variables and fetch the value from there, like we discussed in the previous test case.
Step 3. Create browser capabilities for two different browsers on which we will execute our Playwright cases in parallel.
3.1) Create 2 JsonObjects capabilities1 and ltOptions1 for the first browser, Chrome, configurations.

3.2) Add all the browser and LambdaTest platform-related configurations to these objects as we did for single cloud execution.

3.3) Similarly, create capabilities2 and ltOptions2 for the second browser, Edge, configurations.
3.4) Similar to Chrome, add all the configuration details in the new JsonObjects with the required changes for Edge. The one important difference to note here is the browserName value.
Step 4. Return both the capabilities objects that will be used by the test case for Playwright test execution in parallel.
Once this is done, move to the test class file to execute the test cases.
package test.cloud_execution;

import java.net.URLEncoder;
import org.testng.annotations.Test;

import com.google.gson.JsonObject;
import com.microsoft.playwright.*;

import base.SampleTestFlow;

public class PlaywrightTestParallel
{
      @Test(dataProvider = "BrowserCapabilities", dataProviderClass = LambdaTestCapabilities.class)
      public void playwrightTestParallel(JsonObject capability)
      {
            try (Playwright playwright = Playwright.create())
            {
                  String cdpUrl = "wss://cdp.lambdatest.com/playwright?capabilities=" +
                                                                        URLEncoder.encode(capability.toString(), "utf-8");

                  Browser browser = playwright.chromium().connect(cdpUrl);

                  // Create BrowserContext object and use it to create a Page object to execute cases in isolation
                  BrowserContext browserContext = browser.newContext();
                  Page page = browserContext.newPage();

                  SampleTestFlow.playwrightTestFlow(page);

                  page.close();
                  browserContext.close();
                  browser.close();
                  playwright.close();
            }
            catch (Exception err) {
                  err.printStackTrace();
            }
      }
}
Code Walkthrough: PlaywrightTestParallel.java
Step 1. Create a new test method called playwrightTestParallel(). This method will take a JsonObject capability object as a parameter, containing the browser capabilities passed from the test data provider created in the previous step.

Annotate this test case with @Test annotation of TestNG. Inside the annotation, add attributes
dataProvider = "BrowserCapabilities", to tell the name of DataProvider to be used for this test case.dataProviderClass = LambdaTestCapabilities.class, to tell the Java class name in which this data provider is present.
Step 2. Initialize a new instance of Playwright to access the Playwright API.
Step 3. Use the capability object from the test parameter to create the URL to connect to the LambdaTest cloud grid for Playwright Java test execution.

Step 4. With the initially created playwright object, call the chromium() function with the URL to launch the browser and assign it to a Browser interface object.
We are using the chromium() browser type as in this parallel execution case, Chrome and MicrosoftEdge browsers are used, and both are supported by this browser type.
Step 5. Use the browser object to create a browserContext, which will help to execute both cases in parallel but in total isolation without impacting each other.
Step 6. Using the browserContext, create a new page instance that represents the browser window/tab, in which case it will be executed.
Step 7. Call the previously created playwrightTestFlow() method of the SampleTestFlow class to execute the test scenario. This is the common function used for both single and parallel execution without any modifications.
Step 8. Finally, use the close() method to close all the instances and free up the memory.

Code Execution
Execute the test case as a TestNG test to check the execution results.
You can notice from the screenshot below that a total of 2 cases are executed.


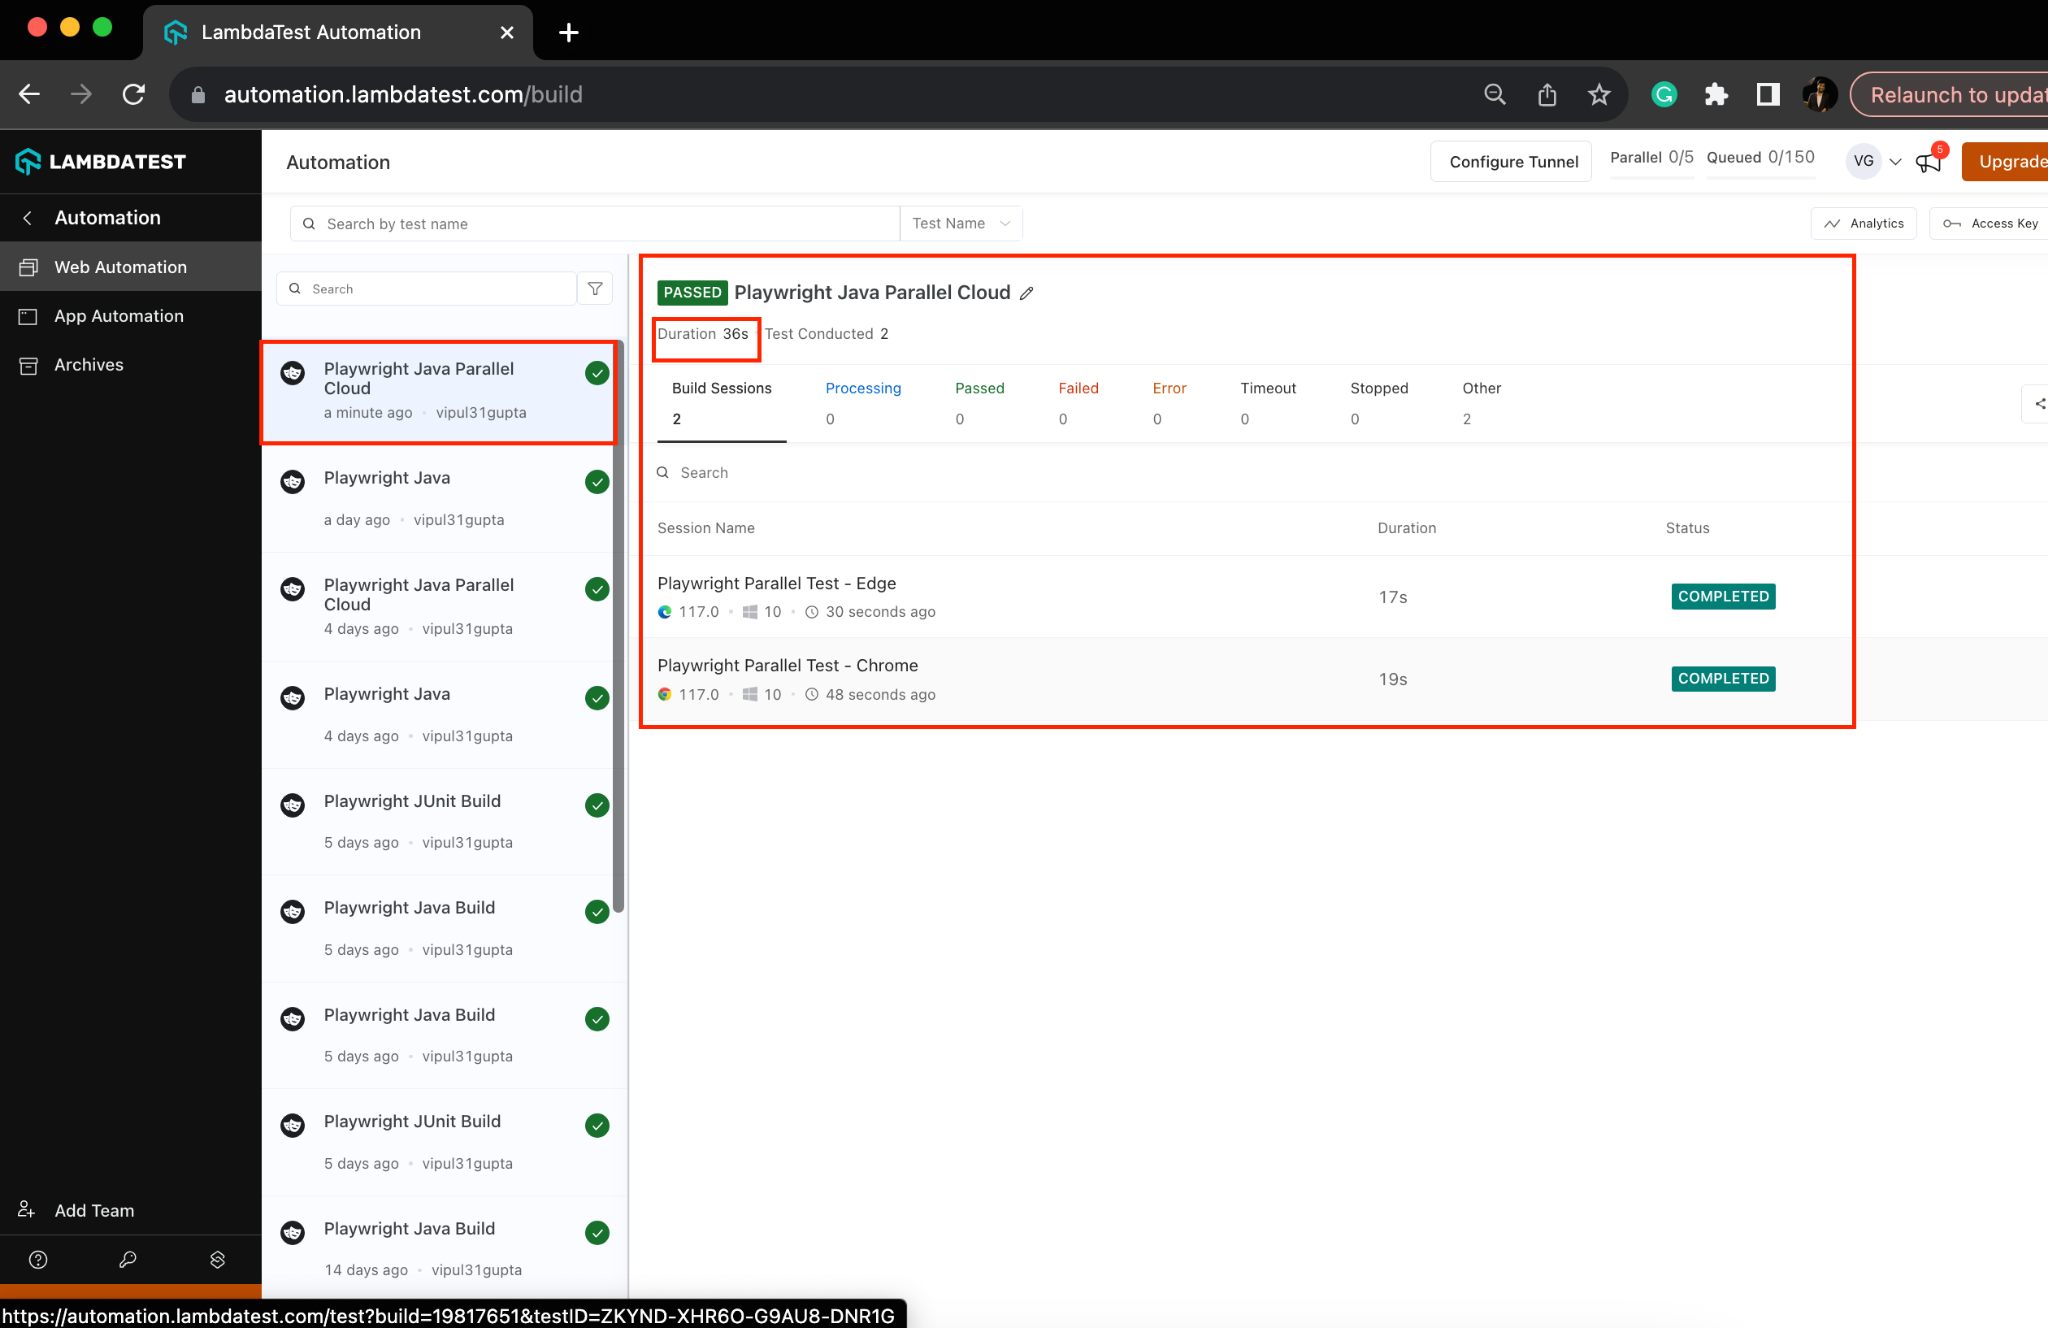
Execution results can be viewed on the LambdaTest dashboard under the Automation → Web Automation section as below.

If you want to confirm if the parallel execution is working or not, update the value for the parallel attribute in the @DataProvider annotation as false and execute again.
In these execution results, you can notice significantly increased total execution time on IDE and LambdaTest dashboard results. This confirms that earlier execution was parallel, and this time, the cases are executed in serial.
With this, we have learned to write Playwright automation at scale and execute it in parallel on the LambdaTest cloud grid.
Conclusion
This concludes our article on running automation tests with Playwright Java. In this article, we learned about Playwright, how it works, and why it is a good choice for web automation with Java. We also learned how to execute Playwright automation cases at scale using the LambdaTest cloud grid. You should now have a solid foundation to tackle complex automation challenges with Playwright. So, it's time to get started and write your first automation script using Playwright with Java!