
Running Automation Tests at Scale Using Cypress
0/5 (0 vote)
In this article, we will learn how to set up Cypress and run the web automation tests (in series and parallel) on the LambdaTest cloud grid.
Cypress is an open-source JavaScript automation framework that can perform unit, integration, component, and end-to-end testing. It is a next-generation front-end testing framework built for modern web apps and allows running cross browser and parallel testing at your fingertips.
With Cypress, teams can easily create web automation tests, debug them visually, and automatically run them in the CI/CD pipelines, thus helping with Continuous Integration (CI) and development.
Though Cypress is often compared with Selenium WebDriver, it is fundamentally and architecturally different. It does not use Selenium WebDriver for automation testing. Thus enabling users to write faster, easier, and more reliable tests.
The installation and setup part of Cypress is also easier compared to other test automation frameworks as it is a node package. You just need to run the npm command npm install cypress and then use the Cypress framework.
In this article, we will learn how to set up Cypress and run the web automation tests (in series and parallel) on the LambdaTest cloud grid.
So, let’s get started!
Key Features of Cypress
Cypress offers some out-of-box features to run automation tests at scale. Let’s look at them.
- Time Travel: Cypress allows you to "time travel" through the web application, meaning it will check out what happens at each step when the tests are executed. We can step forward, backward, and even pause the test execution on run time. Thus providing us the flexibility to inspect the application’s state in real-time test execution.
- Auto Waits: Cypress has the inbuilt auto wait functionality that automatically waits for the command and assertion before moving to the next step. So, there is no need to add waits or sleeps to the web automation tests. Though Cypress has the wait command, it is not explicitly required to be used in the tests.
- Flaky Test Management: A flaky test is one that passes and fails across multiple retry attempts without any code changes. For example, when the test is executed for the first time, it fails; when it is rerun without making any code changes, it passes.
Cypress has a feature of automatically retrying the failed tests. This can help in making the test suite free from flakiness. Flaky test management can help prevent the automated pipeline from failing the entire test suite due to flaky tests.
- Screenshots, Videos, and Easy Test Replay: Cypress allows taking screenshots and videos automatically during the test execution. This can be configured using the Cypress config file. When the test suite runs in headless mode via the CLI and the configuration for videos and screenshots is enabled, Cypress will create a video and take screenshots of the entire test execution.
The screenshots and video can help analyze the test failures and reproduce issues.
- Cross Browser Testing: Cypress provides the capability for running the tests across multiple browsers. It supports Chrome-family browsers like Chrome, Chromium-based Microsoft Edge, and Electron. It also keeps Safari and Firefox browsers.
We need to install the respective browser(excluding Electron) on which we want to run the tests in the local machine or in the CI environment. The
--browserflag can be used with the cypress command to run the tests on the required browser. For example, to run the test on the Firefox browser, we can make use of the following command:cypress run --browser firefox
- Running Parallel Tests: Cypress can perform parallel testing. This helps reduce the overall test execution time and provides fast feedback.
- Easy Debugging: With Cypress CLI’s interactive mode, you can easily debug the tests and find out the issues that cause the test to fail. It’s easily readable errors, and stack traces allow quick debugging.
- Network Stubbing and Spying: Cypress can allow users to choose whether to mock the responses or allow them actually to hit the server and get a response. It also can mix and match within the same test, so you can mock some requests and allow others to hit the actual server and get a response.
- Support for API Testing: Cypress also provides additional support for performing API testing and a great developer experience for testing APIs. It can be extensively used to test APIs and write effective API and integration tests.
- Cypress Test Runner: Cypress has a built-in test runner GUI that provides an interactive interface that can be launched using the
Cypress opencommand. It can be used for running and debugging the web automation tests. TheCypress opencommand opens a test runner window that can be used to select and run individual tests, debug the code, and view the test results.
Setting Up the Cypress Framework
Before we begin setting up the framework, let’s discuss the tech stack we use in this article for the demonstration. The following programming language/tools/framework will be used:
| Programming Language/ Tools/Framework | Version |
| NodeJS | 18.17.1 |
| Cypress | 13.3.0 |
| @faker-js/faker | 8.1.0 |
| LambdaTest Cypress CLI | 3.0.18 |
We will run the tests on the Cypress cloud grid provided by LambdaTest - an AI-powered test orchestration and execution platform. With LambdaTest, you can perform automated testing with Cypress on various browsers and operating systems. It is a good choice for teams that need to perform cross browser testing, testing on real browsers, and parallel testing.
Step 1 - Installing NodeJS
To start with the installation process, let's begin with NodeJS. We can install it using its official website. You can download and install the suitable file based on your operating system.
Once NodeJS is installed, we can verify its successful installation by running the following command in the terminal or the command prompt:
node - v

Step 2 - Installing Cypress
Cypress can be installed in two different ways: using CLI and downloading the zip file.
Using CLI

Directly downloading the zip file

It is recommended to install Cypress using CLI, as it is simple and easy. CLI handles all the installation process, so no manual intervention is required.
The following command can be run on the terminal to install Cypress.
npm install cypress --save-dev

To check that Cypress has been installed successfully, we can run the following command to check its version.
npx cypress --version

Step 3 - Installing LambdaTest Cypress CLI
LambdaTest Cypress CLI is the command-line interface that helps to run Cypress tests on the LambdaTest cloud grid. The following command can be run on the terminal to install the lambdatest-cypress-cli package:
npm install -g lambdatest-cypress-cli

To verify its successful installation, check its version by running the following command on the terminal.
lambdatest-cypress --version

A config file is required by the lambdatest-cypress-cli package that holds all the configuration details like the browser name, operating system details, lambdatest authentication details, run and tunnel settings. A default config file can be generated using the following command. This command should be executed after navigating to the project's root folder.
lambdatest-cypress init --cv=10
Once the command is executed successfully, a file named lambdatest-config.json should be generated in the project's root folder.
FileName: lambdatest-config.json
{
   "lambdatest_auth": {
      "username": "LT_USERNAME",
      "access_key": "LT_ACCESS_KEY"
   },
   "browsers": [
      {
         "browser": "Chrome",
         "platform": "macOS Ventura",
         "versions": [
            "latest-1"
         ]
      },
      {
         "browser": "MicrosoftEdge",
         "platform": "Windows 10",
         "versions": [
            "latest-1"
         ]
      }
   ],
   "run_settings": {
      "reporter_config_file": "",
      "build_name": "cypress-demo-run",
      "parallels": 2,
      "specs": "./cypress/e2e/*.cy.js",
      "ignore_files": "",
      "network": false,
      "headless": false,
      "npm_dependencies": {
         "cypress": "13.2.0",
         "@faker-js/faker": "^8.1.0"
      }
   },
   "tunnel_settings": {
      "tunnel": false,
      "tunnel_name": null
   }
}
The lambdatest-cypress-cli package will help in running the test on LambdaTest cloud grid. It will use the lambdatest-config.json file to get the test configurations.
The lambdatest-config.json file contains the following:
lambdatest_auth
This section includes the LambdaTest credentials to perform Cypress testing on the LambdaTest grid. You can leave the fields as default, we can supply these values using the CLI parameter --user=<LambdaTest Username> and --ak=<LambdaTest_Access_Key> in the terminal.
As per the LambdaTest Cypress CLI documentation, the following order of precedence is used to determine which auth credentials to use in case the user uses more than one option to pass the LambdaTest auth credentials:
CLI arguments > Options set in lambdatest-config.json > Environment variables.

browsers
This section is used for providing the browser, platform, and version on which the Cypress test automation has to be run. We can have multiple browser and OS combinations in an array. We will supply the browser and platform as discussed in the earlier section above.

run_settings
This section contains the desired capabilities of the Cypress test suite. build_name indicates the build name that will be used when performing Cypress testing on LambdaTest. parallels indicate the number of Cypress tests that will be run in parallel on the LambdaTest Grid. The value for parallels should be set based on the number of parallel sessions supported in our LambdaTest plan.
There is also an object named npm_dependencies in which we need to provide the dependencies we will use in our project. By default, Cypress is provided. However, we need to manually update the other dependencies' names here. For example, the @faker-js/faker dependency is used in this project for test data management.

Using ignore_files, we can ignore or exclude any Cypress test file from execution.
tunnel_settings
This section includes the settings for the LambdaTest tunnel. If the value for the "tunnel" key is set to "true", it means tunnel will be used; otherwise, false refers to no tunnel usage.
tunnelName is the name of the tunnel that connects the local system with LambdaTest servers via the SSH integration tunnel.

By default, the LambdaTest tunnel is disabled as its value is set to false. The tunnel with the specified name will automatically start once the Cypress test is triggered. Hence, there is no need to start the LambdaTest tunnel manually.
Now, let's move towards writing the first test using Cypress.
Writing the First Test Case Using Cypress
We will use the Input form demo page on LambdaTest's Selenium Playground to demo writing web automation tests using Cypress. The following is the Test Scenario we will work on
Test Scenario
- Open LambdaTest’s Selenium Playground
- Click on the Input Form Demo link
- Locate and enter values in all the fields on the Input Form Demo page
- Click on Submit button
- Assert the message "Thanks for contacting us, we will get back to you shortly." displayed after the form is submitted successfully.


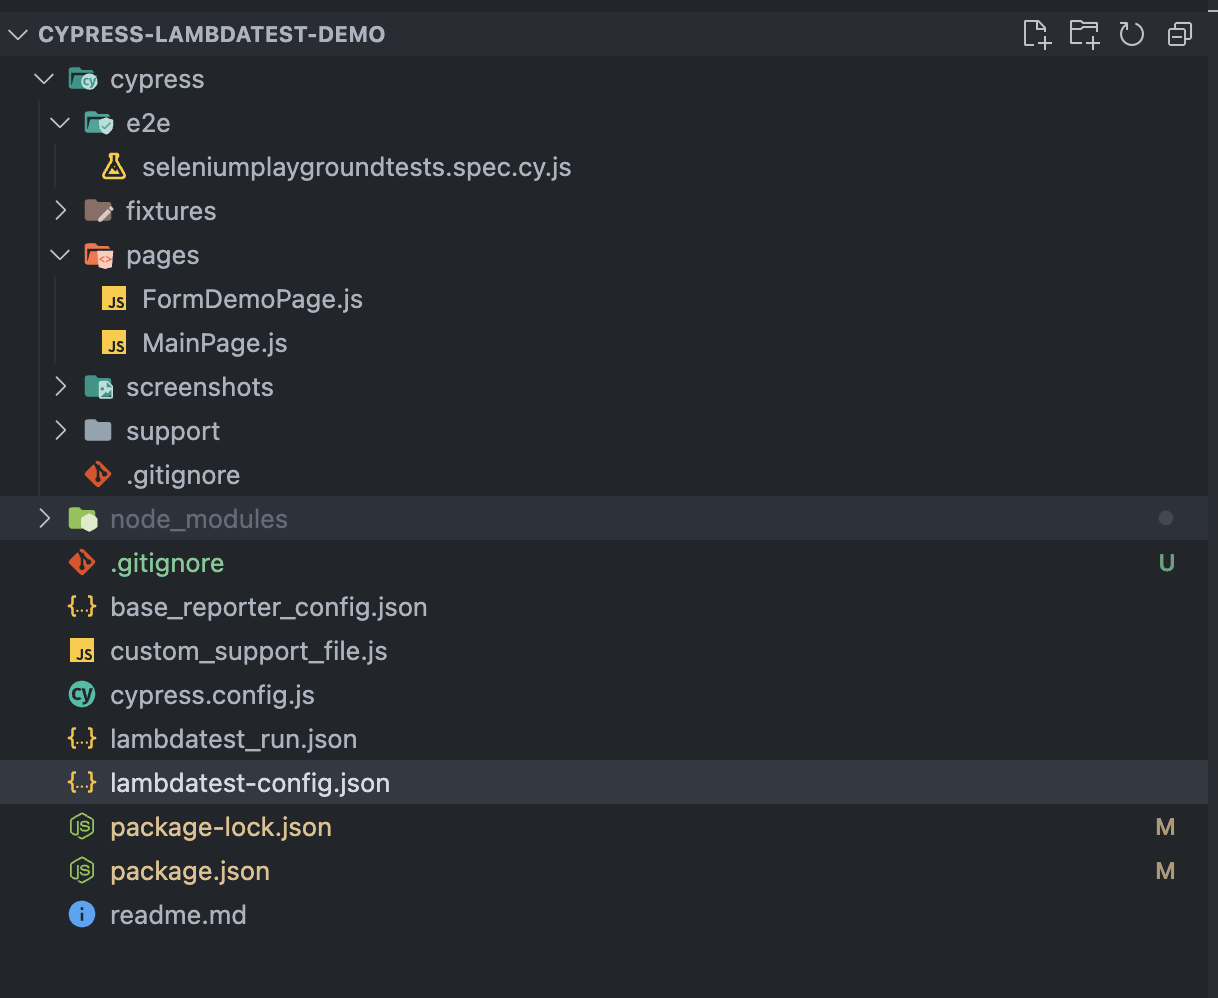
Project Structure
The project structure should look like the screenshot below once all the installation is complete.
Implementing the Test Scenarios
For writing the test, let's create a new file inside the e2e folder in the project and name it "seleniumplaygroundtests.spec.cy.js" and write the test in this file.
FileName: seleniumplaygroundtests.spec.cy.js
import mainPage from "../pages/MainPage.js";
import formDemoPage from "../pages/FormDemoPage.js";

describe("Selenium Playground Demo Tests for Form Demo Page", () => {
  it("should fill in the form on the form demo page and verify the success message", () => {
    cy.visit('https://www.lambdatest.com/selenium-playground/');
    mainPage.navigateToFormDemoPage();
    formDemoPage.fillForm();
    formDemoPage
      .getSuccessMessageText()
      .should(
        "have.text",
        "Thanks for contacting us, we will get back to you shortly."
      );
  });
});
Code Walkthrough
The cy.visit() method will help to navigate to the LambdaTest Selenium Playground website.

On the next line, the navigateToFormDemoPage() method will be called from the MainPage class. This method will open the Form Demo page.

FileName: MainPage.js
class MainPage {

  webElements = {
    inputFormDemoLink: () => cy.get(":nth-child(18) > .text-black")
  };

  navigateToFormDemoPage() {
    this.webElements.inputFormDemoLink().click();
  }
}
module.exports = new MainPage();
In the MainPage class, a map of WebElements has been created to hold all the locators of the Main Page of LambdaTest Selenium Playground website. The inputFormDemoLink property locates the Input Form Submit link on the Main Page.
Using Cypress’s interactive mode makes it easier to locate the selectors for the WebElements. To run Cypress in interactive mode, the following command should be run in the terminal
Step 1 - Execute the below command
npx cypress open

After running the command, Cypress should open in interactive mode

Step 2 - Select E2E Testing

Step 3 - Select the browser to run the test; we will select Chrome

Step 4 - Select the Test Spec to run the test

Step 5 - Locate the WebElement using Cypress’s inbuilt WebElement finder

To locate the WebElement in the interactive mode, we need to perform the following steps:
- Click on the Select Element button.
- Select the WebElement we need to locate
- Cypress will auto-locate the WebElement and provide its selector in the textbox displayed on the top next to the Select Element button.
- The selector displayed in the textbox can be copied using the Copy to clipboard button.
Here, we can see that for the "Input Form Submit" link, Cypress has provided us with the selector - cy.get(':nth-child(18) > .text-black').
This locator can be used in the page object class to locate the link and perform click on it.

inputFormDemoLink property is called in the navigateToFromDemoPage() method to perform the click action on it.
The next line in the test is to fill out the form provided on the Form Demo page.

In the FormDemoPage class,, a map of WebElements has been created that houses all the page objects for the Form Page. The fillForm() method in the FormDemoPage class performs all the interactions to fill up the form.
As we used the Cypress interactive mode to locate the Input Form Submit link WebElement. Similarly, we can use the interactive mode for locating all the fields on this Form Demo Page.
Let’s locate the Name field on this Form Demo page.

Cypress provides the selector along with the command to locate the Name field on the page - "cy.get('#name)". Likewise, we can locate the other fields on the page.
A map of WebElements has been created for all the fields on the page, and accordingly, all the properties from the webElements map are used in the fillForm() field to interact with all the respective fields.

Test data plays a vital role in the testing of any form. This data needs to be generated automatically so we don’t have to manage it every time we run the tests. Considering this, the @faker-js/faker library generates test data.
FileName: FormDemoPage.js
import { faker } from '@faker-js/faker';

class FormDemoPage {
  webElements = {
    nameField: () => cy.get("#name"),
    emailField: () => cy.get("#inputEmail4"),
    passwordField: () => cy.get("#inputPassword4"),
    companyField: () => cy.get("#company"),
    websiteField: () => cy.get("#websitename"),
    countryField: () => cy.get(":nth-child(3) > .pr-20 > .w-full"),
    cityField: () => cy.get("#inputCity"),
    addressLineOneField: () => cy.get("#inputAddress1"),
    addressLineTwoField: () => cy.get("#inputAddress2"),
    stateField: () => cy.get("#inputState"),
    zipCodeField: () => cy.get("#inputZip"),
    submitBtn: () => cy.get(".bg-lambda-900"),
    successMessageText: () => cy.get(".success-msg"),
  };

  fillForm() {
    this.webElements.nameField().type(faker.person.fullName());
    this.webElements.emailField().type(faker.internet.email());
    this.webElements.passwordField().type("Password@1234");
    this.webElements.companyField().type(faker.company.name());
    this.webElements.websiteField().type(faker.internet.domainName());
    this.webElements.countryField().select("India");
    this.webElements.cityField().type(faker.location.city());
    this.webElements
      .addressLineOneField()
      .type(faker.location.streetAddress(false));
    this.webElements.addressLineTwoField().type(faker.location.street());
    this.webElements.stateField().type(faker.location.state());
    this.webElements.zipCodeField().type(faker.location.zipCode());
    this.webElements.submitBtn().click();
  }

  getSuccessMessageText() {
    return this.webElements.successMessageText();
  }
}
module.exports = new FormDemoPage();
Next line in the test after filling up the form is to perform the assertion to verify the success message text. Cypress provides the ability to perform inline assertions by using the should() method and matching the text.

The getSuccessMessageText() method is called from the FormDemoPage class. This method returns the message text in the String format.
FileName: FormDemoPage.js

This marks the completion of our test.
Let’s now discuss how to run the tests on the LambdaTest cloud grid.
Running Automation Tests Using Cypress on Cloud Grid
We will run the tests on LambdaTest cloud grid using the following OS and browser combination.
| Operating System | Browser Name | Browser Version |
| MacOS Ventura | Chrome | 116(Latest) |
| Windows 10 | Microsoft Edge | 116(Latest) |
We will perform the test execution in parallel as we need to run the same test on two different browsers, i.e., Chrome and Microsoft Edge. Parallel execution of the tests helps in saving the test execution time because all tests are performed concurrently.
For running the tests in parallel we need to update the parallels in the run_settings section in the lambdatest-config.json file to run the tests in parallel.

We will use the lambdatest-cypress-cli package to run the tests on the LambdaTest cloud grid. To execute the tests, we need to run the following command from the terminal:
lambdatest-cypress run --user=<"YOUR LAMBDATEST USERNAME"> --ak=< "YOUR LAMBDATEST ACCESS KEY">
The LambdaTest Username and Access Key can be fetched by logging in to the LambdaTest website and navigating to Profile > Account Settings > Password and Security.


Tests executed on the LambdaTest Cloud grid can be viewed on the LambdaTest Dashboard. It provides a fair visibility of the test execution by providing step-by-step granular details of the test run in LambdaTest Test Analytics. Details like video recordings, device logs, screenshots, etc can also be viewed on it.
Check out the screenshots below, which will give you a fair insight into the dashboard for web automation tests.

The build details and the tests conducted are visible in the following screenshots. Each test includes the test name, browser name, browser version, OS name, respective OS version, and screen resolution.
It also has the video of the test that was run, giving a better idea about how tests were run on the browsers.


Running the Cypress test on the local machine
The following command can be used to run the Cypress tests on the Chrome browser on the local machine.
npx cypress run --browser=chrome


By default, all the local tests are executed in headless mode. After the execution, we have a video output in the videos folder. We can also see the video file path getting printed in the console.
Similarly, to execute the tests on the Microsoft Edge browser, the following command can be used:
npx cypress run --browser=edge

We can also add the test execution command in the "scripts" section in the package.json file. So, we run a shortcut command to run the tests and don’t have to remember the lengthy commands for running the tests.

Once the commands are updated in the "scripts" section, instead of running the command
npx cypress run --browser=chrome we can run the command npm run cypress:chrome to run the tests on the Chrome browser.


Likewise, the npm run cypress:edge command can be used now to run the tests on the Microsoft Edge browser.
Conclusion
Cypress is a popular web automation framework that allows automating web browser tests by running unit, integration, component, and end-to-end tests.
By integrating Cypress with cloud testing platforms like LambdaTest, you can run the web automation tests at scale on different platforms, browsers, and their respective versions without worrying about the operating system and browser installations, as all the infrastructure is provided on demand.
After the test execution is completed successfully, detailed insight into the tests can be viewed with all the granular details that can help with reporting to the software teams and the stakeholders.