
Tracing and Logging Technologies on Windows. Part 2 - Simple Ways Tracing in the Kernel Mode
5.00/5 (6 votes)
Discussion of simple ways of tracing and also new tracing technologies involved in Windows 10
Table of Contents
- Introduction
- Text output with DbgPrint
- System Wide String from Kernel Mode
- Receiving System Wide String Kernel Output
- Receiving DbgPrint in the Kernel Mode
- Filtering DbgPrint Output
- Code Samples
Introduction
The kernel drivers also require the ability for tracing their workflow. In case of crash inside the driver, user will get the BSOD and that's why before finalizing the driver for the production, it is necessary to properly check the whole workflow and processing. For that, we can also use some basic methods. This topic describes simple ways for the drivers to communicate with the host application for tracing purposes. We also research how those methods work including some system internals.
Text Output with DbgPrint
Output debug information is also suitable for kernel drivers. For that designed the API’s DbgPrint and DbgPrintEx. They use format strings with variable arguments. In addition, DbgPrintEx allows to specify id of the component and message level. So how can we see those outputs with the DbgPrint API calls from the drivers? And again, the DbgView tool will help us in that. That tool allows capturing output from Windows applications and also from the kernel drivers. How it works in the user mode applications, we figured out previously. Now it’s time to find out how it is done in the kernel.
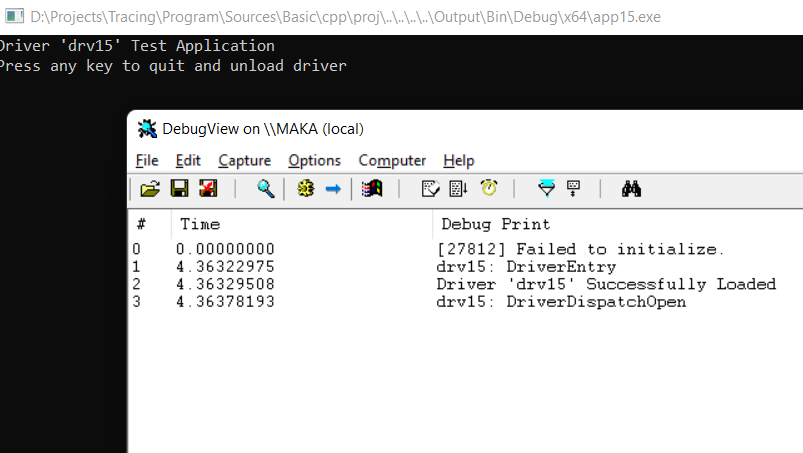
It is good practice to add name prefix into your debug output message text which is printed from the driver, as the DebugView tool allows filtering by containing text in the message. To display how DbgView performs output for the drivers, let's add some DbgPrint calls into certain functions of a simple kernel mode driver. For example, in the driver’s IRP_MJ_CREATE dispatch handler routine, we have the following code:
EXTERN_C NTSTATUS DriverDispatchOpen(IN PDEVICE_OBJECT pDO, IN PIRP Irp)
{
    PAGED_CODE();
    UNREFERENCED_PARAMETER (pDO);

    DbgPrint("%S: %s\n",DRIVER_NAME,__FUNCTION__);

    Irp->IoStatus.Status = STATUS_SUCCESS;
    Irp->IoStatus.Information = 0;

    IoCompleteRequest( Irp, IO_NO_INCREMENT );
    return STATUS_SUCCESS;
}
Once we start a test application which loads the driver, we can see output from the driver in the DbgView application:
For receiving kernel notifications in DbgView, it is required to start an application with administrator rights and enable Capture Kernel under applications Capture menu.

The DbgPrint API is also available for user mode applications, as it is exported from ntdll.dll. That can be implemented in the following way:
ULONG DbgPrint(PCSTR Format,...) {
    ULONG result = STATUS_INVALID_PARAMETER;
    if (Format) {
        typedef ULONG(__cdecl * PDbgPrint)(PCSTR Format, ...);
        HMODULE ntdll = LoadLibraryA("ntdll.dll");
        if (ntdll) {
            PDbgPrint DbgPrint = (PDbgPrint)GetProcAddress(ntdll, "DbgPrint");
            result = ERROR_BAD_DLL_ENTRYPOINT;
            va_list    args;
            va_start(args, Format);
            int _length = _vscprintf(Format, args) + 1;
            char * _string = (CHAR *)malloc(_length);
            if (_string) {
                __try {
                    memset(_string, 0, _length);
                    _vsprintf_p(_string, _length, Format, args);
                    if (DbgPrint) {
                        result = DbgPrint(_string);
                    }
                }
                __finally {
                    free(_string);
                }
            }
            else {
                result = STATUS_INVALID_PARAMETER;
            }
            va_end(args);
            FreeLibrary(ntdll);
        }
        else {
            result = ERROR_DLL_NOT_FOUND;
        }
    }
    return result;
}
If the debugger is attached to the application, then we receive the same notifications in the output window as we had with OutputDebugString implementation. You can see the execution of the code in the screenshot below:

And .NET implementation example of the DbgPrint usage:
class Program
{
    [DllImport("ntdll.dll", CharSet = CharSet.Ansi)]
    static extern int DbgPrint(string Format, __arglist);

    [DllImport("ntdll.dll", CharSet = CharSet.Ansi)]
    static extern int DbgPrint(string Format);

    static void Main(string[] args)
    {
        DbgPrint("This text output with DbgPrint implementation\n");
        Console.WriteLine("Press any key to quit");
        Console.ReadKey();
    }
}
In case there is no text in output window in your C# implementation, then you need to enable native code debugging option in project settings. If there is no debugger attached in the user mode, then the function is passed to the kernel debugger.
System Wide String from Kernel Mode
The DbgPrint API does not output text information to the system wide section as the OutputDebugString does. But it will be good if we can have output in the same ways, so we can use the tool created previously for receiving system wide strings. The kernel objects such as events, mutexes, sections, semaphores are managed by the system, and they can persist in the user mode applications and in the kernel. As we have named objects, then we can try to open and use them in the kernel driver. Let's see how it can be done. First, we create our shared objects, and use for that ZwOpenEvent and ZwOpenSection kernel APIs. First API for opening the event and the second one is for the section.
// Create shared objects
if (NT_SUCCESS(Status)) {
    OBJECT_ATTRIBUTES Attributes = { 0 };
    UNICODE_STRING Name = { 0 };
    RtlInitUnicodeString(&Name, L"\\BaseNamedObjects\\DBWIN_BUFFER");
    InitializeObjectAttributes(&Attributes, &Name,
                               (OBJ_CASE_INSENSITIVE | OBJ_KERNEL_HANDLE), NULL, NULL);
    Status = ZwOpenSection(&hMap, SECTION_MAP_WRITE, &Attributes);
}
if (NT_SUCCESS(Status)) {
    OBJECT_ATTRIBUTES Attributes = { 0 };
    UNICODE_STRING Name = { 0 };
    RtlInitUnicodeString(&Name, L"\\BaseNamedObjects\\DBWIN_BUFFER_READY");
    InitializeObjectAttributes(&Attributes, &Name,
                               (OBJ_CASE_INSENSITIVE | OBJ_KERNEL_HANDLE), NULL, NULL);
    Status = ZwOpenEvent(&hBufferReady, SYNCHRONIZE, &Attributes);
}
if (NT_SUCCESS(Status)) {
    OBJECT_ATTRIBUTES Attributes = { 0 };
    UNICODE_STRING Name = { 0 };
    RtlInitUnicodeString(&Name, L"\\BaseNamedObjects\\DBWIN_DATA_READY");
    InitializeObjectAttributes(&Attributes, &Name,
                               (OBJ_CASE_INSENSITIVE | OBJ_KERNEL_HANDLE), NULL, NULL);
    Status = ZwOpenEvent(&hDataReady, EVENT_MODIFY_STATE, &Attributes);
}
The naming of the shared objects in the kernel should start with the \BaseNamedObject\ prefix. The WinObj tool can be used to see the global objects on the system.

In the code, we are only interested in opening already created objects like we did for OutputDebugString implementation in the previous part, so let the receiver application such as DbgView create those objects. If they are not created, then no applications are waiting for trace messages and we can skip output. Next step is the actual text output. The operations for mapping shared data and writing text into the mapped pointer are done similar to the user mode implementation, but here, we use another API for mapping shared data in the kernel mode: ZwMapViewOfSection.
__try {
    PVOID pBuffer = nullptr;
    size_t view_size = 0;
    if (hMap && hBufferReady && hDataReady) {
        // Map section buffer
        Status = ZwMapViewOfSection(hMap, ZwCurrentProcess(), &pBuffer, 0, 0, 0,
            &view_size, ViewUnmap, 0, PAGE_READWRITE);
    }
    // Be sure that we have enough space and buffer pointer
    if (pBuffer && view_size > 5) {
        if (view_size > 0x1000) view_size = 0x1000;
        size_t cch = strlen(text);
        const char * p = text;
        while (cch > 0) {
            // Split message as shared buffer have 4096 bytes length
            size_t length = view_size - 5;
            if (cch < length) {
                length = cch;
            }
            // Wait for buffer to be free
            if (STATUS_SUCCESS == (Status = ZwWaitForSingleObject
                                  (hBufferReady, FALSE, &timeout))) {
                // First 4 bytes is the process ID
                *((ULONG32*)pBuffer) = pid;
                memcpy((PUCHAR)pBuffer + sizeof(ULONG32), p, length);
                // Append string end character for large text
                ((PUCHAR)pBuffer)[length + 4] = '\0';
                LONG lPrevState = 0;
                // Notify that message is ready
                ZwSetEvent(hDataReady, &lPrevState);
            }
            else {
                break;
            }
            cch -= length;
            p += length;
        }
        // Unmap shared buffer
        ZwUnmapViewOfSection(ZwCurrentProcess(), pBuffer);
    }
}
__finally {
    if (hBufferReady) ZwClose(hBufferReady);
    if (hDataReady) ZwClose(hDataReady);
    if (hMap) ZwClose(hMap);
}
There is no ability for creating shared mutexes on the system from the kernel mode side. In the previous OS versions, the functions which operate with the mutexes ZwOpenMutant or ZwCreateMutant and ZwReleaseMutant were available in ntoskrnl.lib. But, since Windows Vista ntoskrnl.exe contains those APIs but they are not exported, and there is no direct way to call them. Due to that, we will make string output without shared mutex. The algorithm of the implementation is similar to the user mode application we discussed in the previous article. The difference is only in the used function calls.
We put our implementation into the function WriteSharedDebugOutputText which accepts the text and ProcessId as arguments. Then we modify IRP_MJ_CREATE dispatch handler and add the call of our API into its implementation.
EXTERN_C NTSTATUS DriverDispatchOpen(IN PDEVICE_OBJECT pDO, IN PIRP Irp)
{
    PAGED_CODE();
    UNREFERENCED_PARAMETER (pDO);

    DbgPrint("%S: %s\n",DRIVER_NAME,__FUNCTION__);

    PEPROCESS process = PsGetCurrentProcess();
    ULONG32 pid = process ? (ULONG32)HandleToHandle32(PsGetProcessId(process)) : 0;
    WriteSharedDebugOutputText("Test Message From Driver", pid);

    Irp->IoStatus.Status = STATUS_SUCCESS;
    Irp->IoStatus.Information = 0;

    IoCompleteRequest( Irp, IO_NO_INCREMENT );
    return STATUS_SUCCESS;
}
Now we can check the result in the DbgView application.

As was discussed, for the shared kernel objects naming in the driver implementation, we use the prefix \BaseNamedObject\. You can see the kernel object names which are created in the application in the Process Explorer tool, which I showed earlier in the previous article. The full object name can contain session prefix and session number. The actual full object name is possible to obtain with the NtQueryObject API which is also available in the user mode. For example, usage of this API we create or open our named shared section object.
WCHAR Name[] = L"DBWIN_BUFFER";
HANDLE hMap = OpenFileMappingW(FILE_MAP_READ, FALSE, Name);
if (!hMap) {
    SECURITY_DESCRIPTOR SecurityDescriptor = { 0 };
    SECURITY_ATTRIBUTES sa = { 0 };
    InitializeSecurityDescriptor(&SecurityDescriptor, SECURITY_DESCRIPTOR_REVISION);
    SetSecurityDescriptorDacl(&SecurityDescriptor, TRUE, 0, 0);
    sa.nLength = sizeof(sa);
    sa.bInheritHandle = FALSE;
    sa.lpSecurityDescriptor = &SecurityDescriptor;
    hMap = CreateFileMappingW(INVALID_HANDLE_VALUE, &sa,
                              PAGE_READWRITE, 0, 0x1000, Name);
}
So, we have a section object in the user mode application which we create just with the name string DBWIN_BUFFER. The calling of the NtQueryObject API for the requesting name information can be done in the next way:
HMODULE ntdll = LoadLibraryA("ntdll.dll");
typedef NTSTATUS(NTAPI * PFN_NtQueryObject)(HANDLE, ULONG, PVOID, ULONG, PULONG);
PFN_NtQueryObject NtQueryObject =
   (PFN_NtQueryObject)GetProcAddress(ntdll, "NtQueryObject");
ULONG _size = 0;
// First get the size, if it failed then size remain zero
NtQueryObject(hMap, ObjectNameInformation, NULL, 0, &_size);
// We allocate more space for zero ending unicode string
PUNICODE_STRING text = (PUNICODE_STRING)malloc(_size + 2);
if (text) {
    // Fill with zeroes to have proper line ending
    memset(text, 0x00, _size + 2);
    if (0 == NtQueryObject(hMap, ObjectNameInformation, text, _size, &_size)) {
        // Display if we have something
        if (text->Length > 0 && text->Buffer) {
            wprintf(L"Object Name: \"%s\"\n", text->Buffer);
        }
    }
    free(text);
}
It is possible to see the result of the code in the following screenshot:

Actually, the NtQueryObject with the request of ObjectNameInformation returns the structure OBJECT_NAME_INFORMATION which has the following declaration.
typedef struct _OBJECT_NAME_INFORMATION {
    UNICODE_STRING Name;
} OBJECT_NAME_INFORMATION, *POBJECT_NAME_INFORMATION;
But in the example, we just cast it directly into the pointer to the UNICODE_STRING structure. Requesting the ObjectNameInformation with NtQueryObject is undocumented. To make a .NET implementation of this code, first, open or create a mapped object, same like we did in the previous part.
MemoryMappedFile MappedFile = null;
 try
{
    MappedFile = MemoryMappedFile.OpenExisting(
        object_names[i], MemoryMappedFileRights.Read);
}
catch
{
}
if (MappedFile == null)
{
    MemoryMappedFileSecurity memory_security = new MemoryMappedFileSecurity();
    memory_security.AddAccessRule(new AccessRule<MemoryMappedFileRights>(
            new SecurityIdentifier("S-1-1-0"), MemoryMappedFileRights.ReadWrite,
            AccessControlType.Allow));

    MappedFile = MemoryMappedFile.CreateOrOpen(object_names[i], 0x1000,
        MemoryMappedFileAccess.ReadWrite,
        MemoryMappedFileOptions.None,
        memory_security, System.IO.HandleInheritability.None);
}
The wrapper function of the NtQueryObject API in C# looks like the following:
[DllImport("ntdll.dll")]
static extern int NtQueryObject([In] IntPtr Handle,
    [In] int ObjectInformationClass,
    [In,Out] IntPtr ObjectInformation,
    [In,MarshalAs(UnmanagedType.U4)] int ObjectInformationLength,
    [Out, MarshalAs(UnmanagedType.U4)] out int ReturnLength);
We do similar to the C++ implementation here. Request the size in the first call of the NtQueryObject and then allocate the memory for the structure mentioned above. We allocate extra 2 bytes to have zero ending unicode string for proper marshaling. Otherwise, we need to perform different marshaling methods.
int size = 0;
// Get the size of the structure in bytes
NtQueryObject(
    MappedFile.SafeMemoryMappedFileHandle.DangerousGetHandle(),
    ObjectNameInformation, IntPtr.Zero, 0, out size);
// We allocate here 2 more bytes for proper marshaling to structure
IntPtr p = Marshal.AllocCoTaskMem(size + 2);
if (p != IntPtr.Zero)
{
    try
    {
        if (0 == NtQueryObject(
            MappedFile.SafeMemoryMappedFileHandle.DangerousGetHandle(),
            ObjectNameInformation, p, size, out size))
        {
            // This will work, as we allocate 2 bytes for zero ending string
            UNICODE_STRING text = Marshal.PtrToStructure<UNICODE_STRING>(p);
            if (text.Length != 0)
            {
                Console.WriteLine("{0} Object Name: \"{1}\"", object_info[i], text.Buffer);
            }
        }
    }
    finally
    {
        Marshal.FreeCoTaskMem(p);
    }
}
After requesting information, we cast a pointer type to the UNICODE_STRING structure. That structure has Length and MaximumLength fields along with the Buffer string pointer. Length specified the string length of the Buffer pointer in bytes. This string may not have a zero ending. But we do not have an issue here with the string pointer marshaling as we allocate extra 2 bytes, and the memory filled with zeroes after allocation. So we have a zero-ending string in any case. The code gives the same result as C++ implementation.

Receiving System Wide String Kernel Output
If you start the application from the previous article which receives system wide strings, and at the same time, launch the driver control application, then you will not see the text output which we do during opening the device. However, the DbgView application displays it properly. You also can try uncheck the option Capture Global Win32 and then our text message from the driver does not appear. From that, we can make a decision that the receiving OutputDebugString from the kernel has a difference in the implementation. You can start the Process Explorer tool during running the DbgView, open the handles tab and compare it content with checked and unchecked option Capture Global Win32 in the DbgView.

You can see the difference in the Event, Section and Mutant objects. More of it, if the option Capture Global Win32 unchecked, then the WinObj tool does not display the named handles like we showed before.

So, we can see that the global objects do not contain session prefix and the number in their names. Then we tried to create the object with the same name as in the kernel, then we got errors: ERROR_PATH_NOT_FOUND or ERROR_BAD_PATHNAME. You can try it with the next code:
WCHAR Names[][100] = {
    L"\\BaseNamedObjects\\DBWIN_BUFFER",
    L"BaseNamedObjects\\DBWIN_BUFFER"
};
HANDLE hMap = NULL;
for (int i = 0; i < _countof(Names) && !hMap; i++) {
    hMap = OpenFileMappingW(FILE_MAP_READ, FALSE, Names[i]);
    if (!hMap) {
        hMap = CreateFileMappingW(INVALID_HANDLE_VALUE, &sa,
               PAGE_READWRITE, 0, 0x1000, Names[i]);
    }
    if (!hMap) {
        wprintf(L"Error [%s]\t%08d\n", Names[i], GetLastError());
    }
}
if (hMap) {
    wprintf(L"Succeeded\n");
    CloseHandle(hMap);
}
The result of execution of this code is that the section is not able to be opened or created.

We have similar results with the .NET implementation. Only difference is that we receive exceptions during the opening or creation of mapped section.
string[] Names = {
            "\\BaseNamedObjects\\DBWIN_BUFFER",
            "BaseNamedObjects\\DBWIN_BUFFER"
        };

foreach (var name in Names)
{
    MemoryMappedFile MappedFile = null;
    try
    {
        MappedFile = MemoryMappedFile.OpenExisting(
            name, MemoryMappedFileRights.Read);
    }
    catch
    {
    }
    if (MappedFile == null)
    {
        try
        {
            MappedFile = MemoryMappedFile.CreateOrOpen(name, cch,
                MemoryMappedFileAccess.ReadWrite,
                MemoryMappedFileOptions.None,
                memory_security, System.IO.HandleInheritability.None);
        }
        catch (Exception exception)
        {
            Console.Write("Error [{0}]\t0x{1:X8}\t{2}",name,
                exception.HResult, exception.Message);
        }
    }
    if (MappedFile != null)
    {
        Console.WriteLine("\nSucceeded");
        MappedFile.Dispose();
    }
}
In the exception handler, we display HRESULT and error text information. You can see that the error number is the same: we must exclude 0x80070000 and the result will be an error code. The result of the execution code above is next:

As we see, the BaseNamedObjects is the special object namespace for the shared objects which can be accessed for kernel and from user mode. By default, the applications created objects in the current session BaseNamedObjects namespace. To explicitly create an object in the global or session namespace, application can use object names with a Global\ or Local\ prefix. This means that for accessing shared objects from the user mode application, we should use the Global\ prefix. Once we try to create an object with that prefix, then we can see the proper object name in our test code.
WCHAR Name[] = L"Global\\DBWIN_BUFFER";
HANDLE hMap = OpenFileMappingW(FILE_MAP_READ, FALSE, Name);
if (!hMap) {
    hMap = CreateFileMappingW(INVALID_HANDLE_VALUE, &sa, PAGE_READWRITE, 0, 0x1000, Name);
}
if (hMap && hMap != INVALID_HANDLE_VALUE) {
    ULONG _size = 0;
    // First get the size, if it failed then size remain zero
    NtQueryObject(hMap, ObjectNameInformation, NULL, 0, &_size);
    // We allocate more space for zero ending unicode string
    POBJECT_NAME_INFORMATION text = (POBJECT_NAME_INFORMATION)malloc(_size + 2);
    if (text) {
        // Fill with zeroes to have proper line ending
        memset(text, 0x00, _size + 2);
        if (0 == NtQueryObject(hMap, ObjectNameInformation, text, _size, &_size)) {
            if (text->Name.Length > 0 && text->Name.Buffer) {
                wprintf(L"Global Object Name: \"%s\"\n", text->Name.Buffer);
            }
        }
        free(text);
    }
    CloseHandle(hMap);
}
Right now, we can compare created object names:

If you launch code above as non admin, then the creation mapped section with the Global\ prefix will fail with the ERROR_ACCESS_DENIED error code.

With such a prefix, we are also able to create the global section object in the .NET application. We got the same name as in the screenshot above when we started as admin. But if we are launched as a particular user, then the execution comes into the infinite loop while performing the call of the MemoryMappedFile.CreateOrOpen method with the global section. We also can see the System.IO.FileNotFoundException exception on the output window. But this exception is handled internally which causes the CreateOrOpen method to hang.

In the receiver test application, we need to create all objects with the Global\ prefix to be able to communicate with the driver and receive shared text. We modify an example from the previous article and see the results.

Receiving DbgPrint in the Kernel Mode
As was mentioned, DbgView allows us to display messages from the kernel drivers which output with the DbgPrint calls. For that, the DbgView application uses their driver, which handles receiving notifications of the DbgPrint and provides output to the host application. To receive such notifications, we can use undocumented DbgSetDebugPrintCallback API in our driver. By this API, we set our callback which will be called once output text is performed in kernel mode with functions DbgPrint, KdPrint or their variants.
// Set The DbgPrint Callback
DbgSetDebugPrintCallback(DebugPrintCallback,TRUE);
First argument of that API is the callback routine and the second argument is the boolean variable which enables or disables callback notifications. Let's design our callback function to output a string into the shared section of the DebugOutputString which we designed previously, so we can receive it in the common way in our test application or in the DbgView application. Our callback implementation will be done in the following way:
EXTERN_C VOID DebugPrintCallback(PSTRING Output, ULONG ComponentId, ULONG Level)
{
    UNREFERENCED_PARAMETER(ComponentId);
    UNREFERENCED_PARAMETER(Level);
    if (Output && Output->Length) {
        KIRQL irql;
        KeAcquireSpinLock(&s_DebugSpinLock,&irql);
        __try {
            // Allocate buffer for output
            size_t cch = (Output->Length + 1) + 200;
            PCHAR text = (PCHAR)ExAllocatePool(NonPagedPool, cch);
            if (text) {
                __try {
                    const char temp[] = ">> DBGPRINT: \"";
                    size_t cb = strlen(temp);
                    // Fill with zeroes
                    memset(text, 0x00, cch);
                    char * p = text;
                    // Put prefix
                    memcpy(p, temp, cb);
                    p += cb;
                    // Add content
                    memcpy(p, Output->Buffer, Output->Length);
                    p += Output->Length;
                    // If it ended with line break just skip it
                    if (p[-1] == '\n') p--;
                    // Append line ending
                    *p++ = '"'; *p++ = '\0';
                    // Output
                    MyOutputDebugString(text);
                }
                __finally {
                    ExFreePool(text);
                }
            }
        }
        __finally {
            KeReleaseSpinLock(&s_DebugSpinLock,irql);
        }
    }
}
Callback receives id of the component and message level which are passed to DbgPrintEx or DbgPrint APIs, so in implementation possible to perform own filtering based on those values. The callback is called after passing internal filtering.
To have the ability to display output in user mode applications, we will use the function which we implemented previously. We add the prefix “>> DBGPRINT:” text to the beginning of the message and call our kernel DebugOutputString implementation. In the DebugOutputString kernel implementation, we call our WriteSharedDebugOutputText to output system wide strings or make delayed execution based on IRQL level, what for that is necessary I will describe later in the next topics. Setting and removing callbacks along with the processing output are held with spin lock. So execution of the WriteSharedDebugOutputText function is done from the callback at DPC level.
As the usage of receiving notification is not documented, it may make sense to raise execution to SYNCH level by using the KeAcquireSpinLockRaiseToSynch API with the spin lock instead of KeAcquireSpinLockRaiseToDpc API, but for me it is working fine.
EXTERN_C NTSTATUS MyOutputDebugString(LPCSTR pszText) {
    NTSTATUS Status = STATUS_INVALID_PARAMETER;
    if (pszText && strlen(pszText)) {
        size_t cch = (strlen(pszText) + 1);
        char * text = (char *)ExAllocatePool(NonPagedPool,cch);
        if (text) {
            __try {
                memset(text, 0x00, cch);
                memcpy(text, pszText, cch - 1);

                PEPROCESS process = PsGetCurrentProcess();
                ULONG32 pid = process ? (ULONG32)HandleToHandle32(PsGetProcessId(process)) : 0;
                if (PASSIVE_LEVEL == KeGetCurrentIrql()) {
                    // For Passive level just write the text
                    Status = WriteSharedDebugOutputText(text, pid);
                }
                else {
                    LARGE_INTEGER time_out = { 0 };
                    Status = KeWaitForSingleObject
                             (&s_Lock, Executive, KernelMode, FALSE, &time_out);
                    if (Status == STATUS_SUCCESS) {
                        __try {
                            if (s_pDeviceObject) {
                                // Otherwise perform delayed processing
                                PIO_OUTPUT_TEXT io = (PIO_OUTPUT_TEXT)ExAllocatePool(
                                                      NonPagedPool,
                                                      sizeof(IO_OUTPUT_TEXT));
                                if (io) {
                                    memset(io, 0x00, sizeof(IO_OUTPUT_TEXT));
                                    io->Item = IoAllocateWorkItem(s_pDeviceObject);
                                    if (io->Item) {
                                        io->Pid = pid;
                                        io->Text = text;
                                        text = nullptr;
                                        IoQueueWorkItem(io->Item,
                                                        StringOutputWorkItemProc,
                                                        DelayedWorkQueue, io);
                                        Status = STATUS_SUCCESS;
                                    }
                                    else {
                                        Status = STATUS_UNSUCCESSFUL;
                                        ExFreePool(io);
                                    }
                                }
                            }
                            else {
                                Status = STATUS_DEVICE_DOES_NOT_EXIST;
                            }
                        }
                        __finally {
                            KeReleaseMutex(&s_Lock, FALSE);
                        }
                    }
                }
            }
            __finally {
                if (text) ExFreePool(text);
            }
        }
        else {
            Status = STATUS_NO_MEMORY;
        }
    }
    return Status;
}
To remove callback from receiving notification, we need to pass FALSE as the second argument in DbgSetDebugPrintCallback API call.
Result execution of our driver with the DbgView.

As you can see, one message has PID number 4. This is a system process at which DriverEntry is called.
Result of execution with the forwarding DbgPrint output into the system wide string buffer and receiving in our test application.

Sometimes, you can start the DbgView tool and see that the capture kernel does not work, as driver dbgv.sys which is used by the tool is locked on the system.

This may have happened because the debug notifications callback was not removed and the driver file unable to be replaced and loaded. There is a little trick to solve that. First, that sys file unpacked from tool resources into the System32\drivers folder. As the file is locked, you can’t delete it which causes the mentioned issue. But, to make the tool workable back without restarting the PC, it is possible just to rename that file and restart the DbgView tool which starts working properly. You can see that the new dbgv.sys file appears in the target folder, but the renamed file stays locked until you reboot. On the next screenshot, I rename the dbgv.sys into _dbgv.sys and try to delete it.

Filtering DbgPrint Output
As we see in the implementation of debug print callback code above, in addition to text, we have the component id and the level. Those parameters are passed with the DbgPrintEx function along with the formatted string arguments. The DbgPrint API does not contain the level and component id. In Windows Vista and later versions of Windows, all messages sent by DbgPrint and KdPrint are associated with the DEFAULT component. So internally, it calls DbgPrintEx with DPFLTR_DEFAULT_ID as component value and DPFLTR_INFO_LEVEL as level. Instead of DPFLTR_DEFAULT_ID can be used “-1” cast to ULONG.
If we try to launch the driver test application with handling receiving system wide strings but without starting DbgView tool, or disable the "Capture Kernel" option in there, then we will be unable to receive DbgPrint notifications which showed previously. That happened because before the text from the DbgPrint API proceeded to the callbacks, it checked internally for filter settings by those component Id and the level values. And if the passed level is enabled for the target component, then callback receives it. That settings are system wide and the DbgView tool enables them once the "Capture Kernel" option is enabled and reset them back on application exits. So we need to set up those filtering settings to be able to receive notifications.
The default filtering can be enabled or disabled by modifying registry values. The settings are located at HKLM\SYSTEM\CurrentControlSet\Control\Session Manager\Debug Print Filter registry key. If there is no Debug Print Filter key at all, then this means that there are no filtering settings yet. You can create this key and set up the default filtering values. Each entry value has the name of the component and represents the default filtering level as DWORD. The level value is the bit field mask combinations in range from 0 to 32. The major level bit values you can find in the dpfilter.h SDK header file.
#define DPFLTR_ERROR_LEVEL 0
#define DPFLTR_WARNING_LEVEL 1
#define DPFLTR_TRACE_LEVEL 2
#define DPFLTR_INFO_LEVEL 3
#define DPFLTR_MASK 0x80000000
The names of the components also can be found in the same header file in the DPFLTR_TYPE enumeration. It appears as DPFLTR_XXXX_ID where XXXX is the component name which should be used in the registry. Name must be created in upper case.
typedef enum _DPFLTR_TYPE {
    DPFLTR_SYSTEM_ID = 0,
    DPFLTR_SMSS_ID = 1,
    DPFLTR_SETUP_ID = 2,
    DPFLTR_NTFS_ID = 3,
    DPFLTR_FSTUB_ID = 4,
    DPFLTR_CRASHDUMP_ID = 5,
    DPFLTR_CDAUDIO_ID = 6,
    DPFLTR_CDROM_ID = 7,
    DPFLTR_CLASSPNP_ID = 8,
    DPFLTR_DISK_ID = 9,
    DPFLTR_REDBOOK_ID = 10,
    DPFLTR_STORPROP_ID = 11,
    DPFLTR_SCSIPORT_ID = 12,
    DPFLTR_SCSIMINIPORT_ID = 13,
    //...
    //...
    DPFLTR_FSLIB_ID = 154,
    DPFLTR_ENDOFTABLE_ID
} DPFLTR_TYPE;
For example, if we want to enable receiving all default component notifications, we should create a value with name DEFAULT and set value as 0xff.

Alter reboot all notifications with the default component id (DPFLTR_DEFAULT_ID) and the level which is enabled in the registry will be provided to the DbgPrintCallback.
Those settings loaded once the PC started. The filtering settings of the current session can be modified with the WinDbg.
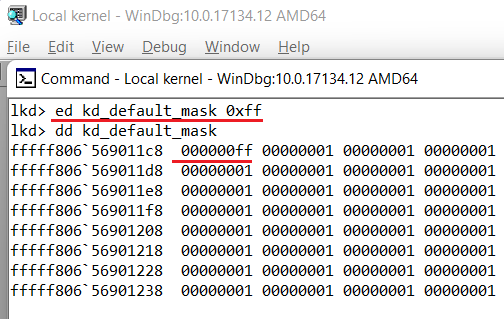
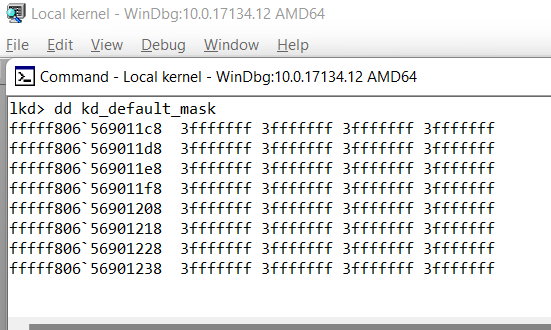
To specify a new filter mask for the component, you should start a local or remote kernel debugging session. And access the symbol Kd_XXXX_Mask where XXXX is the desired component name. To display mask value, it is possible to use the dd command of the WinDbg. It has a component symbol mask as an argument. Example of displaying the usage for the default component id (DPFLTR_DEFAULT_ID).

To modify mask value can be used the ed command, which has filter level value argument along with the component symbol mask.
WinDbg allows you to get output from the DbgPring API but since Windows Vista this works only with remote debugging mode. In the WinDbg, the content of the DbgPrint buffer is displayed immediately in the Debugger Command window, unless it disabled by using the Buffer DbgPrint Output option of GFlags. This application is part of the Debugging Tools For Windows.

The GFlags tool stores those parameters at HKLM\SYSTEM\CurrentControlSet\Control\Session Manager\GlobalFlag DWORD value. It contains bitwise combinations of the specified flags. The suppress debugger output flag is called FLG_DISABLE_DBGPRINT and has the value of 0x08000000.
If the DbgView tool is able to configure component filtering settings at runtime, then we also can try to enable or disable filtering programmatically. For that, there are two functions in the system which are related to debug filtering and allowing to control those settings programmatically. One for query filter settings and another for changing those settings. Those functions are not documented. They are available in kernel: DbgSetDebugFilterState, DbgQueryDebugFilterState and in user mode: NtSetDebugFilterState, NtQueryDebugFilterState.
To see how that function works, we can implement a simple application which we start before enabling the Capture Kernel option along with the Enable Verbose Kernel Output in the DbgView tool.
// Maximum number of levels
const ULONG DPFLTR_LEVEL_MAX = 0x1E;
// The component id
ULONG ComponentId = DPFLTR_DEFAULT_ID;
ULONG Mask = 0;
ULONG Level = 0;
while (Level < DPFLTR_LEVEL_MAX) {
    // Request value for selected level
    if (NtQueryDebugFilterState(ComponentId, Level)) {
        // Build mask
        Mask |= (1 << Level);
    }
    Level++;
}
// Display the mask
wprintf(L"DPFLTR_DEFAULT_ID Filter Mask: \"%08X\"\n",Mask);
In this code, we build a level mask for the default component id (DPFLTR_DEFAULT_ID) and display it. Result of this code execution before DbgView is:
![]()
This means only error messages with DPFLTR_ERROR_LEVEL are passed into the debug print callback by default. And once the DbgView tool is started, you can compare the mask:

That mask, you also can check with the WinDbg as discussed earlier.
The .NET implementation of this code looks similar. We just need to create wrapper for the NtQueryDebugFilterState API.
[DllImport("ntdll.dll", CallingConvention = CallingConvention.Cdecl)]
[return: MarshalAs(UnmanagedType.U1)]
static extern bool NtQueryDebugFilterState(
       [In, MarshalAs(UnmanagedType.U4)] int ComponentId,
       [In, MarshalAs(UnmanagedType.U4)] int Level);

const int DPFLTR_LEVEL_MAX = 0x1E;
const int DPFLTR_DEFAULT_ID = 101;

// The component id
int ComponentId = DPFLTR_DEFAULT_ID;
int Mask = 0;
int Level = 0;
while (Level<DPFLTR_LEVEL_MAX)
{
    // Request value for selected level
    if (NtQueryDebugFilterState(ComponentId, Level))
    {
        // Build mask
        Mask |= (1 << Level);
    }
    Level++;
}
// Display the mask
Console.WriteLine("DPFLTR_DEFAULT_ID Filter Mask: \"{0:X8}\"\n", Mask);
Let's integrate the full functionality. In the application before loading the driver, we store the existing level mask values for each component id in the array. The size of the array is DPFLTR_ENDOFTABLE_ID * 31. Along with it, we enable filter level for each component.
// Array of saved states
BOOLEAN SavedStates[DPFLTR_ENDOFTABLE_ID * DPFLTR_LEVEL_MAX] = { 0 };
ULONG ComponentId = 0;
PBOOLEAN States = (PBOOLEAN)&SavedStates;
BOOLEAN State = TRUE;
while (ComponentId < DPFLTR_ENDOFTABLE_ID) {
    ULONG Level = 0;
    while (Level < DPFLTR_LEVEL_MAX) {
        *States++ = NtQueryDebugFilterState(ComponentId, Level);
        NtSetDebugFilterState(ComponentId, Level++, State);
    }
    ComponentId++;
}
Once the application exits, we restore level masks back from that array.
ULONG ComponentId = 0;
PBOOLEAN States = (PBOOLEAN)&SavedStates;
while (ComponentId < DPFLTR_ENDOFTABLE_ID) {
    ULONG Level = 0;
    while (Level < DPFLTR_LEVEL_MAX) {
        BOOLEAN State = (BOOLEAN)(*States++);
        NtSetDebugFilterState(ComponentId, Level++, State);
    }
    ComponentId++;
}
Same implementation of the functionality above in the kernel. Saving component level states, which can be called in DriverEntry.
#define DPFLTR_LEVEL_MAX    0x1E
// Saved DbgPrint States
ULONG s_SavedStates[DPFLTR_ENDOFTABLE_ID * DPFLTR_LEVEL_MAX] = { 0 };
ULONG ComponentId = 0;
PULONG States = (PULONG)&s_SavedStates;
// Enable States
BOOLEAN State = TRUE;
while ( ComponentId < DPFLTR_ENDOFTABLE_ID ) {
    ULONG Level = 0;
    while ( Level < DPFLTR_LEVEL_MAX ) {
        *States++ = DbgQueryDebugFilterState(ComponentId, Level);
        DbgSetDebugFilterState(ComponentId, Level++, State);
    }
    ComponentId++;
}
Restoring levels which can be called once the driver unloads.
ULONG ComponentId = 0;
PULONG States = (PULONG)&s_SavedStates;
// Set Filter State Back
while (ComponentId < DPFLTR_ENDOFTABLE_ID) {
    ULONG Level = 0;
    while (Level < DPFLTR_LEVEL_MAX) {
        BOOLEAN State = (BOOLEAN)(*States++);
        DbgSetDebugFilterState(ComponentId, Level++, State);
    }
    ComponentId++;
}
Compared to user mode, we have an array here with the ULONG values instead of BOOLEAN; this is based on the return result from the DbgQueryDebugFilterState function.
Once we add those functionality into the driver test application then we are able to receive messages from the DbgPrintCallback.
As a result, we are able to start C++ application with driver loading mode and C# application in receiving global strings, which is displayed on the next screenshot.

Code Samples
Code to that part is available to be downloaded. If you want to try out the sample driver for this part, it can be compiled from the sources. It is configured to compile with the WDK toolset from Visual Studio. During build, it creates the test certificate drv1.cer and signs the driver. To be able to use the driver, you need to install that certificate on your PC and enable test mode on the system, or disable driver signing checking. Driver test application will work from the admin only as it loads and unloads the driver which requires admin rights.
History
- 15th June, 2023: Initial version