
Setting Up Wazuh for Host-Based Monitoring
5.00/5 (2 votes)
Deploy XDR, host integrity, and more with Wazuh Server

Our modern world is a dangerous place, fraught with peril, seemingly with bad actors at every turn. Yet we must continue forth somehow! What to do, what to do? For the solo admin with a limited budget, in this article (and an article or two to follow), we'll take a look at Wazuh for endpoint security. I'll note here that The Solo Admin blog isn't affiliated or partnered with anyone; the software and hardware that I write about is from personal interest and use only. So let's dive in.
First off, since the only official Debian flavor that Wazuh supports is Ubuntu, I spun up a new Proxmox VM with 4 CPU cores, 8 GB of RAM, and 50 GB disk space. According to the Wazuh server requirements, this is the bare minimum for 1 - 25 agents. In my environment, it should be sufficient for my needs, but if not, my virtual server host does have some extra head room I can allocate later on.
As an aside, one of the things that bugs me is Ubuntu's lack of a "small" install source for their server version, along the lines of Debian's "network install" ISO which clocks in at a svelte 380 MB. I was unable to find anything comparable for Ubuntu 22.04, however, I was able to find a small install for Ubuntu 20.04 at this link. For the build, I'm not going to walk step by step through the Ubuntu install; simply perform a standard install using whatever process you prefer (in the future, I may write up the standard build process that I follow for all Linux systems that includes package installation and configuration after the initial build). One step I always perform on Ubuntu systems is to disable automatic updates; linuxnightly.com has a detailed walk-through of the process here. The reason I recommend disabling automatic updates is because I've been burned by Linux (and Windows) updates too many times. On my servers, I install updates manually - apt update && apt dist-upgrade - and record my updates into a log file per-server (yes, I know apt keeps its own log too) so that I can easily troubleshoot a broken app or a server that won't boot. Of course with virtual servers, I take a snapshot so that if the problem is REALLY bad, I can rollback, but what's the fun in that?
Aside - Removing Ubuntu "Cruft"
One of the main reasons I dislike Ubuntu servers is the amount of "cruft" they force on you right out of the gate. In this instance, I'm talking about netplan and systemd-resolved. I vastly prefer the /etc/network/interfaces style of configuration - it's simple. It also covers your DNS resolution; no need to spread files all over /etc. So 2 additional post-build steps I took were to disable Netplan using these instructions and disable systemd-resolved with:
systemctl disable systemd-resolved
rm /etc/resolv.conf
Ensure that you create a new /etc/resolv.conf, using your settings from /etc/network/interfaces:
nameserver 8.8.8.8
nameserver 1.1.1.1
...
So that now that we've built the server, performed our standard post-build configuration, and taken a snapshot, it's time to upgrade to Ubuntu 22.04. For this process, I got the basic steps from linuxize.com here. It's pretty straightforward, but I would strongly recommend performing an update of this magnitude from the console (or from the VM server's virtual console) versus over SSH, both so you have virtual terminal support for troubleshooting and so you don't need to worry about disconnects. Note: In preparation for the update, I did need to edit the file /etc/update-manager/release-upgrades and set Prompt=normal in order to move to 22.04. For me, the upgrade took close to 2 hours but YMMV. After package installs and a reboot, let's double-check the server version with lsb_release:
root@infosecserver:~# lsb_release -a
No LSB modules are available.
Distributor ID: Ubuntu
Description:    Ubuntu 22.04 LTS
Release:        22.04
Codename:       jammy
One detour from the basic Wazuh install - I'm going to install Postgresql server to enable database storage for alerts. By default, it looks like Wazuh stores alerts in a file, but I like the option for database storage so I'm going to try it out. If I run into performance issues, I'll revert back to file-based alert storage. Simple Postgresql server install instructions:
# Add Postgresql repo
echo "deb http://apt.postgresql.org/pub/repos/apt $(lsb_release -cs)-pgdg main" > /etc/apt/sources.list.d/postgresql.list

# Install the Postgresql GnuPG signing key
wget --quiet -O - https://www.postgresql.org/media/keys/ACCC4CF8.asc > /etc/apt/trusted.gpg.d/postgresql-official.asc

# Update and install
apt update && apt install postgresql

# Install the Postgresql development libraries
apt install libpq-dev
Now we're finally ready to get down to the meat of the matter - Wazuh server installation! Since we have a supported installation, we're going to use the Quickstart installation process from here. Basically, it's just:
curl -sO https://packages.wazuh.com/4.3/wazuh-install.sh && sudo bash ./wazuh-install.sh -a
While it's installing, I would encourage you to open a new terminal window a start a tail follow of the install log file, /var/log/wazuh-install.log.
root@infosecserver [/usr/local/src]# ./wazuh-install.sh -a
19/07/2022 11:32:46 INFO: Starting Wazuh installation assistant. Wazuh version: 4.3.5
19/07/2022 11:32:46 INFO: Verbose logging redirected to /var/log/wazuh-install.log
19/07/2022 11:32:51 INFO: --- Dependencies ----
19/07/2022 11:32:51 INFO: Installing apt-transport-https.
19/07/2022 11:32:53 INFO: Installing software-properties-common.
19/07/2022 11:33:04 INFO: Wazuh repository added.
19/07/2022 11:33:04 INFO: --- Configuration files ---
19/07/2022 11:33:04 INFO: Generating configuration files.
19/07/2022 11:33:06 INFO: Created wazuh-install-files.tar. It contains the Wazuh cluster key, certificates, and passwords necessary for installation.
19/07/2022 11:33:06 INFO: --- Wazuh indexer ---
19/07/2022 11:33:06 INFO: Starting Wazuh indexer installation.
19/07/2022 11:33:54 INFO: Wazuh indexer installation finished.
...<snip>...
19/07/2022 11:36:24 INFO: --- Summary ---
19/07/2022 11:36:24 INFO: You can access the web interface https://<wazuh-dashboard-ip>
    User: admin
    Password:
19/07/2022 11:36:24 INFO: Installation finished.
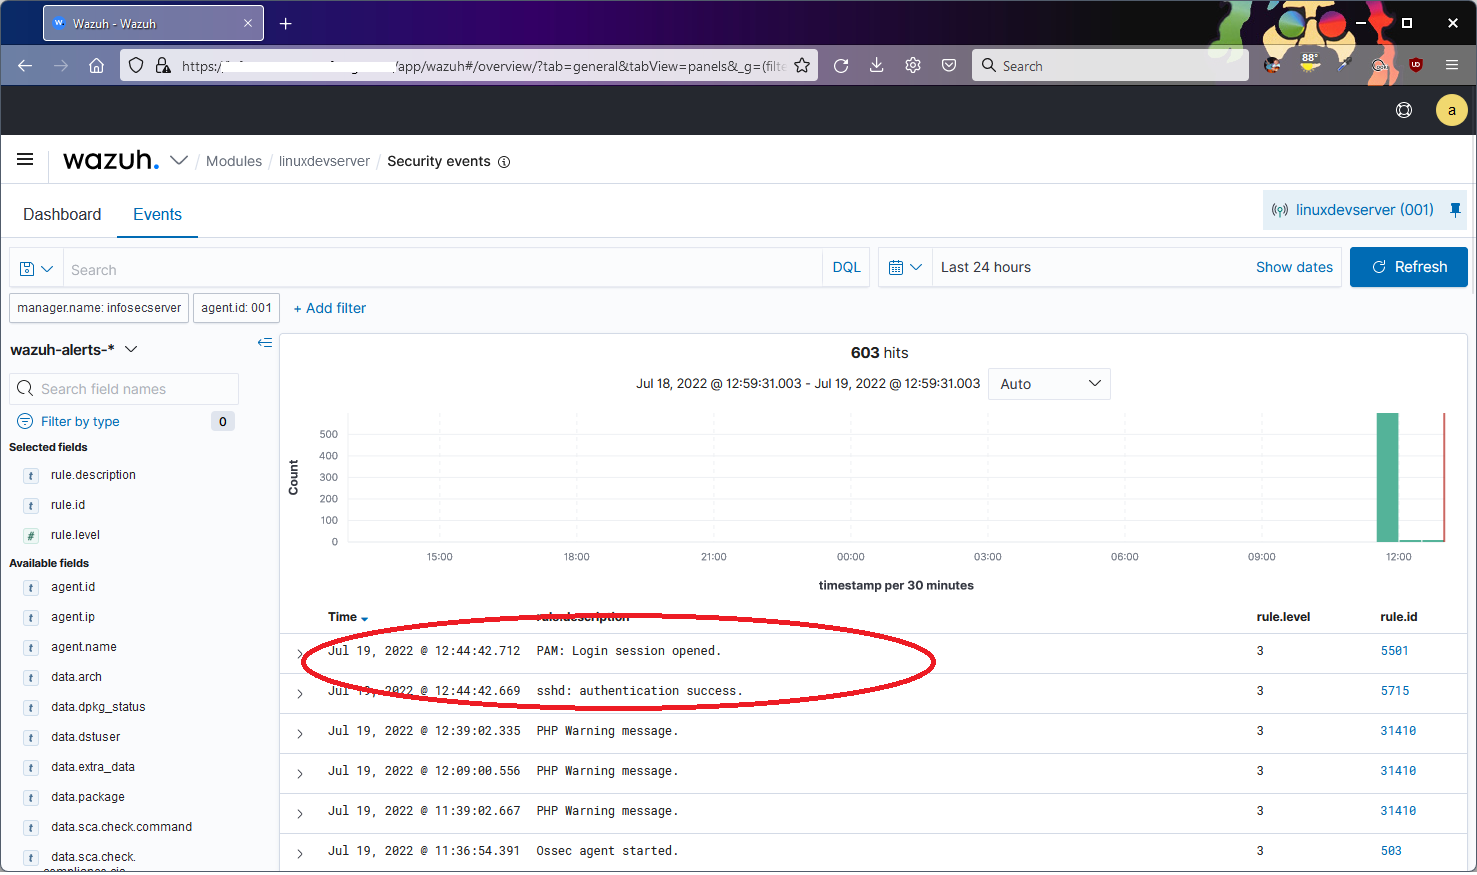
Now that the server install is complete, I deployed my first agent using the instructions found here. After install, I logged into the Wazuh console and sure enough, there's my agent. I also validated that my recent SSH session into the agent system was detected and logged.
So we now have a working Wazuh installation with a successful Linux agent install. I will now start working on the bane of every security admin's existence - alert tuning/false positive elimination. I will also be deploying Windows server agents and I will write up both processes - tuning and agent deployment - in the near future. Stay tuned!