
Introduction to Infrastructure as Code - Part 2: IaC Hands-On with Azure Resource Manager Templates
0/5 (0 vote)
How to use the Bicep language and Terraform HCL syntax to create templates
The first article of this series explained the basic concept of infrastructure as code (IaC) and what problems it solves. We learned how to differentiate between vendor-specific and multi-cloud IaC tools and the templating languages they support.
This article introduces Azure ARM templates and explains the difference between JSON and Bicep syntax. Then, using Bicep syntax, we'll walk through the steps to create a template that provisions infrastructure for a web app by creating several virtual machines (VMs) and a PostgreSQL database. By the end of the article, we’ll create a fully-provisioned infrastructure on Azure.
Follow the steps in this tutorial to get your Azure deployment running, and visit this GitHub repository to see the final IaC template.
Requirements
To follow this tutorial, ensure you:
- follow the instructions section to create a free Azure account if you don't have a subscription yet.
- install Azure CLI on your machine.
ARM Templates, JSON Syntax, and Bicep Syntax
The most basic IaC programming in Azure is with Azure Resource Manager (ARM) templates. ARM templates are JSON files that define the infrastructure and configuration to provision resources on Azure.
ARM templates use declarative syntax, meaning that instead of using a sequence of commands to execute deployment operations, they describe how the deployment should look. ARM templates specify the resources to deploy and their properties.
ARM templates depend on the JSON files, which are often too difficult hard to read. Fortunately, Microsoft introduced an alternative declarative language named Bicep, which is as capable as JSON-based ARM templates, but with more straightforward syntax. Given its advantages, Microsoft recommends that you use Bicep instead of JSON when creating automated Azure deployments for your projects. Although you don't need to deal with JSON files, deployment automatically converts Bicep files to ARM templates.
Bicep comes with syntax and type checking, and support for code reusability. Its template syntax supports powerful features, including data types, parameters, variables, child resources, modules, outputs, loops, and conditions.
Bicep is a considerable improvement over JSON templates because it keeps up with every upgraded or newly added resource. Every new resource release on Azure Resource Manager is already available in Bicep syntax.
Creating an ARM Template for Provisioning VMs and a PostgreSQL DB
In this tutorial, we’ll use the Bicep language to create a template that provisions infrastructure for a web app by creating several VMs and a PostgreSQL database, like in the diagram below:

Our goal is to create two types of resources: VMs (multiple of them) and an Azure Database for PostgreSQL. However, these resources depend on secondary resources that we must create, as the diagram below demonstrates:

Building the Bicep File
Open your development terminal and run the install subcommand to install the Bicep CLI:
> az bicep install
Then, run the following command to initiate the login session:
> az login
Next, define your active subscription:
> az account set --subscription "YOUR-SUBSCRIPTION-NAME"
Declaring a Resource Group
In Azure, a Resource Group (RG) is a container that facilitates the management of related resources for a solution. For example, suppose you have three distinct applications in Azure. You can organize your resources into three different resource groups, so you won't get confused when dealing with the resources of each application.
Let’s create a main.bicep file containing the following code:
targetScope = 'subscription'

resource rg 'Microsoft.Resources/resourceGroups@2021-01-01' = {
  name: 'bicep-rg'
  location: 'eastus'
}

module vmAndPostgreSQLModule 'VMAndPostgreSQL.bicep' = {
  name: 'VMAndPostgreSQL'
  scope: rg
}
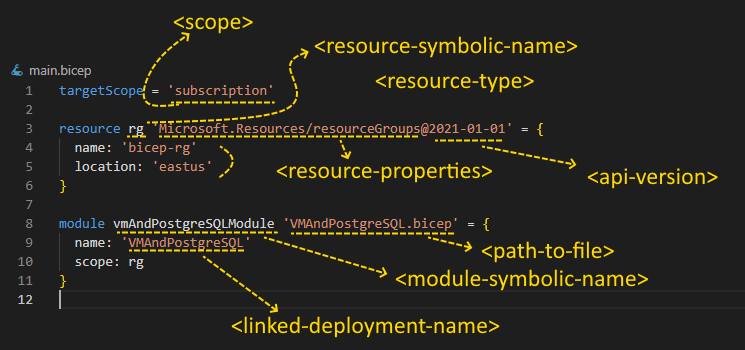
The code above defines the target scope and declares a resource and a module. By default, the code scopes a Bicep file to the resource group. But since we’re creating the resource group using Bicep, we change the scope to target our active subscription.
Next, we add a resource declaration by using the resource keyword. We set the symbolic name rg for our resource group named bicep-rg with the location set to East US. Like a variable name in an imperative programming language, we use this symbolic name to later reference the resource in other parts of the Bicep file.
The last part of the code above is the module declaration. The VMAndPostgreSQL.bicep module is a Bicep file deployed from the main.Bicep file. With modules, we can break our provisioning logic into smaller files. Simple modules are great for readability and are reusable in different deployments.
Next, let’s create a new VMAndPostgreSQL.bicep file, which contains the rest of our deployment logic. The VMAndPostgreSQL.bicep file begins with this code:
@description('Number of Virtual Machines to Provision')
param virtualMachineCount int = 3

@description('Location for all resources.')
param location string = resourceGroup().location
The description decorators above allow you to explain how to use the parameters. Decorators can add metadata to your declarations. For example, the Azure portal displays the description to users.
The virtualMachineCount parameter defines how many VM instances we provision, and the location parameter stores the location of the resource group defined in the module.
Declaring a Network Security Group
The network security group (NSG) filters network traffic to and from Azure resources in a virtual network. The network security group rules allow or deny inbound or outbound traffic from our created VMs and database resources. The rules will enable us to specify the source, destination, port, and protocol.
resource networkSecurityGroup 'Microsoft.Network/networkSecurityGroups@2021-02-01' = {
  name: 'b1c3p-nsg'
  location: location
  properties: {
    securityRules: [
      {
        name: 'SSH'
        properties: {
          priority: 1001
          direction: 'Inbound'
          access: 'Allow'
          protocol: 'Tcp'
          sourcePortRange: '*'
          destinationPortRange: '22'
          sourceAddressPrefix: '*'
          destinationAddressPrefix: '*'
        }
      }
    ]
  }
}
Declaring a Virtual Network
A virtual network (VNet) enables our VMs and database server to securely communicate with each other, the internet, and on-premises networks. To create a virtual network, add this code to your Bicep module:
resource virtualNetwork 'Microsoft.Network/virtualNetworks@2021-02-01' = {
  name: 'b1c3p-vn'
  location: location
  properties: {
    addressSpace: {
      addressPrefixes: [
        '10.0.0.0/16'
      ]
    }
    subnets: [
      {
        name: 'b1c3p-sn'
        properties: {
          addressPrefix: '10.0.0.0/24'
          networkSecurityGroup: {
            id: networkSecurityGroup.id
          }
        }
      }
    ]
  }
}
Declaring Public IPs
VMs depend on a network interface, which depends on public IP (PIP) addresses. To create public IP addresses, declare the following resource in your Bicep module:
resource publicIPAddresses 'Microsoft.Network/publicIPAddresses@2021-02-01' =
  [for i in range(0, virtualMachineCount): {
  name: 'b1c3p-ip-${i}'
  location: location
  properties: {
    publicIPAddressVersion: 'IPv4'
    publicIPAllocationMethod: 'Dynamic'
  }
}]
We can use the “for” syntax to iterate over items in a collection to create multiple resources. In the code above, we use an integer index to create many instances of the public IP address. The range function creates an array from 0 to the virtualMachineCount parameter.
Declaring a Network Interface
A network interface connects a VM and the underlying software network. Here, we declare a collection of network interfaces with dynamic public IP addresses.
resource networkInterfaces 'Microsoft.Network/networkInterfaces@2020-08-01' =
  [for i in range(0, virtualMachineCount): {
  name: 'b1c3p-nic-${i}'
  location: location
  properties: {
    ipConfigurations: [
      {
        name: 'ipconfig1'
        properties: {
          publicIPAddress: {
            id: publicIPAddresses[i].id
          }
          privateIPAllocationMethod: 'Dynamic'
          subnet: {
            id: resourceId('Microsoft.Network/virtualNetworks/subnets',
                            virtualNetwork.name, 'b1c3p-sn')
          }
        }
      }
    ]
  }
}]
Declaring Virtual Machines
After declaring the secondary resources, we can finally declare a collection of VMs. Be sure to determine which VM size is available for your subscription. Fortunately, there’s an Azure CLI command for that. For example, since I’m hosting my VMs in the East US region, I can run the following command and pick one of the VM sizes where the Restrictions column has the None value:
> az vm list-skus --location eastus --all --output table
Name                       Zones    Restrictions
-------------------------  -------  -----------------------------------
Standard_B2s               1,2,3    None
Standard_B4ms              1,2,3    None
Standard_D1                3        ['NotAvailableForSubscription, ...
Standard_D11               3        ['NotAvailableForSubscription, ...
Now you can define your VM resource with the appropriate VM size. In my case, I’ve chosen Standard_B2s because it was available for my subscription in the East US region. Be aware that you might have to select another VM size to account for other VM properties, like your storage profile, operating system, and network profiles.
resource virtualMachines 'Microsoft.Compute/virtualMachines@2021-03-01' =
    [for i in range(0, virtualMachineCount): {
    name: 'b1c3p-vm-${i}'
    location: location
    properties:{
      hardwareProfile: {
        vmSize:'Standard_B2s'
      }
      storageProfile: {
        osDisk: {
          createOption: 'FromImage'
          managedDisk: {
            storageAccountType: 'Standard_LRS'
          }
        }
        imageReference: {
          publisher: 'Canonical'
          offer: 'UbuntuServer'
          sku: '18.04-LTS'
          version: 'latest'
        }
      }
      osProfile: {
        computerName: 'b1c3p-vm-${i}'
        adminUsername: 'azureuser'
        adminPassword: 'Adm1nP@55w0rd'
      }
      networkProfile: {
        networkInterfaces: [
          {
            id: networkInterfaces[i].id
          }
        ]
      }
    }
  }]
Declaring an Azure Database for PostgreSQL
It’s pretty standard for web applications to use relational databases. So, we’ll also create one in our provisioning for this tutorial.
We declare a resource for the Azure Database for PostgreSQL, a relational, database-as-a-service based on the PostgreSQL database engine. We define the SKU identifiers, properties, and virtual network on which the database operates:
resource server 'Microsoft.DBforPostgreSQL/servers@2017-12-01' = {
  name: 'b1c3ppostgresql'
  location: location
  sku: {
    name: 'GP_Gen5_2'
    tier: 'GeneralPurpose'
    capacity: 2
    size: '51200'
    family: 'Gen5'
  }
  properties: {
    createMode: 'Default'
    version: '11'
    administratorLogin: 'MyAdministrator'
    administratorLoginPassword: 'Adm1nP@55w0rd'
    storageProfile: {
      storageMB: 51200
      backupRetentionDays: 7
      geoRedundantBackup: 'Disabled'
    }
  }

  resource virtualNetworkRule 'virtualNetworkRules@2017-12-01' = {
    name: 'AllowSubnet'
    properties: {
      virtualNetworkSubnetId: virtualNetwork.properties.subnets[0].id
      ignoreMissingVnetServiceEndpoint: true
    }
  }
}
Deploying with the Bicep File
To create a deployment at subscription scope using the main.bicep file, run the following command:
az deployment sub create --template-file main.bicep --location eastus
The Final Provisioned Infrastructure
Now let’s see what our fully-provisioned infrastructure looks like on Azure.
On the Azure Portal, open the bicep-rg resource and click the Resource Visualizer menu. The Resource Visualizer allows us to view and understand the components deployed with our Bicep template.

Go to the Azure Portal dashboard and click All Resources for a more detailed view of the provisioned resources.

Next Steps
In this article, we introduced Azure ARM templates and explained the difference between JSON and Bicep syntax. Then, using Bicep syntax, we created a template that provisions infrastructure for a web app by creating several VM resources and their dependencies and a PostgreSQL database. We saw how to declare variables, break templates into modules, and use the Bicep language to iterate through a range of numbers to provision multiple VMs. Finally, we arrived at a fully-provisioned infrastructure on Azure.
The third and final article of this series explains how to create declarations that provision resources based on the Terraform language, and compares that process to using ARM templates.
To learn more about how you can use Bicep to define your Azure networking resources, check out the resource Create virtual network resources by using Bicep.