
Node.js on Azure: Cloud Native Authentication
5.00/5 (1 vote)
In this article we’ll use Azure Active Directory to easily and securely add a login button to our application, without handling storing and managing user account data ourselves
So far in this series, we created, deployed, monitored, and scaled a Node.js application on Azure. Now it’s time to upgrade our application.
Almost every useful web application requires authentication but implementing your own solution or managing your users’ account information and passwords is difficult and introduces many security risks and challenges. For example, databases could be hacked to leak users’ sensitive account information or your login page could be taken down from a Denial-of-Service (DoS) attack, preventing users from accessing your application. Plus, working with encryption algorithms and authentication tokens can sometimes be a headache.
A cloud-managed provider makes authentication much easier. A provider keeps your web application more secure by handling the user authentication and account management through its gateway and APIs, and then giving your web application only the necessary login session information. With no software installations on your servers, or any database to manage, there is less risk.
In this part of the series, we will use Azure Active Directory (Azure AD) as a cloud-managed authentication provider to add a user signup and login flow to our application with Azure AD B2C and indicate on the web page the user’s logged-in status.
Setting up the Project
Let’s start the project!
We’ll build on the code we have so far in this series. Take a look and feel free to fork this repository as your starting point.
You can also skip ahead to the final code.
Creating an Azure AD B2C Tenant
A tenant groups a collection of applications within the directory. We start by creating a tenant for our application.
Sign in to the Azure Portal, click the menu button on the top left, and select Create a resource.

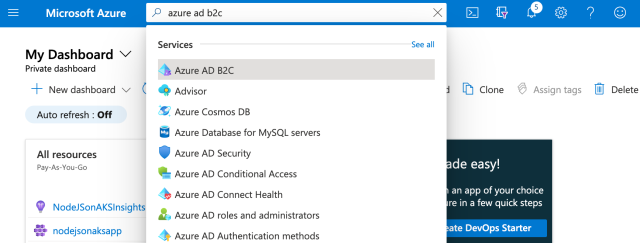
Search for "Azure Active Directory B2C" in the search bar and press Create.


Next, select Create a new Azure AD B2C Tenant, fill in the information, then press Review + Create.


Note: If you get an error message, "The subscription is not registered to use namespace 'Microsoft.AzureActiveDirectory'. See https://aka.ms/rps-not-found for how to register subscriptions", you may need to register the namespace. You can register it through the Azure CLI with the following command and then try creating the tenant again:
az provider register --namespace Microsoft.AzureActiveDirectory

Registering an Application
The tenant now needs an application within it to configure the login system. Register an application through the portal to integrate the Azure AD B2C login.
Search for "Azure AD B2C" using the search bar and open the service.
Then, select the address book button along the top to open the Directory + subscription options. Switch your directory to the one containing your tenant. You might have to look under All Directories to find the right one.

Navigate to App Registrations to find and click New registration. Type in a name, select the default option (any identity provider) for supported account types. For the Redirect URI, enter the application’s local development endpoint: http://localhost:8080
Later, if you want to deploy, connect, and log in to the Azure Kubernetes Service cluster, you can add the IP address or domain of the deployed application on the cluster as another Redirect URI, enabling the login flow to work in the production environment.

Go to the Authentication section and scroll to Implicit grant and hybrid flows. Then, check Access tokens and ID tokens to enable implicit authentication flow, and Save
Creating a User Flow
User flows are just as they sound: they are the authentication-related processes your users go through in your application.
You can select from different types of user flows, such as account creation or password recovery, and simply redirect your users to the URL for the corresponding user flow. Azure Active Directory manages the back end and authentication system for you. You can theme and customize these flows to fit your application’s requirements and design.
Navigate to User Flows under Policies in the menu and select New user flow.

For our login integration, let’s select the user flow type called Sign up and sign.

Fill in a name for the user flow and select Email signup. Before pressing Create, you can also select which attribute fields to ask from the user as part of this user flow, such as Display Name and City.
One of the terrific parts about using Azure AD for authentication is that it handles multi-factor authentication (MFA) for you as part of this user flow, so you don’t need to integrate these types of account security measures yourself. Adding social logins — such as GitHub, Twitter, Facebook, and Google — is also as easy as adding identity providers. Follow this guide to learn how to add other identity providers.


After creating the user flow, select Run user flow. This tests the account creation and login configuration.


Let’s see if this user flow redirects properly to our application. Ensure the application is running locally on http://localhost:8080.
After going through the user signup process and verifying your email address with the MFA code, the user flow should redirect to your app, including a JSON Web Token (JWT) included in the URL after the #. We’ll decode this token to get the logged-in user’s information.
Before moving to the next section, copy and save this user flow endpoint URL because we’ll use it when updating the application web page.
Adding Web Code
Finally, let’s finish integrating this authentication process into the main web page (index.html) with a login button and decode the auth token if the user is logged in.
Add a login element between the title and jobs listings:
<h1>Latest Node.js Jobs!</h1>
<div id="login"></div>
<div id="jobs" class="row row-cols-1 row-cols-md-3 g-4">
</div>
Define this JWT parsing function at the beginning of the script section:
        function parseJwt( token ) {
            return JSON.parse( atob( token.split( "." )[ 1 ] ) );
        }
We can extract the JWT from the URL, if it exists, and parse it into a JSON object to show a "You are logged in" message on the page with the user’s name. If there isn’t a token, the page displays a login button that links to the sign up and sign in user flow using the endpoint URL we saved earlier.
To generalize the webpage to work properly from localhost during local development and from the deployed web application, you can also replace the value of the redirect_uri parameter in the endpoint URL with the value inside window.location.origin.
        const urlParams = new URLSearchParams( location.hash.replace( "#", "" ) );
        const idToken = urlParams.get( "id_token" );

        if( idToken ) {
            let decoded = parseJwt( idToken );
            console.log( decoded );
            $( "#login" ).html( `
                <p>You are logged in, ${decoded.name}!</p>
                ` );
        }
        else {
            $( "#login" ).html( `
                <a class="btn btn-secondary" href="https://nodejsonazure.b2clogin.com/nodejsonazure.onmicrosoft.com/oauth2/v2.0/authorize?p=B2C_1_NodeJSOnAzureSignUpSignIn&client_id=02c42bd8-b450-490b-9542-aadf3c281321&nonce=defaultNonce&redirect_uri=${location.origin}&scope=openid&response_type=id_token&prompt=login">Login</a>
                ` );
        }
Now you have a full user account creation and authentication user flow in your application using Azure AD.
Find the final code for this project on GitHub.
Next Steps
In this article, we learned how to add a cloud-native user authentication service to your application using the Azure Active Directory B2C service, without all the hassles of user account and secure password management. Azure Active Directory supports up to 50,000 monthly active users (MAUs) within the free tier, with low pricing even after your application surpasses this limit, so it’s an ideal system for many new projects just starting out and looking to grow their user base.
In the next and final part of this series, we’ll explore some Azure Cognitive Services that bring the power of AI to any app through the cloud. So don’t miss out on the finale. See just how easy it is to integrate AI services such as sentiment analysis and language translation into your app.