
How to Get Started with Static Web Apps on Azure Using the Azure Static Web Apps Service
In 5 minutes without leaving Visual Studio Code
Note: I did a stream of this live – but it looks like that Twitch stream has since been taken down, https://www.twitch.tv/videos/730261909. I have a lightning talk from VueConf you can take a look at here: Deploy Vue Apps to Azure - Kim Noel - YouTube. Due to the nature of lightning talks it is told at a fast pace so hopefully this blog post is the perfect compliment, at a slowed down pace!
The amazing (cough cough not) web app I created during the Twitch stream is here: https://github.com/kim-codes/lizzie-demo. But to be quite honest you’re probably better off using a demo app built as part of the Microsoft docs. Those can be found here staticwebdev / Repositories (github.com) : and you have options! There is one for Vanilla JavaScript, Vue, React, Angular, etc.
We can fast forward past the part where I create my sad fake web app (built minimal HTML, CSS, and JavaScript) and imagine by webapp is now sitting in a GitHub repository online.


If you’re following along in my VueConf talk skip to 2:20.

On the left-hand side next to the Activity bar in VS Code, is my Azure panel; you’ll see I already have App Service Extension along with Azure Functions Extension and Azure Static Web Apps Extension installed. You can get the extension directly in VS Code.
You can manage and install extensions directly in VS Code by clicking on the Extensions Icon in the Activity Bar on the side of VS Code or the View, or even use the View:Extensions command (Ctrl+Shift+X).

Or you can use the webpage, using the links I provided above, and it should automatically open VS Code (assuming you have VS Code installed).
Note: If it’s your first time setting up any Microsoft Azure extension in VS Code you will need to go through the steps of connecting it to your Azure account (again assuming you already have an Azure account). If you don't have an Azure subscription, create a free trial account.

- Directly in VS Code we can click the "+" so create a new setup for my web app.

The first step, once you have your Azure account setup, it’s going to ask you which "Subscription to use" – everything in Azure requires a Subscription, even if it doesn’t cost you anything. (The Azure Static Web Apps service is currently in Preview so it won’t be charging you – but you still need a Subscription to run). Think of a Subscription as the bucket that needs to be tied to a service or product in order to run (aka where to charge costs to).
This assumes I already setup my Azure account with VS Code. I have done this previously when setting up Azure Function. If you haven’t connected your Azure account yet, VS Code will redirect you to the browser to make that connection.
You will see I have three different Subscriptions.

- Name our Web App in Azure. I keep the naming the same as my Web App in GitHub. I am not sure if this is necessarily best practices but it helps me keep track of things easily.

- Next, we need to select where our repository for our web app lives online. Again, I already setup a connection in VS Code to my GitHub so it already knows where to go looking for my code.

- Once I select the Organization on GitHub, it will ask me which repository within that organization. I belong to several organizations so I had to select my personal account, then I will search for my web-app on my GitHub account. You will see VS Code starts populating suggestions alphabetically.

- Next, we need to select which Branch we want to trigger the Build from. I only have one branch for this demo so I will select ‘main’ branch.

- In my repository, I have many demo apps, so I need to specify where my app location is (again so it knows where to build and deploy the app from). You probably just need to select ‘/’ as you’re already in your app’s location.

- Since my app is a Vue app I need to specify the path for my framework – in my case it will be `dist`. If you have a React app, you’ll probably put `build`. If you aren’t using a framework you can leaver this blank.
Now on Step 8 is where we touch on some Azure specifics.
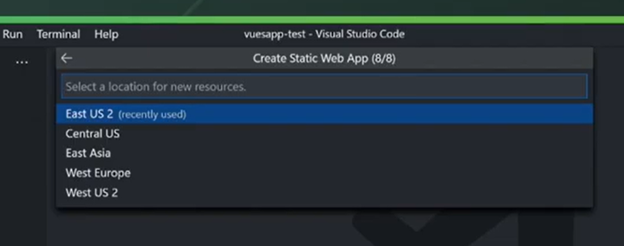
- Azure needs to know where I want to deploy my app from. Depending on where my customers are - that will probably have a say on this decision. I am in Eastern North America so I’ll just use `East US 2` for this demo.
Now we let Azure do it’s magic!

As Azure sets up this static web app for me, it’s creating a GitHub Action on my repository in GitHub. This is why we had all these prompts in steps 1-8.
The GitHub Action is going to monitor my main branch (that is what I specified) for changes. The GitHub Action will trigger in Azure to build my app to production once I make a change to that branch.
Again, all this is done without leaving VS Code! You can do the same thing in the browser in the Azure portal, btu I love working in Visual Studio Code 😊.
If you click on output at the bottom of VS Code, we will see it successfully setup our web app.

In my Azure panel in VS Code, I can actually see all my projects and play around with them and even open them in the browser.

If you click on "Open in Portal" it will take me to my Azure portal and I can see the site where my web app lives and also check the status of my GitHub Action.
Once the GitHub Action finishes, I will be able to see my app online and running.

It’s that easy!